Command completionThis collection of links is oriented on students (initially it was provided
as a reference material to my shell programming university course) and is
designed to emphasize usage of advanced shell constructs and pipes
in shell programming (mainly in the context of ksh93 and bash 3.2+ which
have good support for those constructs). An introductory paper
Slightly Skeptical View on Shell discusses the shell as a scripting
language and as one of the earliest examples of very high level languages.
The page might also be useful for system administrators who constitute the
considerable percentage of shell users and lion part of shell programmers.
This page is the main page to a set of sub-pages devoted to shell that
collectively are known as Shellorama. The most important are:
Language
page - describes some of the exotic shell contracts and provides links
to web resources about them. Bash 3.x added several useful extensions.
Among them (Bash
Reference Manual ):
Arithmetic expansion allows the evaluation of an arithmetic
expression and the substitution of the result. The format for arithmetic
expansion is:
$(( expression ))
Older (( ... )) construct borrowed from ksh93 is also supported.
Process substitution. It takes the form of <(list)
or >(list). See Process substitution
=~ operator. An additional
binary operator, '=~', is available, with the same
precedence as '==' and '!='. When it is
used, the string to the right of the operator is considered an extended
regular expression and matched accordingly (as in regex3)).
The return value is 0 if the string matches the pattern, and 1 otherwise.
If the regular expression is syntactically incorrect, the conditional
expression's return value is 2. If the shell option nocasematch
(see the description of shopt in
Bash Builtins) is enabled, the match
is performed without regard to the case of alphabetic characters.
Substrings matched by parenthesized sub-expressions within the regular
expression are saved in the array variable BASH_REMATCH.
The element of BASH_REMATCH with index 0 is the portion
of the string matching the entire regular expression. The element
of BASH_REMATCH with index n is the portion
of the string matching the nth parenthesized sub-expression.
C-style for loop. Bash implements the for ((
expr1 ; expr2 ;
expr3 )) loop, similar to the C language
(see
Looping Constructs).
Brace expansion -- a mechanism for generation of a sequence
of similar strings (see also
Filename Expansion), but the file names generated need not exist.
Patterns to be brace expanded take the form of an optional
preamble, followed by either a series of comma-separated strings
or a sequnce expression between a pair of braces, followed by an
optional postscript. Brace expansions may be nested.
For example,
     bash$ echo a{d,c,b}e
     ade ace abe
Tilde notation (csh an tcsh feature). Content of DIRSTACK
array can be referenced positionally:
~N -- The string that would
be displayed by 'dirs +N'
~+N -- The string that would be
displayed by 'dirs +N'
~-N -- The string that
would be displayed by 'dirs -N'
which is rather convenient for implementing "directory favorites"
concept with "push/pop/dirs" troika
Debugging
Current bash has the best debugger and from this point of view represents
the best shell. Until Actually for ksh93 absence of the
debugger is more a weakness, it is a blunder and it is strange that
such talented person David Korn did not realize this.
Command history reuse which is devoted to one of the most important
command line features
I strongly recommend getting a so-called
orthodox file manager (OFM).
This tool can immensely simplify Unix filesystem navigation and file operations
(Midnight Commander
while defective in handling command line can be tried first as this is an
active project and it provides fpt and sftp virtual filesystem in remote
hosts)
Actually filesystem navigation in shell is an area of great concern as
there are several serious problems with the current tools for Unix filesystem
navigation. I would say that usage of cd command
(the most common method) is conceptually broken and
deprives people from the full understanding of Unix filesystem; I doubt
that it can be fixed within the shell paradigm (C-shell made an attempt
to compensate for this deficiency by introducing history and
popd/pushd/dirs troika, but
this proved to be neither necessary nor sufficient for compensating problems
with the in-depth understanding of the classical Unix hierarchical filesystem
inherent in purely command line navigation ;-). Paradoxically sysadmins
who use OFMs usually have much better understanding of the power and flexibility
of the Unix filesystem then people who use command line. All-in-all
usage of OFM is system administration represents Eastern European school
of administration and it might be a better way to administer system that
a typical "North American Way".
The second indispensable tool for shell programmer is
Expect. This
is a very flexible application that can be used for automation of interactive
sessions as well as automation of testing of applications.
Usually people who know shell and awk
and/or Perl well are usually considered to be advanced
Unix system administrators (this is another way to say the system administrators
who does not know shall/awk/Perl troika well are essentially a various flavors
of entry-level system administrators no matter how many years of experience
they have). I would argue that no system administrator can consider himself
to be a senior Unix system administrator without in-depth knowledge of both
one of the OFMs and Expect.
No system administrator can consider himself
to be a senior Unix system administrator without in-depth knowledge
of both one of the OFMs and Expect.
An OFM tends to educate the user about the Unix filesystem in some subtle,
but definitely psychologically superior way. Widespread use of OFMs
in Europe, especially in Germany and Eastern Europe, tend to produce specialists
with substantially greater skills at handling Unix (and Windows) file systems
than users that only have experience with a more primitive command line
based navigational tools.
And yes, cd navigation is conceptually broken. This is not a bizarre
opinion of the author, this is a fact: when you do not even
suspect that a particular part of the tree exists something is conceptually
broken. People using command line know only fragments of the file
system structure like blinds know only the parts of the elephant.
Current Unix file system with, say, 13K directories for a regular
Solaris installation, are just unsuitable for the "cd way of navigation";
1K directories was probably OK. But when there are over 10K of directories
you need something else. Here quantity turns into quality. That's my point.
The page provides rather long quotes as web pages as web pages are notoriously
unreliable medium and can disappear without trace. That makes this
page somewhat difficult to browse, but it's not designed for browsing; it's
designed as a supplementary material to the university shell course and
for self-education.
A complementary page with
Best Shell Books Reviews
is also available. Although the best book selection is to a certain extent
individual, the selection of a bad book is not: so this page might at least
help you to avoid most common bad books (often the book recommended by a
particular university are either weak or boring or both;
Unix Shell
by Example is one such example ;-). Still the shell literature is substantial
(over a hundred of books) and that mean that you can find
a suitable textbook. Please be aware of the fact that that few authors of
shell programming books have a broad understanding of Unix necessary for
writing a comprehensive shell book.
IMHO the first edition of O'Reilly
Learning Korn Shell
is probably one of the best and contains nice set of
examples
(the second edition is more up to date but generally is weaker). Also the
first edition has advantage of being available in HTML form too (O'Reilly
Unix CD). It does not cover ksh93 but it presents ksh in a unique way that
no other book does. Some useful examples can also be found in
UNIX Power Tools Book( see
Archive of all shell scripts (684 KB); the book is available in HTML
from one of O'Reilly
CD bookshelf collections).
Still one needs to understand that Unix shells are pretty archaic languages
which were designed with compatibility with dinosaur shells in mind (and
Borne is a dinosaur shell by any definition). Designers even such strong
designers as David Korn were hampered by compatibility problems from the
very beginning (in a way it is amazing how much ingenuity they demonstrate
in enhancing Borne shell; I am really amazed how David Korn managed
to extend borne shell into something much more usable and much loser to
"normal" scripting language. In this sense ksh93 stands like a real pinnacle
of shell compatibility and the the testament of the art of shell language
extension).
That means that outside of interactive usage and small one
page scripts they generally outlived their usefulness. That's why for more
or less complex tasks Perl is usually used (and should be used) instead
of shells. While shells continued to improve since the original C-shell
and Korn shell, the shell syntax is frozen in space and time and now looks
completely archaic. There are a large number of problems with this
syntax as it does not cleanly separate lexical analysis from syntax analysis.
Bash 3.2 actually made some progress of overcoming most archaic features
of old shells but still it has it own share of warts (for example last stage
of the pipe does not run in on the same level as encompassing the pipe script)
Some syntax features in shell are idiosyncratic as Steve Bourne played
with Algol 68 before starting work on the shell. In a way, he proved to
be the most influential bad language designer, the designer who has the
most lasting influence on Unix environment (that does not exonerate the
subsequent designers which probably can take a more aggressive stance on
the elimination of initial shell design blunders by marking them as "legacy").
For example there is very little logic in how different types of
blocks are delimitated in shell scripts. Conditional statements end with
(broken) classic Algor-68 the reverse keyword syntax: 'if condition;
then echo yes; else echo no; fi', but loops are structured like perverted
version of PL/1 (loop prefix do; ... done;)
, individual case branches blocks ends with ';;' . Functions have
C-style bracketing "{", "}". M. D. McIlroy as Steve Borne manager
should be ashamed. After all at this time the level of compiler construction
knowledge was pretty sufficient to avoid such blunders (David
Gries book was published in 1971) and Bell Labs staff were not a bunch
of enthusiasts ;-).
Also the original Bourne shell was a almost pure macro language. It performed
variable substitution, tokenization and other operations on one line at
a time without understanding the underlying syntax. This results in many
unexpected side effects: Consider a simple command
rm $file
If variable $file is accidentally
contains space that will lead to treating it as two separate augments to
the rm command with possible nasty side effects. To fix this, the
user has to make sure every use of a variable in enclosed in quotes, like
in rm "$file".
Variable assignments in Bourne shell are whitespace sensitive. 'foo=bar'
is an assignment, but 'foo = bar' is not. It is a function call
with "= "and "bar" as two arguments. This is another strange
idiosyncrasy.
There is also an overlap between aliases and functions. Aliases are positional
macros that are recognized only as the first word of the command like in
classic alias ll='ls -l'. Because of this, aliases
have several limitations:
You can only redirect input/output to the last command in the alias.
You can only specify arguments to the last command in the alias.
Alias definitions are a single text string, this means complex functions
are nearly impossible to create.
Functions are not positional and can in most cases can emulate aliases functionality:
ll() { ls -l $*; }
The curly brackets are some sort of pseudo-commands, so skipping the semicolon
in the example above results in a syntax error. As there is no clean separation
between lexical analysis and syntax analysis removing the whitespace
between the opening bracket and 'ls' will also result in a syntax error.
Since the use of variables as commands is allowed, it is impossible to reliably
check the syntax of a script as substitution can accidentally result in
key word as in example that I found in the paper about fish (not that I
like or recommend fish):
if true; then if [ $RANDOM -lt 1024 ]; then END=fi; else END=true; fi; $END
Both bash and zsh try to determine if the command in the current buffer
is finished when the user presses the return key, but because of issues
like this, they will sometimes fail.
What if you needed to execute a specific command again, one which you used a while back? And
you can't remember the first character, but you can remember you used the word "serve".
You can use the up key and keep on pressing up until you find your command. (That could take
some time)
Or, you can enter CTRL + R and type few keywords you used in your last command. Linux will
help locate your command, requiring you to press enter once you found your command. The example
below shows how you can enter CTRL + R and then type "ser" to find the previously run "PHP
artisan serve" command. For sure, this tip will help you speed up your command-line
experience.
You can also use the history command to output all the previously stored commands. The
history command will give a list that is ordered in ascending relative to its execution.
In Bash scripting, $? prints the exit status. If it returns zero, it means there is no error. If it is non-zero,
then you can conclude the earlier task has some issue.
If you run the above script once, it will print 0 because the directory does not exist, therefore the script will
create it. Naturally, you will get a non-zero value if you run the script a second time, as seen below:
$ ./debug.sh
Testing Debudding
+ a=2
+ b=3
+ c=5
+ DEBUG set +x
+ '[' on == on ']'
+ set +x
2 + 3 = 5
Standard error redirection
You can redirect all the system errors to a custom file using standard errors, which can be denoted by the number 2 . Execute
it in normal Bash commands, as demonstrated below:
Most of the time, it is difficult to find the exact line number in scripts. To print the line number with the error, use the PS4
option (supported with Bash 4.1 or later). Example below:
There are a number of ways to loop within a script. Use for when you want to loop a preset
number of times. For example:
#!/bin/bash

for day in Sun Mon Tue Wed Thu Fri Sat
do
    echo $day
done
or
#!/bin/bash

for letter in {a..z}
do
   echo $letter
done
Use while when you want to loop as long as some condition exists or doesn't exist.
#!/bin/bash

n=1

while [ $n -le 4 ]
do
    echo $n
    ((n++))
done
Using case statements
Case statements allow your scripts to react differently depending on what values are being
examined. In the script below, we use different commands to extract the contents of the file
provided as an argument by identifying the file type.
#!/bin/bash

if [ $# -eq 0 ]; then
    echo -n "filename> "
    read filename
else
    filename=$1
fi

if [ ! -f "$filename" ]; then
    echo "No such file: $filename"
    exit
fi

case $filename in
    *.tar)      tar xf $filename;;
    *.tar.bz2)  tar xjf $filename;;
    *.tbz)      tar xjf $filename;;
    *.tbz2)     tar xjf $filename;;
    *.tgz)      tar xzf $filename;;
    *.tar.gz)   tar xzf $filename;;
    *.gz)       gunzip $filename;;
    *.bz2)      bunzip2 $filename;;
    *.zip)      unzip $filename;;
    *.Z)        uncompress $filename;;
    *.rar)      rar x $filename ;;
    *)          echo "No extract option for $filename"
esac
Note that this script also prompts for a file name if none was provided and then checks to
make sure that the file specified actually exists. Only after that does it bother with the
extraction.
Reacting to errors
You can detect and react to errors within scripts and, in doing so, avoid other errors. The
trick is to check the exit codes after commands are run. If an exit code has a value other than
zero, an error occurred. In this script, we look to see if Apache is running, but send the
output from the check to /dev/null . We then check to see if the exit code isn't equal to zero
as this would indicate that the ps command did not get a response. If the exit code is
not zero, the script informs the user that Apache isn't running.
#!/bin/bash

ps -ef | grep apache2 > /dev/null
if [ $? != 0 ]; then
    echo Apache is not running
    exit
fi
Those shortcuts belong to the class of commands known as bang commands . Internet
search for this term provides a wealth of additional information (which probably you do not
need ;-), I will concentrate on just most common and potentially useful in the current command
line environment bang commands. Of them !$ is probably the most useful and definitely
is the most widely used. For many sysadmins it is the only bang command that is regularly
used.
!! is the bang command that re-executes the last command . This command is used
mainly as a shortcut sudo !! -- elevation of privileges after your command failed
on your user account. For example:
fgrep 'kernel' /var/log/messages # it will fail due to unsufficient privileges, as /var/log directory is not readable by ordinary user
sudo !! # now we re-execute the command with elevated privileges
!$ puts into the current command line the last argument from previous command . For
example:
mkdir -p /tmp/Bezroun/Workdir
cd !$
In this example the last command is equivalent to the command cd /tmp/Bezroun/Workdir. Please
try this example. It is a pretty neat trick.
NOTE: You can also work with individual arguments using numbers.
!:1 is the previous command and its options
!:2 is the first argument of the previous command
!:3 is the second
And so on
For example:
cp !:2 !:3 # picks up the first and the second argument from the previous command
For this and other bang command capabilities, copying fragments of the previous command line
using mouse is much more convenient, and you do not need to remember extra staff. After all, band
commands were created before mouse was available, and most of them reflect the realities and needs
of this bygone era. Still I met sysadmins that use this and some additional capabilities like
!!:s^<old>^<new> (which replaces the string 'old' with the string 'new" and
re-executes previous command) even now.
The same is true for !* -- all arguments of the last command. I do not use them and
have had troubles writing this part of this post, correcting it several times to make it right
4/0
Nowadays CTRL+R activates reverse search, which provides an easier way to
navigate through your history then capabilities in the past provided by band commands.
Images removed. See the original for the full text.
Notable quotes:
"... You might also mention !? It finds the last command with its' string argument. For example, if"� ..."
"... I didn't see a mention of historical context in the article, so I'll give some here in the comments. This form of history command substitution originated with the C Shell (csh), created by Bill Joy for the BSD flavor of UNIX back in the late 70's. It was later carried into tcsh, and bash (Bourne-Again SHell). ..."
The The '!'
symbol or operator in Linux can be used as Logical Negation operator as well as to fetch commands from history
with tweaks or to run previously run command with modification. All the commands below have been checked explicitly in bash Shell. Though
I have not checked but a major of these won't run in other shell. Here we go into the amazing and mysterious uses of '!'
symbol or operator in Linux commands.
4. How to handle two or more arguments using (!)
Let's say I created a text file 1.txt on the Desktop.
$ touch /home/avi/Desktop/1.txt
and then copy it to "� /home/avi/Downloads "� using complete path on either side with cp command.
$ cp /home/avi/Desktop/1.txt /home/avi/downloads
Now we have passed two arguments with cp command. First is "� /home/avi/Desktop/1.txt "� and second is "� /home/avi/Downloads
"�, lets handle them differently, just execute echo [arguments] to print both arguments differently.
$ echo "1st Argument is : !^"�
$ echo "2nd Argument is : !cp:2"�
Note 1st argument can be printed as "!^"� and rest of the arguments can be printed by executing "![Name_of_Command]:[Number_of_argument]"�
.
In the above example the first command was "� cp "� and 2nd argument was needed to print. Hence "!cp:2"� , if any
command say xyz is run with 5 arguments and you need to get 4th argument, you may use "!xyz:4"� , and use it as you
like. All the arguments can be accessed by "!*"� .
5. Execute last command on the basis of keywords
We can execute the last executed command on the basis of keywords. We can understand it as follows:
$ ls /home > /dev/null						[Command 1]
$ ls -l /home/avi/Desktop > /dev/null		                [Command 2]
$ ls -la /home/avi/Downloads > /dev/null	                [Command 3]
$ ls -lA /usr/bin > /dev/null				        [Command 4]
Here we have used same command (ls) but with different switches and for different folders. Moreover we have sent to output of
each command to "� /dev/null "� as we are not going to deal with the output of the command also the console remains clean.
Now Execute last run command on the basis of keywords.
$ ! ls					[Command 1]
$ ! ls -l				[Command 2]
$ ! ls -la				[Command 3]
$ ! ls -lA				[Command 4]
Check the output and you will be astonished that you are running already executed commands just by ls keywords.
Run Commands Based on Keywords
6. The power of !! Operator
You can run/alter your last run command using (!!) . It will call the last run command with alter/tweak in the current
command. Lets show you the scenario
Last day I run a one-liner script to get my private IP so I run,
Then suddenly I figured out that I need to redirect the output of the above script to a file ip.txt , so what should I do? Should
I retype the whole command again and redirect the output to a file? Well an easy solution is to use UP navigation key
and add '> ip.txt' to redirect the output to a file as.
As soon as I run script, the bash prompt returned an error with the message "bash: ifconfig: command not found"�
, It was not difficult for me to guess I run this command as user where it should be run as root.
So what's the solution? It is difficult to login to root and then type the whole command again! Also ( UP Navigation Key ) in
last example didn't came to rescue here. So? We need to call "!!"� without quotes, which will call the last command
for that user.
$ su -c "!!"� root
Here su is switch user which is root, -c is to run the specific command as the user and the most important part
!! will be replaced by command and last run command will be substituted here. Yeah! You need to provide root password.
I make use of !! mostly in following scenarios,
1. When I run apt-get command as normal user, I usually get an error saying you don't have permission to execute.
$ apt-get upgrade && apt-get dist-upgrade
Opps error"�don't worry execute below command to get it successful..
$ su -c !!
Same way I do for,
$ service apache2 start
or
$ /etc/init.d/apache2 start
or
$ systemctl start apache2
OOPS User not authorized to carry such task, so I run..
$ su -c 'service apache2 start'
or
$ su -c '/etc/init.d/apache2 start'
or
$ su -c 'systemctl start apache2'
7. Run a command that affects all the file except ![FILE_NAME]
The ! ( Logical NOT ) can be used to run the command on all the files/extension except that is behind '!'
.
A. Remove all the files from a directory except the one the name of which is 2.txt .
$ rm !(2.txt)
B. Remove all the file type from the folder except the one the extension of which is "� pdf "�.
I didn't see a mention of historical context in the article, so I'll give some here in the comments. This form of history command
substitution originated with the C Shell (csh), created by Bill Joy for the BSD flavor of UNIX back in the late 70's. It was later
carried into tcsh, and bash (Bourne-Again SHell).
Personally, I've always preferred the C-shell history substitution mechanism, and never really took to the fc command (that
I first encountered in the Korne shell).
4th command. You can access it much simpler. There are actually regular expressions:
^ -- is at the begging expression
$ -- is at the end expression
:number -- any number parameter
Examples:
touch a.txt b.txt c.txt
echo !^ ""> display first parameter
echo !:1 ""> also display first parameter
echo !:2 ""> display second parameter
echo !:3 ""> display third parameter
echo !$ ""> display last (in our case 3th) parameter
echo !* ""> display all parameters
I think (5) works differently than you pointed out, and redirection to devnull hides it, but ZSh still prints the command.
When you invoke "! ls"�"�, it always picks the last ls command you executed, just appends your switches at the end (after /dev/null).
One extra cool thing is the !# operator, which picks arguments from current line. Particularly good if you need to retype long
path names you already typed in current line. Just say, for example
cp /some/long/path/to/file.abc !#:1
And press tab. It's going to replace last argument with entire path and file name.
For your first part of feedback: It doesn't pick the last command executed and just to prove this we have used 4 different
switches for same command. ($ ! ls $ ! ls -l $ ! ls -la $ ! ls -lA ). Now you may check it by entering the keywords in any
order and in each case it will output the same result.
As far as it is not working in ZSH as expected, i have already mentioned that it i have tested it on BASH and most of these
won't work in other shell.
You can achieve the same result by replacing the backticks with the $ parens, like in the example below:
⯠echo "There are $(ls | wc -l) files in this directory"
There are 3 files in this directory
Here's another example, still very simple but a little more realistic. I need to troubleshoot something in my network connections,
so I decide to show my total and waiting connections minute by minute.
It doesn't seem like a huge difference, right? I just had to adjust the syntax. Well, there are some implications involving
the two approaches. If you are like me, who automatically uses the backticks without even blinking, keep reading.
Deprecation and recommendations
Deprecation sounds like a bad word, and in many cases, it might really be bad.
When I was researching the explanations for the backtick operator, I found some discussions about "are the backtick operators
deprecated?"
The short answer is: Not in the sense of "on the verge of becoming unsupported and stop working." However, backticks should be
avoided and replaced by the $ parens syntax.
The main reasons for that are (in no particular order):
1. Backticks operators can become messy if the internal commands also use backticks.
You will need to escape the internal backticks, and if you have single quotes as part of the commands or part of the results,
reading and troubleshooting the script can become difficult.
If you start thinking about nesting backtick operators inside other backtick operators, things will not work as expected
or not work at all. Don't bother.
2. The $ parens operator is safer and more predictable.
What you code inside the $ parens operator is treated as a shell script. Syntactically it is the same thing as
having that code in a text file, so you can expect that everything you would code in an isolated shell script would work here.
Here are some examples of the behavioral differences between backticks and $ parens:
If you compare the two approaches, it seems logical to think that you should always/only use the $ parens approach.
And you might think that the backtick operators are only used by
sysadmins from an older era .
Well, that might be true, as sometimes I use things that I learned long ago, and in simple situations, my "muscle memory" just
codes it for me. For those ad-hoc commands that you know that do not contain any nasty characters, you might be OK using backticks.
But for anything that is more perennial or more complex/sophisticated, please go with the $ parens approach.
The ability for a Bash script to handle command line options such as -h to
display help gives you some powerful capabilities to direct the program and modify what it
does. In the case of your -h option, you want the program to print the help text
to the terminal session and then quit without running the rest of the program. The ability to
process options entered at the command line can be added to the Bash script using the
while command in conjunction with the getops and case
commands.
The getops command reads any and all options specified at the command line and
creates a list of those options. The while command loops through the list of
options by setting the variable $options for each in the code below. The case
statement is used to evaluate each option in turn and execute the statements in the
corresponding stanza. The while statement will continue to assess the list of
options until they have all been processed or an exit statement is encountered, which
terminates the program.
Be sure to delete the help function call just before the echo "Hello world!" statement so
that the main body of the program now looks like this.
############################################################
############################################################
# Main program                                             #
############################################################
############################################################
############################################################
# Process the input options. Add options as needed.        #
############################################################
# Get the options
while getopts ":h" option; do
   case $option in
      h) # display Help
         Help
         exit;;
   esac
done

echo "Hello world!"
Notice the double semicolon at the end of the exit statement in the case option for
-h . This is required for each option. Add to this case statement to delineate the
end of each option.
Testing is now a little more complex. You need to test your program with several different
options -- and no options -- to see how it responds. First, check to ensure that with no
options that it prints "Hello world!" as it should.
[student@testvm1 ~]$ hello.sh
Hello world!
That works, so now test the logic that displays the help text.
[student@testvm1 ~]$ hello.sh -h
Add a description of the script functions here.

Syntax: scriptTemplate [-g|h|t|v|V]
options:
g     Print the GPL license notification.
h     Print this Help.
v     Verbose mode.
V     Print software version and exit.
That works as expected, so now try some testing to see what happens when you enter some
unexpected options.
[student@testvm1 ~]$ hello.sh -x
Hello world!
[student@testvm1 ~]$ hello.sh -q
Hello world!
[student@testvm1 ~]$ hello.sh -lkjsahdf
Add a description of the script functions here.

Syntax: scriptTemplate [-g|h|t|v|V]
options:
g     Print the GPL license notification.
h     Print this Help.
v     Verbose mode.
V     Print software version and exit.

[student@testvm1 ~]$
Handling invalid options
The program just ignores the options for which you haven't created specific responses
without generating any errors. Although in the last entry with the -lkjsahdf
options, because there is an "h" in the list, the program did recognize it and print the help
text. Testing has shown that one thing that is missing is the ability to handle incorrect input
and terminate the program if any is detected.
You can add another case stanza to the case statement that will match any option for which
there is no explicit match. This general case will match anything you haven't provided a
specific match for. The case statement now looks like this.
while getopts ":h" option; do
   case $option in
      h) # display Help
         Help
         exit;;
     \?) # Invalid option
         echo "Error: Invalid option"
         exit;;
   esac
done
This bit of code deserves an explanation about how it works. It seems complex but is fairly
easy to understand. The while – done structure defines a loop that executes once for each
option in the getopts – option structure. The ":h" string -- which requires the quotes --
lists the possible input options that will be evaluated by the case – esac structure.
Each option listed must have a corresponding stanza in the case statement. In this case, there
are two. One is the h) stanza which calls the Help procedure. After the Help procedure
completes, execution returns to the next program statement, exit;; which exits from the program
without executing any more code even if some exists. The option processing loop is also
terminated, so no additional options would be checked.
Notice the catch-all match of \? as the last stanza in the case statement. If any options
are entered that are not recognized, this stanza prints a short error message and exits from
the program.
Any additional specific cases must precede the final catch-all. I like to place the case
stanzas in alphabetical order, but there will be circumstances where you want to ensure that a
particular case is processed before certain other ones. The case statement is sequence
sensitive, so be aware of that when you construct yours.
The last statement of each stanza in the case construct must end with the double semicolon (
;; ), which is used to mark the end of each stanza explicitly. This allows those
programmers who like to use explicit semicolons for the end of each statement instead of
implicit ones to continue to do so for each statement within each case stanza.
Test the program again using the same options as before and see how this works now.
The Bash script now looks like this.
#!/bin/bash
############################################################
# Help                                                     #
############################################################
Help()
{
   # Display Help
   echo "Add description of the script functions here."
   echo
   echo "Syntax: scriptTemplate [-g|h|v|V]"
   echo "options:"
   echo "g     Print the GPL license notification."
   echo "h     Print this Help."
   echo "v     Verbose mode."
   echo "V     Print software version and exit."
   echo
}

############################################################
############################################################
# Main program                                             #
############################################################
############################################################
############################################################
# Process the input options. Add options as needed.        #
############################################################
# Get the options
while getopts ":h" option; do
   case $option in
      h) # display Help
         Help
         exit;;
     \?) # Invalid option
         echo "Error: Invalid option"
         exit;;
   esac
done


echo "hello world!"
Be sure to test this version of your program very thoroughly. Use random input and see what
happens. You should also try testing valid and invalid options without using the dash (
- ) in front.
Using options to enter data
First, add a variable and initialize it. Add the two lines shown in bold in the segment of
the program shown below. This initializes the $Name variable to "world" as the default.
<snip>
############################################################
############################################################
# Main program                                             #
############################################################
############################################################

# Set variables
Name="world"

############################################################
# Process the input options. Add options as needed.        #
<snip>
Change the last line of the program, the echo command, to this.
echo "hello $Name!"
Add the logic to input a name in a moment but first test the program again. The result
should be exactly the same as before.
# Get the options
while getopts ":hn:" option; do
   case $option in
      h) # display Help
         Help
         exit;;
      n) # Enter a name
         Name=$OPTARG;;
     \?) # Invalid option
         echo "Error: Invalid option"
         exit;;
   esac
done
$OPTARG is always the variable name used for each new option argument, no matter how many
there are. You must assign the value in $OPTARG to a variable name that will be used in the
rest of the program. This new stanza does not have an exit statement. This changes the program
flow so that after processing all valid options in the case statement, execution moves on to
the next statement after the case construct.
#!/bin/bash
############################################################
# Help                                                     #
############################################################
Help()
{
   # Display Help
   echo "Add description of the script functions here."
   echo
   echo "Syntax: scriptTemplate [-g|h|v|V]"
   echo "options:"
   echo "g     Print the GPL license notification."
   echo "h     Print this Help."
   echo "v     Verbose mode."
   echo "V     Print software version and exit."
   echo
}

############################################################
############################################################
# Main program                                             #
############################################################
############################################################

# Set variables
Name="world"

############################################################
# Process the input options. Add options as needed.        #
############################################################
# Get the options
while getopts ":hn:" option; do
   case $option in
      h) # display Help
         Help
         exit;;
      n) # Enter a name
         Name=$OPTARG;;
     \?) # Invalid option
         echo "Error: Invalid option"
         exit;;
   esac
done


echo "hello $Name!"
Be sure to test the help facility and how the program reacts to invalid input to verify that
its ability to process those has not been compromised. If that all works as it should, then you
have successfully learned how to use options and option arguments.
The Bash String Operators Posted on December 11, 2014 | 3 minutes | Kevin Sookocheff
A common task in bash programming is to manipulate portions of a string and return the result. bash provides rich
support for these manipulations via string operators. The syntax is not always intuitive so I wanted to use this blog post to serve
as a permanent reminder of the operators.
The string operators are signified with the ${} notation. The operations can be grouped in to a few classes. Each
heading in this article describes a class of operation.
Substring ExtractionExtract from a position
1
${string:position}
Extraction returns a substring of string starting at position and ending at the end of string
. string is treated as an array of characters starting at 0.
1
2
3
4
5
> string="hello world"
> echo ${string:1}
ello world
> echo ${string:6}
world
Extract from a position with a length
${string:position:length}
Adding a length returns a substring only as long as the length parameter.
Substring ReplacementReplace first occurrence of word
${variable/pattern/string}
Find the first occurrence of pattern in variable and replace it with string . If
string is null, pattern is deleted from variable . If pattern starts with #
, the match must occur at the beginning of variable . If pattern starts with % , the match
must occur at the end of the variable .
When you need to split a string in bash, you can use bash's built-in read
command. This command reads a single line of string from stdin, and splits the string on a
delimiter. The split elements are then stored in either an array or separate variables supplied
with the read command. The default delimiter is whitespace characters (' ', '\t',
'\r', '\n'). If you want to split a string on a custom delimiter, you can specify the delimiter
in IFS variable before calling read .
# strings to split
var1="Harry Samantha Bart   Amy"
var2="green:orange:black:purple"

# split a string by one or more whitespaces, and store the result in an array
read -a my_array <<< $var1

# iterate the array to access individual split words
for elem in "${my_array[@]}"; do
    echo $elem
done

echo "----------"
# split a string by a custom delimter
IFS=':' read -a my_array2 <<< $var2
for elem in "${my_array2[@]}"; do
    echo $elem
done
Harry
Samantha
Bart
Amy
----------
green
orange
black
purple
Remove a Trailing Newline Character from a String in Bash
If you want to remove a trailing newline or carriage return character from a string, you can
use the bash's parameter expansion in the following form.
${string%$var}
This expression implies that if the "string" contains a trailing character stored in "var",
the result of the expression will become the "string" without the character. For example:
# input string with a trailing newline character
input_line=$'This is my example line\n'
# define a trailing character.  For carriage return, replace it with $'\r'
character=$'\n'

echo -e "($input_line)"
# remove a trailing newline character
input_line=${input_line%$character}
echo -e "($input_line)"
(This is my example line
)
(This is my example line)
Trim Leading/Trailing Whitespaces from a String in Bash
If you want to remove whitespaces at the beginning or at the end of a string (also known as
leading/trailing whitespaces) from a string, you can use sed command.
my_str="   This is my example string    "

# original string with leading/trailing whitespaces
echo -e "($my_str)"

# trim leading whitespaces in a string
my_str=$(echo "$my_str" | sed -e "s/^[[:space:]]*//")
echo -e "($my_str)"

# trim trailing whitespaces in a string
my_str=$(echo "$my_str" | sed -e "s/[[:space:]]*$//")
echo -e "($my_str)"
(   This is my example string    )
(This is my example string    )      ← leading whitespaces removed
(This is my example string)          ← trailing whitespaces removed
If you want to stick with bash's built-in mechanisms, the following bash function can get
the job done.
trim() {
    local var="$*"
    # remove leading whitespace characters
    var="${var#"${var%%[![:space:]]*}"}"
    # remove trailing whitespace characters
    var="${var%"${var##*[![:space:]]}"}"
    echo "$var"
}

my_str="   This is my example string    "
echo "($my_str)"

my_str=$(trim $my_str)
echo "($my_str)"
If varname exists and isn't null, return its value; otherwise return
word .
Purpose :
Returning a default value if the variable is undefined.
Example :
${count:-0} evaluates to 0 if count is undefined.
$ { varname := word }
If varname exists and isn't null, return its value; otherwise set it to
word and then return its value. Positional and special parameters cannot be
assigned this way.
Purpose :
Setting a variable to a default value if it is undefined.
Example :
$ {count := 0} sets count to 0 if it is undefined.
$ { varname :? message }
If varname exists and isn't null, return its value; otherwise print
varname : followed by message , and abort the current command or script
(non-interactive shells only). Omitting message produces the default message
parameter null or not set .
Purpose :
Catching errors that result from variables being undefined.
Example :
{count :?" undefined! " } prints "count: undefined!" and exits if count is
undefined.
$ { varname : + word }
If varname exists and isn't null, return word ; otherwise return
null.
Purpose :
Testing for the existence of a variable.
Example :
$ {count :+ 1} returns 1 (which could mean "true") if count is defined.
$ { varname : offset }
$ { varname : offset : length }
Performs substring expansion. a It returns the substring of $
varname starting at offset and up to length characters. The first
character in $ varname is position 0. If length is omitted, the substring
starts at offset and continues to the end of $ varname . If offset
is less than 0 then the position is taken from the end of $ varname . If
varname is @ , the length is the number of positional parameters starting
at parameter offset .
Purpose :
Returning parts of a string (substrings or slices ).
Example :
If count is set to frogfootman , $ {count :4} returns footman . $
{count :4:4} returns foot .
If the pattern matches the beginning of the variable's value, delete the shortest
part that matches and return the rest.
$ { variable ## pattern }
If the pattern matches the beginning of the variable's value, delete the longest
part that matches and return the rest.
$ { variable % pattern }
If the pattern matches the end of the variable's value, delete the shortest part
that matches and return the rest.
$ { variable %% pattern }
If the pattern matches the end of the variable's value, delete the longest part that
matches and return the rest.
$ { variable / pattern / string }
$ { variable // pattern / string }
The longest match to pattern in variable is replaced by string
. In the first form, only the first match is replaced. In the second form, all matches
are replaced. If the pattern is begins with a # , it must match at the start of the
variable. If it begins with a % , it must match with the end of the variable. If
string is null, the matches are deleted. If variable is @ or * , the
operation is applied to each positional parameter in turn and the expansion is the
resultant list. a
The curly-bracket syntax allows for the shell's string operators . String operators
allow you to manipulate values of variables in various useful ways without having to write
full-blown programs or resort to external UNIX utilities. You can do a lot with string-handling
operators even if you haven't yet mastered the programming features we'll see in later
chapters.
In particular, string operators let you do the following:
Ensure that variables exist (i.e., are defined and have non-null values)
Set default values for variables
Catch errors that result from variables not being set
Remove portions of variables' values that match patterns
The basic idea behind the syntax of string operators is that special characters that denote
operations are inserted between the variable's name and the right curly brackets. Any argument
that the operator may need is inserted to the operator's right.
The first group of string-handling operators tests for the existence of variables and allows
substitutions of default values under certain conditions. These are listed in Table
4.1 . [6]
[6] The colon ( : ) in each of these operators is actually optional. If the
colon is omitted, then change "exists and isn't null" to "exists" in each definition, i.e.,
the operator tests for existence only.
If varname exists and isn't null, return its value; otherwise return word
.
Purpose :
Returning a default value if the variable is undefined.
Example :
${count:-0} evaluates to 0 if count is undefined.
${varname:=word}
If varname exists and isn't null, return its value; otherwise set it to
word and then return its value.[7]
Purpose :
Setting a variable to a default value if it is undefined.
Example :
${count:=0} sets count to 0 if it is undefined.
${varname:?message}
If varname exists and isn't null, return its value; otherwise print
varname: followed by message , and abort the current command or
script. Omitting message produces the default message parameter null or not
set .
Purpose :
Catching errors that result from variables being undefined.
Example :
{count:?"undefined!"} prints
"count: undefined!" and exits if count is undefined.
${varname:+word}
If varname exists and isn't null, return word ; otherwise return
null.
Purpose :
Testing for the existence of a variable.
Example :
${count:+1} returns 1 (which could mean "true") if count is defined.
[7] Pascal, Modula, and Ada programmers may find it helpful to recognize the similarity of
this to the assignment operators in those languages.
The first two of these operators are ideal for setting defaults for command-line arguments
in case the user omits them. We'll use the first one in our first programming task.
Task
4.1
You have a large album collection, and you want to write some software to keep track of
it. Assume that you have a file of data on how many albums you have by each artist. Lines in
the file look like this:
14 Bach, J.S.
1       Balachander, S.
21      Beatles
6       Blakey, Art
Write a program that prints the N highest lines, i.e., the N artists by whom
you have the most albums. The default for N should be 10. The program should take one
argument for the name of the input file and an optional second argument for how many lines to
print.
By far the best approach to this type of script is to use built-in UNIX utilities, combining
them with I/O redirectors and pipes. This is the classic "building-block" philosophy of UNIX
that is another reason for its great popularity with programmers. The building-block technique
lets us write a first version of the script that is only one line long:
sort -nr $1 | head -${2:-10}
Here is how this works: the sort (1) program sorts the data in the file whose name is
given as the first argument ( $1 ). The -n option tells sort to interpret
the first word on each line as a number (instead of as a character string); the -r tells
it to reverse the comparisons, so as to sort in descending order.
The output of sort is piped into the head (1) utility, which, when given the
argument -N , prints the first N lines of its input on the standard
output. The expression -${2:-10} evaluates to a dash ( - ) followed by the second
argument if it is given, or to -10 if it's not; notice that the variable in this expression is
2 , which is the second positional parameter.
Assume the script we want to write is called highest . Then if the user types
highest myfile , the line that actually runs is:
sort -nr myfile | head -10
Or if the user types highest myfile 22 , the line that runs is:
sort -nr myfile | head -22
Make sure you understand how the :- string operator provides a default value.
This is a perfectly good, runnable script-but it has a few problems. First, its one line is
a bit cryptic. While this isn't much of a problem for such a tiny script, it's not wise to
write long, elaborate scripts in this manner. A few minor changes will make the code more
readable.
First, we can add comments to the code; anything between # and the end of a line is a
comment. At a minimum, the script should start with a few comment lines that indicate what the
script does and what arguments it accepts. Second, we can improve the variable names by
assigning the values of the positional parameters to regular variables with mnemonic names.
Finally, we can add blank lines to space things out; blank lines, like comments, are ignored.
Here is a more readable version:
#
#       highest filename [howmany]
#
#       Print howmany highest-numbered lines in file filename.
#       The input file is assumed to have lines that start with
#       numbers.  Default for howmany is 10.
#

filename=$1

howmany=${2:-10}
sort -nr $filename | head -$howmany
The square brackets around howmany in the comments adhere to the convention in UNIX
documentation that square brackets denote optional arguments.
The changes we just made improve the code's readability but not how it runs. What if the
user were to invoke the script without any arguments? Remember that positional parameters
default to null if they aren't defined. If there are no arguments, then $1 and $2
are both null. The variable howmany ( $2 ) is set up to default to 10, but there
is no default for filename ( $1 ). The result would be that this command
runs:
sort -nr | head -10
As it happens, if sort is called without a filename argument, it expects input to
come from standard input, e.g., a pipe (|) or a user's terminal. Since it doesn't have the
pipe, it will expect the terminal. This means that the script will appear to hang! Although you
could always type [CTRL-D] or [CTRL-C] to get out of the script, a naive
user might not know this.
Therefore we need to make sure that the user supplies at least one argument. There are a few
ways of doing this; one of them involves another string operator. We'll replace the line:
filename=$1
with:
filename=${1:?"filename missing."}
This will cause two things to happen if a user invokes the script without any arguments:
first the shell will print the somewhat unfortunate message:
highest: 1: filename missing.
to the standard error output. Second, the script will exit without running the remaining
code.
With a somewhat "kludgy" modification, we can get a slightly better error message. Consider
this code:
filename=$1
filename=${filename:?"missing."}
This results in the message:
highest: filename: missing.
(Make sure you understand why.) Of course, there are ways of printing whatever message is
desired; we'll find out how in Chapter 5 .
Before we move on, we'll look more closely at the two remaining operators in Table
4.1 and see how we can incorporate them into our task solution. The := operator does
roughly the same thing as :- , except that it has the "side effect" of setting the value
of the variable to the given word if the variable doesn't exist.
Therefore we would like to use := in our script in place of :- , but we can't;
we'd be trying to set the value of a positional parameter, which is not allowed. But if we
replaced:
howmany=${2:-10}
with just:
howmany=$2
and moved the substitution down to the actual command line (as we did at the start), then we
could use the := operator:
sort -nr $filename | head -${howmany:=10}
Using := has the added benefit of setting the value of howmany to 10 in case
we need it afterwards in later versions of the script.
The final substitution operator is :+ . Here is how we can use it in our example:
Let's say we want to give the user the option of adding a header line to the script's output.
If he or she types the option -h , then the output will be preceded by the line:
ALBUMS ARTIST
Assume further that this option ends up in the variable header , i.e., $header
is -h if the option is set or null if not. (Later we will see how to do this without
disturbing the other positional parameters.)
The expression:
${header:+"ALBUMS ARTIST\n"}
yields null if the variable header is null, or ALBUMS══ARTIST\n if
it is non-null. This means that we can put the line:
print -n ${header:+"ALBUMS ARTIST\n"}
right before the command line that does the actual work. The -n option to
print causes it not to print a LINEFEED after printing its arguments. Therefore
this print statement will print nothing-not even a blank line-if header is null;
otherwise it will print the header line and a LINEFEED (\n).
We'll continue refining our solution to Task 4-1 later in this chapter. The next type of
string operator is used to match portions of a variable's string value against patterns
. Patterns, as we saw in Chapter 1 are strings that can
contain wildcard characters ( * , ? , and [] for character
sets and ranges).
Wildcards have been standard features of all UNIX shells going back (at least) to the
Version 6 Bourne shell. But the Korn shell is the first shell to add to their capabilities. It
adds a set of operators, called regular expression (or regexp for short)
operators, that give it much of the string-matching power of advanced UNIX utilities like
awk (1), egrep (1) (extended grep (1)) and the emacs editor, albeit
with a different syntax. These capabilities go beyond those that you may be used to in other
UNIX utilities like grep , sed (1) and vi (1).
Advanced UNIX users will find the Korn shell's regular expression capabilities occasionally
useful for script writing, although they border on overkill. (Part of the problem is the
inevitable syntactic clash with the shell's myriad other special characters.) Therefore we
won't go into great detail about regular expressions here. For more comprehensive information,
the "last word" on practical regular expressions in UNIX is sed & awk , an O'Reilly
Nutshell Handbook by Dale Dougherty. If you are already comfortable with awk or
egrep , you may want to skip the following introductory section and go to "Korn Shell
Versus awk/egrep Regular Expressions" below, where we explain the shell's regular expression
mechanism by comparing it with the syntax used in those two utilities. Otherwise, read
on.
Think of regular expressions as strings that match patterns more powerfully than the
standard shell wildcard schema. Regular expressions began as an idea in theoretical computer
science, but they have found their way into many nooks and crannies of everyday, practical
computing. The syntax used to represent them may vary, but the concepts are very much the
same.
A shell regular expression can contain regular characters, standard wildcard characters, and
additional operators that are more powerful than wildcards. Each such operator has the form
x ( exp) , where x is the particular operator and exp is
any regular expression (often simply a regular string). The operator determines how many
occurrences of exp a string that matches the pattern can contain. See Table 4.2 and
Table 4.3 .
Regular expressions are extremely useful when dealing with arbitrary text, as you already
know if you have used grep or the regular-expression capabilities of any UNIX editor.
They aren't nearly as useful for matching filenames and other simple types of information with
which shell users typically work. Furthermore, most things you can do with the shell's regular
expression operators can also be done (though possibly with more keystrokes and less
efficiency) by piping the output of a shell command through grep or egrep .
Nevertheless, here are a few examples of how shell regular expressions can solve
filename-listing problems. Some of these will come in handy in later chapters as pieces of
solutions to larger tasks.
The emacs editor supports customization files whose names end in .el (for
Emacs LISP) or .elc (for Emacs LISP Compiled). List all emacs customization
files in the current directory.
In a directory of C source code, list all files that are not necessary. Assume that
"necessary" files end in .c or .h , or are named Makefile or
README .
Filenames in the VAX/VMS operating system end in a semicolon followed by a version
number, e.g., fred.bob;23 . List all VAX/VMS-style filenames in the current
directory.
Here are the solutions:
In the first of these, we are looking for files that end in .el with an optional
c . The expression that matches this is * .el ? (c)
.
The second example depends on the four standard subexpressions *.c ,
*.h , Makefile , and README . The entire expression is
!(*.c|*.h|Makefile|README) , which matches
anything that does not match any of the four possibilities.
The solution to the third example starts with *\; :
the shell wildcard * followed by a backslash-escaped semicolon. Then, we could
use the regular expression +([0-9]) , which matches one or more characters in the
range [0-9] , i.e., one or more digits. This is almost correct (and probably close
enough), but it doesn't take into account that the first digit cannot be 0. Therefore the
correct expression is *\;[1-9]*([0-9]) , which
matches anything that ends with a semicolon, a digit from 1 to 9, and zero or more
digits from 0 to 9.
Regular expression operators are an interesting addition to the Korn shell's features, but
you can get along well without them-even if you intend to do a substantial amount of shell
programming.
In our opinion, the shell's authors missed an opportunity to build into the wildcard
mechanism the ability to match files by type (regular, directory, executable, etc., as
in some of the conditional tests we will see in Chapter 5 ) as well as by name
component. We feel that shell programmers would have found this more useful than arcane regular
expression operators.
The following section compares Korn shell regular expressions to analogous features in
awk and egrep . If you aren't familiar with these, skip to the section entitled
"Pattern-matching Operators."
These equivalents are close but not quite exact. Actually, an exp within any of the
Korn shell operators can be a series of exp1 | exp2 |... alternates. But because
the shell would interpret an expression like dave|fred|bob as a pipeline of commands,
you must use @(dave|fred|bob) for alternates by themselves.
For example:
@(dave|fred|bob) matches dave , fred , or bob .
*(dave|fred|bob) means, "0 or more occurrences of dave ,
fred , or bob ". This expression matches strings like the null string,
dave , davedave , fred , bobfred , bobbobdavefredbobfred ,
etc.
+(dave|fred|bob) matches any of the above except the null string.
?(dave|fred|bob) matches the null string, dave , fred , or
bob .
!(dave|fred|bob) matches anything except dave , fred , or bob
.
It is worth re-emphasizing that shell regular expressions can still contain standard shell
wildcards. Thus, the shell wildcard ? (match any single character) is the equivalent to
. in egrep or awk , and the shell's character set operator [ ...
] is the same as in those utilities. [9] For example, the expression +([0-9])
matches a number, i.e., one or more digits. The shell wildcard character * is
equivalent to the shell regular expression * ( ?) .
[9] And, for that matter, the same as in grep , sed , ed , vi
, etc.
A few egrep and awk regexp operators do not have equivalents in the Korn
shell. These include:
The beginning- and end-of-line operators ^ and $ .
The beginning- and end-of-word operators \< and \> .
Repeat factors like \{N\} and \{M,N\} .
The first two pairs are hardly necessary, since the Korn shell doesn't normally operate on
text files and does parse strings into words itself.
If the pattern matches the beginning of the variable's value, delete the shortest part
that matches and return the rest.
$ { variable ## pattern }
If the pattern matches the beginning of the variable's value, delete the longest part
that matches and return the rest.
$ { variable % pattern }
If the pattern matches the end of the variable's value, delete the shortest part that
matches and return the rest.
$ { variable %% pattern }
If the pattern matches the end of the variable's value, delete the longest part that
matches and return the rest.
These can be hard to remember, so here's a handy mnemonic device: # matches the front
because number signs precede numbers; % matches the rear because percent signs
follow numbers.
The classic use for pattern-matching operators is in stripping off components of pathnames,
such as directory prefixes and filename suffixes. With that in mind, here is an example that
shows how all of the operators work. Assume that the variable path has the value
/home /billr/mem/long.file.name ; then:
The two patterns used here are /*/ , which matches anything between two
slashes, and .* , which matches a dot followed by anything.
We will incorporate one of these operators into our next programming task.
Task
4.2
You are writing a C compiler, and you want to use the Korn shell for your
front-end.[10]
[10] Don't laugh-many UNIX compilers have shell scripts as front-ends.
Think of a C compiler as a pipeline of data processing components. C source code is input to
the beginning of the pipeline, and object code comes out of the end; there are several steps in
between. The shell script's task, among many other things, is to control the flow of data
through the components and to designate output files.
You need to write the part of the script that takes the name of the input C source file and
creates from it the name of the output object code file. That is, you must take a filename
ending in .c and create a filename that is similar except that it ends in .o
.
The task at hand is to strip the .c off the filename and append .o . A single
shell statement will do it:
objname=${filename%.c}.o
This tells the shell to look at the end of filename for .c . If there is a
match, return $filename with the match deleted. So if filename had the value
fred.c , the expression ${filename%.c} would return fred . The .o
is appended to make the desired fred.o , which is stored in the variable objname
.
If filename had an inappropriate value (without .c ) such as fred.a ,
the above expression would evaluate to fred.a.o : since there was no match, nothing is
deleted from the value of filename , and .o is appended anyway. And, if
filename contained more than one dot-e.g., if it were the y.tab.c that is so
infamous among compiler writers-the expression would still produce the desired y.tab.o .
Notice that this would not be true if we used %% in the expression instead of % .
The former operator uses the longest match instead of the shortest, so it would match
.tab.o and evaluate to y.o rather than y.tab.o . So the single % is
correct in this case.
A longest-match deletion would be preferable, however, in the following task.
Task
4.3
You are implementing a filter that prepares a text file for printer output. You want to
put the file's name-without any directory prefix-on the "banner" page. Assume that, in your
script, you have the pathname of the file to be printed stored in the variable
pathname .
Clearly the objective is to remove the directory prefix from the pathname. The following
line will do it:
bannername=${pathname##*/}
This solution is similar to the first line in the examples shown before. If pathname
were just a filename, the pattern */ (anything followed by a slash) would
not match and the value of the expression would be pathname untouched. If
pathname were something like fred/bob , the prefix fred/ would match the
pattern and be deleted, leaving just bob as the expression's value. The same thing would
happen if pathname were something like /dave/pete/fred/bob : since the ##
deletes the longest match, it deletes the entire /dave/pete/fred/ .
If we used #*/ instead of ##*/ ,
the expression would have the incorrect value dave/pete/fred/bob , because the shortest
instance of "anything followed by a slash" at the beginning of the string is just a slash (
/ ).
The construct $ { variable##*/} is actually
equivalent to the UNIX utility basename (1). basename takes a pathname as
argument and returns the filename only; it is meant to be used with the shell's command
substitution mechanism (see below). basename is less efficient than $ {
variable##/*} because it runs in its own separate process
rather than within the shell. Another utility, dirname (1), does essentially the
opposite of basename : it returns the directory prefix only. It is equivalent to the
Korn shell expression $ { variable%/*} and is less
efficient for the same reason.
There are two remaining operators on variables. One is $ {# varname }, which
returns the length of the value of the variable as a character string. (In Chapter 6 we will see how to
treat this and similar values as actual numbers so they can be used in arithmetic expressions.)
For example, if filename has the value fred.c , then ${#filename} would
have the value 6 . The other operator ( $ {# array[*]} ) has to do with array variables, which are also discussed in Chapter 6 .
When you are writing a bash script, there are situations where you need to generate a
sequence of numbers or strings . One common use of such sequence data is for loop iteration.
When you iterate over a range of numbers, the range may be defined in many different ways
(e.g., [0, 1, 2,..., 99, 100], [50, 55, 60,..., 75, 80], [10, 9, 8,..., 1, 0], etc). Loop
iteration may not be just over a range of numbers. You may need to iterate over a sequence of
strings with particular patterns (e.g., incrementing filenames; img001.jpg, img002.jpg,
img003.jpg). For this type of loop control, you need to be able to generate a sequence of
numbers and/or strings flexibly.
While you can use a dedicated tool like seq to generate a range of numbers, it
is really not necessary to add such external dependency in your bash script when bash itself
provides a powerful built-in range function called brace expansion . In this tutorial, let's
find out how to generate a sequence of data in bash using brace expansion and what are useful
brace expansion examples .
Brace Expansion
Bash's built-in range function is realized by so-called brace expansion . In a nutshell,
brace expansion allows you to generate a sequence of strings based on supplied string and
numeric input data. The syntax of brace expansion is the following.
All these sequence expressions are iterable, meaning you can use them for while/for loops . In the rest
of the tutorial, let's go over each of these expressions to clarify their use
cases.
The first use case of brace expansion is a simple string list, which is a comma-separated
list of string literals within the braces. Here we are not generating a sequence of data, but
simply list a pre-defined sequence of string data.
{<string1>,<string2>,...,<stringN>}
You can use this brace expansion to iterate over the string list as follows.
for fruit in {apple,orange,lemon}; do
    echo $fruit
done
apple
orange
lemon
This expression is also useful to invoke a particular command multiple times with different
parameters.
For example, you can create multiple subdirectories in one shot with:
The most common use case of brace expansion is to define a range of numbers for loop
iteration. For that, you can use the following expressions, where you specify the start/end of
the range, as well as an optional increment value.
Finally, it's possible to combine multiple brace expansions, in which case the
combined expressions will generate all possible combinations of sequence data produced by each
expression.
For example, we have the following script that prints all possible combinations of
two-character alphabet strings using double-loop iteration.
for char1 in {A..Z}; do
    for char2 in {A..Z}; do
        echo "${char1}${char2}"
    done
done
By combining two brace expansions, the following single loop can produce the same output as
above.
for str in {A..Z}{A..Z}; do
    echo $str
done
Conclusion
In this tutorial, I described a bash's built-in mechanism called brace expansion, which
allows you to easily generate a sequence of arbitrary strings in a single command line. Brace
expansion is useful not just for a bash script, but also in your command line environment
(e.g., when you need to run the same command multiple times with different arguments). If you
know any useful brace expansion tips and use cases, feel free to share it in the
comment.
In an ideal world, things always work as expected, but you know that's hardly the case. The
same goes in the world of bash scripting. Writing a robust, bug-free bash script is always
challenging even for a seasoned system administrator. Even if you write a perfect bash script,
the script may still go awry due to external factors such as invalid input or network problems.
While you cannot prevent all errors in your bash script, at least you should try to handle
possible error conditions in a more predictable and controlled fashion.
That is easier said than done, especially since error handling in bash is notoriously
difficult. The bash shell does not have any fancy exception swallowing mechanism like try/catch
constructs. Some bash errors may be silently ignored but may have consequences down the line.
The bash shell does not even have a proper debugger.
In this tutorial, I'll introduce basic tips to catch and handle errors in bash . Although
the presented error handling techniques are not as fancy as those available in other
programming languages, hopefully by adopting the practice, you may be able to handle potential
bash errors more gracefully.
As the first line of defense, it is always recommended to check the exit status of a
command, as a non-zero exit status typically indicates some type of error. For example:
if ! some_command; then
    echo "some_command returned an error"
fi
Another (more compact) way to trigger error handling based on an exit status is to use an OR
list:
<command1> || <command2>
With this OR statement, <command2> is executed if and only if <command1> returns
a non-zero exit status. So you can replace <command2> with your own error handling
routine. For example:
Bash provides a built-in variable called $? , which tells you the exit status
of the last executed command. Note that when a bash function is called, $? reads
the exit status of the last command called inside the function. Since some non-zero exit codes
have special
meanings , you can handle them selectively. For example:
# run some command
status=$?
if [ $status -eq 1 ]; then
    echo "General error"
elif [ $status -eq 2 ]; then
    echo "Misuse of shell builtins"
elif [ $status -eq 126 ]; then
    echo "Command invoked cannot execute"
elif [ $status -eq 128 ]; then
    echo "Invalid argument"
fi
Bash Error Handling Tip #2: Exit on Errors in Bash
When you encounter an error in a bash script, by default, it throws an error message to
stderr , but continues its execution in the rest of the script. In fact you see
the same behavior in a terminal window; even if you type a wrong command by accident, it will
not kill your terminal. You will just see the "command not found" error, but you terminal/bash
session will still remain.
This default shell behavior may not be desirable for some bash script. For example, if your
script contains a critical code block where no error is allowed, you want your script to exit
immediately upon encountering any error inside that code block. To activate this
"exit-on-error" behavior in bash, you can use the set command as follows.
set -e
#
# some critical code block where no error is allowed
#
set +e
Once called with -e option, the set command causes the bash shell
to exit immediately if any subsequent command exits with a non-zero status (caused by an error
condition). The +e option turns the shell back to the default mode. set
-e is equivalent to set -o errexit . Likewise, set +e is a
shorthand command for set +o errexit .
However, one special error condition not captured by set -e is when an error
occurs somewhere inside a pipeline of commands. This is because a pipeline returns a
non-zero status only if the last command in the pipeline fails. Any error produced by
previous command(s) in the pipeline is not visible outside the pipeline, and so does not kill a
bash script. For example:
set
    -e
true | false | true
echo "This will be printed" # "false" inside the pipeline not detected
If you want any failure in pipelines to also exit a bash script, you need to add -o
pipefail option. For example:
set -o pipefail -e
true | false | true          # "false" inside the pipeline detected correctly
echo "This will not be printed"
Therefore, to protect a critical code block against any type of command errors or pipeline
errors, use the following pair of set commands.
set -o pipefail -e
#
# some critical code block where no error or pipeline error is allowed
#
set +o pipefail +e
Bash Error Handling Tip #3: Try and Catch Statements in Bash
Although the set command allows you to terminate a bash script upon any error
that you deem critical, this mechanism is often not sufficient in more complex bash scripts
where different types of errors could happen.
To be able to detect and handle different types of errors/exceptions more flexibly, you will
need try/catch statements, which however are missing in bash. At least we can mimic the
behaviors of try/catch as shown in this trycatch.sh script:
function try()
{
    [[ $- = *e* ]]; SAVED_OPT_E=$?
    set +e
}

function throw()
{
    exit $1
}

function catch()
{
    export exception_code=$?
    (( $SAVED_OPT_E )) && set +e
    return $exception_code
}
Here we define several custom bash functions to mimic the
semantic of try and catch statements. The throw() function is supposed to raise a
custom (non-zero) exception. We need set +e , so that the non-zero returned by
throw() will not terminate a bash script. Inside catch() , we store
the value of exception raised by throw() in a bash variable
exception_code , so that we can handle the exception in a user-defined
fashion.
Perhaps an example bash script will make it clear how trycatch.sh works. See
the example below that utilizes trycatch.sh .
# Include trybatch.sh as a library
source ./trycatch.sh

# Define custom exception types
export ERR_BAD=100
export ERR_WORSE=101
export ERR_CRITICAL=102

try
(
    echo "Start of the try block"

    # When a command returns a non-zero, a custom exception is raised.
    run-command || throw $ERR_BAD
    run-command2 || throw $ERR_WORSE
    run-command3 || throw $ERR_CRITICAL

    # This statement is not reached if there is any exception raised
    # inside the try block.
    echo "End of the try block"
)
catch || {
    case $exception_code in
        $ERR_BAD)
            echo "This error is bad"
        ;;
        $ERR_WORSE)
            echo "This error is worse"
        ;;
        $ERR_CRITICAL)
            echo "This error is critical"
        ;;
        *)
            echo "Unknown error: $exit_code"
            throw $exit_code    # re-throw an unhandled exception
        ;;
    esac
}
In this example script, we define three types of custom exceptions. We can choose to raise
any of these exceptions depending on a given error condition. The OR list <command>
|| throw <exception> allows us to invoke throw() function with a
chosen <exception> value as a parameter, if <command> returns a non-zero exit
status. If <command> is completed successfully, throw() function will be
ignored. Once an exception is raised, the raised exception can be handled accordingly inside
the subsequent catch block. As you can see, this provides a more flexible way of handling
different types of error conditions.
Granted, this is not a full-blown try/catch constructs. One limitation of this approach is
that the try block is executed in a sub-shell . As you may know, any
variables defined in a sub-shell are not visible to its parent shell. Also, you cannot modify
the variables that are defined in the parent shell inside the try block, as the
parent shell and the sub-shell have separate scopes for variables.
Conclusion
In this bash tutorial, I presented basic error handling tips that may come in handy when you
want to write a more robust bash script. As expected these tips are not as sophisticated as the
error handling constructs available in other programming language. If the bash script you are
writing requires more advanced error handling than this, perhaps bash is not the right language
for your task. You probably want to turn to other languages such as Python.
Let me conclude the tutorial by mentioning one essential tool that every shell script writer
should be familiar with. ShellCheck is a static analysis tool for shell
scripts. It can detect and point out syntax errors, bad coding practice and possible semantic
issues in a shell script with much clarity. Definitely check it out if you haven't tried
it.
The idea was that sharing this would inspire others to improve their bashrc savviness. Take
a look at what our Sudoers group shared and, please, borrow anything you like to make your
sysadmin life easier.
# Require confirmation before overwriting target files. This setting keeps me from deleting things I didn't expect to, etc
alias cp='cp -i'
alias mv='mv -i'
alias rm='rm -i'

# Add color, formatting, etc to ls without re-typing a bunch of options every time
alias ll='ls -alhF'
alias ls="ls --color"
# So I don't need to remember the options to tar every time
alias untar='tar xzvf'
alias tarup='tar czvf'

# Changing the default editor, I'm sure a bunch of people have this so they don't get dropped into vi instead of vim, etc. A lot of distributions have system default overrides for these, but I don't like relying on that being around
alias vim='nvim'
alias vi='nvim'
# Easy copy the content of a file without using cat / selecting it etc. It requires xclip to be installed
# Example:  _cp /etc/dnsmasq.conf
_cp()
{
  local file="$1"
  local st=1
  if [[ -f $file ]]; then
    cat "$file" | xclip -selection clipboard
    st=$?
  else
    printf '%s\n' "Make sure you are copying the content of a file" >&2
  fi
  return $st
}

# This is the function to paste the content. The content is now in your buffer.
# Example: _paste

_paste()
{
  xclip -selection cliboard -o
}

# Generate a random password without installing any external tooling
genpw()
{
  alphanum=( {a..z} {A..Z} {0..9} ); for((i=0;i<=${#alphanum[@]};i++)); do printf '%s' "${alphanum[@]:$((RANDOM%255)):1}"; done; echo
}
# See what command you are using the most (this parses the history command)
cm() {
  history | awk ' { a[$4]++ } END { for ( i in a ) print a[i], i | "sort -rn | head -n10"}' | awk '$1 > max{ max=$1} { bar=""; i=s=10*$1/max;while(i-->0)bar=bar"#"; printf "%25s %15d %s %s", $2, $1,bar, "\n"; }'
}
alias vim='nvim'
alias l='ls -CF --color=always''
alias cd='cd -P' # follow symlinks
alias gits='git status'
alias gitu='git remote update'
alias gitum='git reset --hard upstream/master'
I don't know who I need to thank for this, some awesome woman on Twitter whose name I no
longer remember, but it's changed the organization of my bash aliases and commands
completely.
I have Ansible drop individual <something>.bashrc files into ~/.bashrc.d/
with any alias or command or shortcut I want, related to any particular technology or Ansible
role, and can manage them all separately per host. It's been the best single trick I've learned
for .bashrc files ever.
Git stuff gets a ~/.bashrc.d/git.bashrc , Kubernetes goes in
~/.bashrc.d/kube.bashrc .
if [ -d ${HOME}/.bashrc.d ]
then
  for file in ~/.bashrc.d/*.bashrc
  do
    source "${file}"
  done
fi
These aren't bashrc aliases, but I use them all the time. I wrote a little script named
clean for getting rid of excess lines in files. For example, here's
nsswitch.conf with lots of comments and blank lines:
[pgervase@pgervase etc]$ head authselect/nsswitch.conf
# Generated by authselect on Sun Dec  6 22:12:26 2020
# Do not modify this file manually.

# If you want to make changes to nsswitch.conf please modify
# /etc/authselect/user-nsswitch.conf and run 'authselect apply-changes'.
#
# Note that your changes may not be applied as they may be
# overwritten by selected profile. Maps set in the authselect
# profile always take precedence and overwrites the same maps
# set in the user file. Only maps that are not set by the profile

[pgervase@pgervase etc]$ wc -l authselect/nsswitch.conf
80 authselect/nsswitch.conf

[pgervase@pgervase etc]$ clean authselect/nsswitch.conf
passwd:     sss files systemd
group:      sss files systemd
netgroup:   sss files
automount:  sss files
services:   sss files
shadow:     files sss
hosts:      files dns myhostname
bootparams: files
ethers:     files
netmasks:   files
networks:   files
protocols:  files
rpc:        files
publickey:  files
aliases:    files

[pgervase@pgervase etc]$ cat `which clean`
#! /bin/bash
#
/bin/cat $1 | /bin/sed 's/^[ \t]*//' | /bin/grep -v -e "^#" -e "^;" -e "^[[:space:]]*$" -e "^[ \t]+"
In this case, you're running the loop with a true condition, which means it will run forever
or until you hit CTRL-C. Therefore, you need to keep an eye on it (otherwise, it will remain
using the system's resources).
Note : If you use a loop like this, you need to include a command like sleep to
give the system some time to breathe between executions. Running anything non-stop could become
a performance issue, especially if the commands inside the loop involve I/O
operations.
2. Waiting for a condition to become true
There are variations of this scenario. For example, you know that at some point, the process
will create a directory, and you are just waiting for that moment to perform other
validations.
You can have a while loop to keep checking for that directory's existence and
only write a message while the directory does not exist.
Another useful application of a while loop is to combine it with the
read command to have access to columns (or fields) quickly from a text file and
perform some actions on them.
In the following example, you are simply picking the columns from a text file with a
predictable format and printing the values that you want to use to populate an
/etc/hosts file.
Here the assumption is that the file has columns delimited by spaces or tabs and that there
are no spaces in the content of the columns. That could shift the content of the fields
and not give you what you needed.
Notice that you're just doing a simple operation to extract and manipulate information and
not concerned about the command's reusability. I would classify this as one of those "quick and
dirty tricks."
Of course, if this was something that you would repeatedly do, you should run it from a
script, use proper names for the variables, and all those good practices (including
transforming the filename in an argument and defining where to send the output, but today, the
topic is while loops).
#!/bin/bash

cat servers.txt | grep -v CPU | while read servername cpu ram ip
do
   echo $ip $servername
done
In the Bash shell, file descriptors (FDs) are important in managing the input and output of
commands. Many people have issues understanding file descriptors correctly. Each process has
three default file descriptors, namely:
Code
Meaning
Location
Description
0
Standard input
/dev/stdin
Keyboard, file, or some stream
1
Standard output
/dev/stdout
Monitor, terminal, display
2
Standard error
/dev/stderr
Non-zero exit codes are usually >FD2, display
Now that you know what the default FDs do, let's see them in action. I start by creating a
directory named foo , which contains file1 .
$> ls foo/ bar/
ls: cannot access 'bar/': No such file or directory
foo/:
file1
The output No such file or directory goes to Standard Error (stderr) and is also
displayed on the screen. I will run the same command, but this time use 2> to
omit stderr:
$> ls foo/ bar/ 2>/dev/null
foo/:
file1
It is possible to send the output of foo to Standard Output (stdout) and to a
file simultaneously, and ignore stderr. For example:
$> { ls foo bar | tee -a ls_out_file ;} 2>/dev/null
foo:
file1
Then:
$> cat ls_out_file
foo:
file1
The following command sends stdout to a file and stderr to /dev/null so that
the error won't display on the screen:
In the first command, as an example, we used ' single quotes. This resulted in
our subshell command, inside the single quotes, to be interpreted as literal text instead of a
command. This is standard Bash: ' indicates literal, " indicates that
the string will be parsed for subshells and variables.
In the second command we swap the ' to " and thus the string is
parsed for actual commands and variables. The result is that a subshell is being started,
thanks to our subshell syntax ( $() ), and the command inside the subshell (
echo 'a' ) is being executed literally, and thus an a is produced,
which is then inserted in the overarching / top level echo . The command at that
stage can be read as echo "a" and thus the output is a .
In the third command, we further expand this to make it clearer how subshells work
in-context. We echo the letter b inside the subshell, and this is joined on the
left and the right by the letters a and c yielding the overall output
to be abc in a similar fashion to the second command.
In the fourth and last command, we exemplify the alternative Bash subshell syntax of using
back-ticks instead of $() . It is important to know that $() is the
preferred syntax, and that in some remote cases the back-tick based syntax may yield some
parsing errors where the $() does not. I would thus strongly encourage you to
always use the $() syntax for subshells, and this is also what we will be using in
the following examples.
Example 2: A little more complex
$ touch a
$ echo "-$(ls [a-z])"
-a
$ echo "-=-||$(ls [a-z] | xargs ls -l)||-=-"
-=-||-rw-rw-r-- 1 roel roel 0 Sep 5 09:26 a||-=-
Here, we first create an empty file by using the touch a command. Subsequently,
we use echo to output something which our subshell $(ls [a-z]) will
generate. Sure, we can execute the ls directly and yield more or less the same
result, but note how we are adding - to the output as a prefix.
In the final command, we insert some characters at the front and end of the
echo command which makes the output look a bit nicer. We use a subshell to first
find the a file we created earlier ( ls [a-z] ) and then - still
inside the subshell - pass the results of this command (which would be only a
literally - i.e. the file we created in the first command) to the ls -l using the
pipe ( | ) and the xargs command. For more information on xargs,
please see our articles xargs for beginners with
examples and multi threaded xargs with
examples .
Example 3: Double quotes inside subshells and sub-subshells!
echo "$(echo "$(echo "it works")" | sed 's|it|it surely|')"
it surely works
Cool, no? Here we see that double quotes can be used inside the subshell without generating
any parsing errors. We also see how a subshell can be nested inside another subshell. Are you
able to parse the syntax? The easiest way is to start "in the middle or core of all subshells"
which is in this case would be the simple echo "it works" .
This command will output it works as a result of the subshell call $(echo
"it works") . Picture it works in place of the subshell, i.e.
echo "$(echo "it works" | sed 's|it|it surely|')"
it surely works
This looks simpler already. Next it is helpful to know that the sed command
will do a substitute (thanks to the s command just before the |
command separator) of the text it to it surely . You can read the
sed command as replace __it__ with __it surely__. The output of the subshell
will thus be it surely works`, i.e.
echo "it surely works"
it surely works
Conclusion
In this article, we have seen that subshells surely work (pun intended), and that they can
be used in wide variety of circumstances, due to their ability to be inserted inline and within
the context of the overarching command. Subshells are very powerful and once you start using
them, well, there will likely be no stopping. Very soon you will be writing something like:
$ VAR="goodbye"; echo "thank $(echo "${VAR}" | sed 's|^| and |')" | sed 's|k |k you|'
This one is for you to try and play around with! Thank you and goodbye
Assume I have a file with a lot of IP addresses and want to operate on those IP addresses.
For example, I want to run dig to retrieve reverse-DNS information for the IP
addresses listed in the file. I also want to skip IP addresses that start with a comment (# or
hashtag).
I'll use fileA as an example. Its contents are:
10.10.12.13 some ip in dc1
10.10.12.14 another ip in dc2
#10.10.12.15 not used IP
10.10.12.16 another IP
I could copy and paste each IP address, and then run dig manually:
$> dig +short -x 10.10.12.13
Or I could do this:
$> while read -r ip _; do [[ $ip == \#* ]] && continue; dig +short -x "$ip"; done < ipfile
What if I want to swap the columns in fileA? For example, I want to put IP addresses in the
right-most column so that fileA looks like this:
some ip in dc1 10.10.12.13
another ip in dc2 10.10.12.14
not used IP #10.10.12.15
another IP 10.10.12.16
I run:
$> while read -r ip rest; do printf '%s %s\n' "$rest" "$ip"; done < fileA
1 - Catchall for general errors. The exit code is 1 as the operation was not
successful.
2 - Misuse of shell builtins (according to Bash documentation)
126 - Command invoked cannot execute.
127 - "command not found".
128 - Invalid argument to exit.
128+n - Fatal error signal "n".
130 - Script terminated by Control-C.
255\* - Exit status out of range.
There is no "recipe" to get the meanings of an exit status of a given terminal command.
My first attempt would be the manpage:
user@host:~# man ls
Exit status:
0 if OK,
1 if minor problems (e.g., cannot access subdirectory),
2 if serious trouble (e.g., cannot access command-line argument).
Third : The exit statuses of the shell, for example bash. Bash and it's builtins may use
values above 125 specially. 127 for command not found, 126 for command not executable. For more
information see the bash
exit codes .
Some list of sysexits on both Linux and BSD/OS X with preferable exit codes for programs
(64-78) can be found in /usr/include/sysexits.h (or: man sysexits on
BSD):
0 /* successful termination */
64 /* base value for error messages */
64 /* command line usage error */
65 /* data format error */
66 /* cannot open input */
67 /* addressee unknown */
68 /* host name unknown */
69 /* service unavailable */
70 /* internal software error */
71 /* system error (e.g., can't fork) */
72 /* critical OS file missing */
73 /* can't create (user) output file */
74 /* input/output error */
75 /* temp failure; user is invited to retry */
76 /* remote error in protocol */
77 /* permission denied */
78 /* configuration error */
/* maximum listed value */
The above list allocates previously unused exit codes from 64-78. The range of unallotted
exit codes will be further restricted in the future.
However above values are mainly used in sendmail and used by pretty much nobody else, so
they aren't anything remotely close to a standard (as pointed by
@Gilles ).
In shell the exit status are as follow (based on Bash):
1 - 125 - Command did not complete successfully. Check the
command's man page for the meaning of the status, few examples below:
1 - Catchall for general errors
Miscellaneous errors, such as "divide by zero" and other impermissible operations.
Example:
$ let "var1 = 1/0"; echo $?
-bash: let: var1 = 1/0: division by 0 (error token is "0")
1
2 - Misuse of shell builtins (according to Bash documentation)
Missing keyword or command, or permission problem (and diff return code on a failed
binary file comparison).
Example:
empty_function() {}
6 - No such device or address
Example:
$ curl foo; echo $?
curl: (6) Could not resolve host: foo
6
128 - 254 - fatal error signal "n" - command died due to
receiving a signal. The signal code is added to 128 (128 + SIGNAL) to get the status
(Linux: man 7 signal , BSD: man signal ), few examples below:
130 - command terminated due to Ctrl-C being pressed, 130-128=2
(SIGINT)
Example:
$ cat
^C
$ echo $?
130
137 - if command is sent the KILL(9) signal (128+9), the exit
status of command otherwise
exit takes only integer args in the range 0 - 255.
Example:
$ sh -c 'exit 3.14159'; echo $?
sh: line 0: exit: 3.14159: numeric argument required
255
According to the above table, exit codes 1 - 2, 126 - 165, and 255 have special meanings,
and should therefore be avoided for user-specified exit parameters.
Please note that out of range exit values can result in unexpected exit codes (e.g. exit
3809 gives an exit code of 225, 3809 % 256 = 225).
You will have to look into the code/documentation. However the thing that comes closest to a
"standardization" is errno.h share improve this answer
follow answered Jan 22 '14 at 7:35 Thorsten Staerk 2,885 1 1 gold
badge 17 17 silver badges 25 25 bronze badges
PSkocik ,
thanks for pointing the header file.. tried looking into the documentation of a few utils..
hard time finding the exit codes, seems most will be the stderrs... – precise Jan 22 '14 at
9:13
What is the value of this utility in comparison with "environment variables" package. Is this reinvention of the wheel?
It allow "perdirectory" ,envrc file which contain specific for this directory env viruables. So it is simply load them and we can do
this in bash without instlling this new utilitiy with uncler vale.
Did the author knew about existence of "environment modules" when he wrote it ?
direnv
is a nifty open-source extension
for your shell on a UNIX operating system such as Linux and macOS. It is compiled into a single static executable and supports
shells such as
bash
,
zsh
,
tcsh
,
and
fish
.
The main
purpose of
direnv
is to allow for
project-specific environment variables without cluttering
~/.profile
or
related shell startup files. It implements a new way to load and unload environment variables depending on the current directory.
It is used
to load
12factor
apps (a methodology for
building software-as-a-service apps) environment variables, create per-project isolated development environments, and also load
secrets for deployment. Additionally, it can be used to build multi-version installation and management solutions similar to
rbenv
,
pyenv
,
and
phpenv
.
So How Does direnv Works?
Before the
shell loads a command prompt,
direnv
checks
for the existence of a
.envrc
file
in the current (which you can display using the
pwd
command
) and parent directory. The checking process is swift and can't be noticed on each prompt.
Once it
finds the
.envrc
file
with the appropriate permissions, it loads it into a bash sub-shell and it captures all exported variables and makes them
available to the current shell.
... ... ...
How to Use direnv in Linux Shell
To
demonstrate how
direnv
works, we will
create a new directory called
tecmint_projects
and
move into it.
$ mkdir ~/tecmint_projects
$ cd tecmint_projects/
Next, let's
create a new variable called
TEST_VARIABLE
on
the command line and when it is
echoed
,
the value should be empty:
$ echo $TEST_VARIABLE
Now we will
create a new
.envrc
file
that contains Bash code that will be loaded by
direnv
.
We also try to add the line "
export the
TEST_VARIABLE=tecmint
" in it using the
echo
command
and the output redirection character
(>)
:
$ echo export TEST_VARIABLE=tecmint > .envrc
By default,
the security mechanism blocks the loading of the
.envrc
file.
Since we know it a secure file, we need to approve its content by running the following command:
$ direnv allow .
Now that
the content of
.envrc
file
has been allowed to load, let's check the value of
TEST_VARIABLE
that
we set before:
$ echo $TEST_VARIABLE
When we
exit the
tecmint_project
directory,
the
direnv
will be unloaded and if we
check the value of
TEST_VARIABLE
once
more, it should be empty:
$ cd ..
$ echo $TEST_VARIABLE
Demonstration
of How direnv Works in Linux
Every time you move into the
tecmint_projects
directory,
the
.envrc
file
will be loaded as shown in the following screenshot:
$ cd tecmint_projects/
Loading
envrc File in a Directory
To revoke the authorization of a given
.envrc
,
use the
deny
command.
$ direnv deny . #in current directory
OR
$ direnv deny /path/to/.envrc
For more
information and usage instructions, see the
direnv
man
page:
$ man direnv
Additionally,
direnv
also uses a
stdlib
(
direnv-stdlib
)
comes with several functions that allow you to easily add new directories to your
PATH
and
do so much more.
In the first article
in this series, you created your first, very small, one-line Bash script and explored the
reasons for creating shell scripts. In the second article , you
began creating a fairly simple template that can be a starting point for other Bash programs
and began testing it. In the third article , you
created and used a simple Help function and learned about using functions and how to handle
command-line options such as -h .
This fourth and final article in the series gets into variables and initializing them as
well as how to do a bit of sanity testing to help ensure the program runs under the proper
conditions. Remember, the objective of this series is to build working code that will be used
for a template for future Bash programming projects. The idea is to make getting started on new
programming projects easy by having common elements already available in the
template.
Variables
The Bash shell, like all programming languages, can deal with variables. A variable is a
symbolic name that refers to a specific location in memory that contains a value of some sort.
The value of a variable is changeable, i.e., it is variable. If you are not familiar with using
variables, read my article How to program with
Bash: Syntax and tools before you go further.
Done? Great! Let's now look at some good practices when using variables.
I always set initial values for every variable used in my scripts. You can find this in
your template script immediately after the procedures as the first part of the main program
body, before it processes the options. Initializing each variable with an appropriate value can
prevent errors that might occur with uninitialized variables in comparison or math operations.
Placing this list of variables in one place allows you to see all of the variables that are
supposed to be in the script and their initial values.
Your little script has only a single variable, $option , so far. Set it by inserting the
following lines as
shown:
# Main program #
# Initialize variables
option = ""
# Process the input options. Add options as needed. #
Test this to ensure that everything works as it should and that nothing has broken as the
result of this change.
Constants
Constants are variables, too -- at least they should be. Use variables wherever possible in
command-line interface (CLI) programs instead of hard-coded values. Even if you think you will
use a particular value (such as a directory name, a file name, or a text string) just once,
create a variable and use it where you would have placed the hard-coded name.
For example, the message printed as part of the main body of the program is a string
literal, echo "Hello world!" . Change that to a variable. First, add the following statement to
the variable initialization section:
Msg="Hello world!"
And now change the last line of the program from:
echo "Hello world!"
to:
echo "$Msg"
Test the results.
Sanity checks
Sanity checks are simply tests for conditions that need to be true in order for the program
to work correctly, such as: the program must be run as the root user, or it must run on a
particular distribution and release of that distro. Add a check for root as the running
user in your simple program template.
Testing that the root user is running the program is easy because a program runs as the user
that launches it.
The id command can be used to determine the numeric user ID (UID) the program is running
under. It provides several bits of information when it is used without any options:
Add the following function to the program. I added it after the Help procedure, but you can
place it anywhere in the procedures section. The logic is that if the UID is not zero, which is
always the root user's UID, the program
exits:
################################################################################
# Check for root. #
################################################################################
CheckRoot ()
{
if [ ` id -u ` ! = 0 ]
then
echo "ERROR: You must be root user to run this program"
exit
fi
}
Now, add a call to the CheckRoot procedure just before the variable's initialization. Test
this, first running the program as the student user:
[ student @ testvm1 ~ ] $ . / hello
ERROR: You must be root user to run this program
[ student @ testvm1 ~ ] $
You may not always need this particular sanity test, so comment out the call to CheckRoot
but leave all the code in place in the template. This way, all you need to do to use that code
in a future program is to uncomment the call.
The code
After making the changes outlined above, your code should look like
this:
#!/usr/bin/bash
################################################################################
# scriptTemplate #
# #
# Use this template as the beginning of a new program. Place a short #
# description of the script here. #
# #
# Change History #
# 11/11/2019 David Both Original code. This is a template for creating #
# new Bash shell scripts. #
# Add new history entries as needed. #
# #
# #
################################################################################
################################################################################
################################################################################
# #
# Copyright (C) 2007, 2019 David Both #
# [email protected] #
# #
# This program is free software; you can redistribute it and/or modify #
# it under the terms of the GNU General Public License as published by #
# the Free Software Foundation; either version 2 of the License, or #
# (at your option) any later version. #
# #
# This program is distributed in the hope that it will be useful, #
# but WITHOUT ANY WARRANTY; without even the implied warranty of #
# MERCHANTABILITY or FITNESS FOR A PARTICULAR PURPOSE. See the #
# GNU General Public License for more details. #
# #
# You should have received a copy of the GNU General Public License #
# along with this program; if not, write to the Free Software #
# Foundation, Inc., 59 Temple Place, Suite 330, Boston, MA 02111-1307 USA #
# #
################################################################################
################################################################################
################################################################################
################################################################################
# Help #
################################################################################
Help ()
{
# Display Help
echo "Add description of the script functions here."
echo
echo "Syntax: scriptTemplate [-g|h|v|V]"
echo "options:"
echo "g Print the GPL license notification."
echo "h Print this Help."
echo "v Verbose mode."
echo "V Print software version and exit."
echo
}
################################################################################
# Check for root. #
################################################################################
CheckRoot ()
{
# If we are not running as root we exit the program
if [ ` id -u ` ! = 0 ]
then
echo "ERROR: You must be root user to run this program"
exit
fi
}
################################################################################
################################################################################
# Main program #
################################################################################
################################################################################
################################################################################
# Sanity checks #
################################################################################
# Are we rnning as root?
# CheckRoot
# Initialize variables
option = ""
Msg = "Hello world!"
################################################################################
# Process the input options. Add options as needed. #
################################################################################
# Get the options
while getopts ":h" option; do
case $option in
h ) # display Help
Help
exit ;;
\? ) # incorrect option
echo "Error: Invalid option"
exit ;;
esac
done
echo " $Msg " A final exercise
You probably noticed that the Help function in your code refers to features that are not in
the code. As a final exercise, figure out how to add those functions to the code template you
created.
Summary
In this article, you created a couple of functions to perform a sanity test for whether your
program is running as root. Your program is getting a little more complex, so testing is
becoming more important and requires more test paths to be complete.
This series looked at a very minimal Bash program and how to build a script up a bit at a
time. The result is a simple template that can be the starting point for other, more useful
Bash scripts and that contains useful elements that make it easy to start new scripts.
By now, you get the idea: Compiled programs are necessary and fill a very important need.
But for sysadmins, there is always a better way. Always use shell scripts to meet your job's
automation needs. Shell scripts are open; their content and purpose are knowable. They can be
readily modified to meet different requirements. I have never found anything that I need to do
in my sysadmin role that cannot be accomplished with a shell script.
What you have created so far in this series is just the beginning. As you write more Bash
programs, you will find more bits of code that you use frequently and should be included in
your program template.
In the first article
in this series, you created a very small, one-line Bash script and explored the reasons for
creating shell scripts and why they are the most efficient option for the system administrator,
rather than compiled programs.
In this second article, you will begin creating a Bash script template that can be used as a
starting point for other Bash scripts. The template will ultimately contain a Help facility, a
licensing statement, a number of simple functions, and some logic to deal with those options
and others that might be needed for the scripts that will be based on this template.
Like automation in general, the idea behind creating a template is to be the " lazy sysadmin ." A
template contains the basic components that you want in all of your scripts. It saves time
compared to adding those components to every new script and makes it easy to start a new
script.
Although it can be tempting to just throw a few command-line Bash statements together into a
file and make it executable, that can be counterproductive in the long run. A well-written and
well-commented Bash program with a Help facility and the capability to accept command-line
options provides a good starting point for sysadmins who maintain the program, which includes
the programs that you write and maintain.
The requirements
You should always create a set of requirements for every project you do. This includes
scripts, even if it is a simple list with only two or three items on it. I have been involved
in many projects that either failed completely or failed to meet the customer's needs, usually
due to the lack of a requirements statement or a poorly written one.
The requirements for this Bash template are pretty simple:
Create a template that can be used as the starting point for future Bash programming
projects.
The template should follow standard Bash programming practices.
It must include:
A heading section that can be used to describe the function of the program and a
changelog
A licensing statement
A section for functions
A Help function
A function to test whether the program user is root
A method for evaluating command-line options
The basic structure
A basic Bash script has three sections. Bash has no way to delineate sections, but the
boundaries between the sections are implicit.
All scripts must begin with the shebang ( #! ), and this must be the first line in any
Bash program.
The functions section must begin after the shebang and before the body of the program. As
part of my need to document everything, I place a comment before each function with a short
description of what it is intended to do. I also include comments inside the functions to
elaborate further. Short, simple programs may not need functions.
The main part of the program comes after the function section. This can be a single Bash
statement or thousands of lines of code. One of my programs has a little over 200 lines of
code, not counting comments. That same program has more than 600 comment lines.
That is all there is -- just three sections in the structure of any Bash
program.
Leading comments
I always add more than this for various reasons. First, I add a couple of sections of
comments immediately after the shebang. These comment sections are optional, but I find them
very helpful.
The first comment section is the program name and description and a change history. I
learned this format while working at IBM, and it provides a method of documenting the long-term
development of the program and any fixes applied to it. This is an important start in
documenting your program.
The second comment section is a copyright and license statement. I use GPLv2, and this seems
to be a standard statement for programs licensed under GPLv2. If you use a different open
source license, that is fine, but I suggest adding an explicit statement to the code to
eliminate any possible confusion about licensing. Scott Peterson's article The source code is the
license helps explain the reasoning behind this.
So now the script looks like this:
#!/bin/bash
################################################################################
# scriptTemplate #
# #
# Use this template as the beginning of a new program. Place a short #
# description of the script here. #
# #
# Change History #
# 11/11/2019 David Both Original code. This is a template for creating #
# new Bash shell scripts. #
# Add new history entries as needed. #
# #
# #
################################################################################
################################################################################
################################################################################
# #
# Copyright (C) 2007, 2019 David Both #
# [email protected] #
# #
# This program is free software; you can redistribute it and/or modify #
# it under the terms of the GNU General Public License as published by #
# the Free Software Foundation; either version 2 of the License, or #
# (at your option) any later version. #
# #
# This program is distributed in the hope that it will be useful, #
# but WITHOUT ANY WARRANTY; without even the implied warranty of #
# MERCHANTABILITY or FITNESS FOR A PARTICULAR PURPOSE. See the #
# GNU General Public License for more details. #
# #
# You should have received a copy of the GNU General Public License #
# along with this program; if not, write to the Free Software #
# Foundation, Inc., 59 Temple Place, Suite 330, Boston, MA 02111-1307 USA #
# #
################################################################################
################################################################################
################################################################################
echo "hello world!"
Run the revised program to verify that it still works as expected.
About testing
Now is a good time to talk about testing.
" There is always one more bug."
-- Lubarsky's Law of Cybernetic Entomology
Lubarsky -- whoever that might be -- is correct. You can never find all the bugs in your
code. For every bug I find, there always seems to be another that crops up, usually at a very
inopportune time.
Testing is not just about programs. It is also about verification that problems -- whether
caused by hardware, software, or the seemingly endless ways users can find to break things --
that are supposed to be resolved actually are. Just as important, testing is also about
ensuring that the code is easy to use and the interface makes sense to the user.
Following a well-defined process when writing and testing shell scripts can contribute to
consistent and high-quality results. My process is simple:
Create a simple test plan.
Start testing right at the beginning of development.
Perform a final test when the code is complete.
Move to production and test more.
The test plan
There are lots of different formats for test plans. I have worked with the full range --
from having it all in my head; to a few notes jotted down on a sheet of paper; and all the way
to a complex set of forms that require a full description of each test, which functional code
it would test, what the test would accomplish, and what the inputs and results should be.
Speaking as a sysadmin who has been (but is not now) a tester, I try to take the middle
ground. Having at least a short written test plan will ensure consistency from one test run to
the next. How much detail you need depends upon how formal your development and test functions
are.
The sample test plan documents I found using Google were complex and intended for large
organizations with very formal development and test processes. Although those test plans would
be good for people with "test" in their job title, they do not apply well to sysadmins' more
chaotic and time-dependent working conditions. As in most other aspects of the job, sysadmins
need to be creative. So here is a short list of things to consider including in your test plan.
Modify it to suit your needs:
The name and a short description of the software being tested
A description of the software features to be tested
The starting conditions for each test
The functions to follow for each test
A description of the desired outcome for each test
Specific tests designed to test for negative outcomes
Tests for how the program handles unexpected inputs
A clear description of what constitutes pass or fail for each test
Fuzzy testing, which is described below
This list should give you some ideas for creating your test plans. Most sysadmins should
keep it simple and fairly informal.
Test early -- test often
I always start testing my shell scripts as soon as I complete the first portion that is
executable. This is true whether I am writing a short command-line program or a script that is
an executable file.
I usually start creating new programs with the shell script template. I write the code for
the Help function and test it. This is usually a trivial part of the process, but it helps me
get started and ensures that things in the template are working properly at the outset. At this
point, it is easy to fix problems with the template portions of the script or to modify it to
meet needs that the standard template does not.
Once the template and Help function are working, I move on to creating the body of the
program by adding comments to document the programming steps required to meet the program
specifications. Now I start adding code to meet the requirements stated in each comment. This
code will probably require adding variables that are initialized in that section of the
template -- which is now becoming a shell script.
This is where testing is more than just entering data and verifying the results. It takes a
bit of extra work. Sometimes I add a command that simply prints the intermediate result of the
code I just wrote and verify that. For more complex scripts, I add a -t option for "test mode."
In this case, the internal test code executes only when the -t option is entered on the command
line.
Final testing
After the code is complete, I go back to do a complete test of all the features and
functions using known inputs to produce specific outputs. I also test some random inputs to see
if the program can handle unexpected input.
Final testing is intended to verify that the program is functioning essentially as intended.
A large part of the final test is to ensure that functions that worked earlier in the
development cycle have not been broken by code that was added or changed later in the
cycle.
If you have been testing the script as you add new code to it, you may think there should
not be any surprises during the final test. Wrong! There are always surprises during final
testing. Always. Expect those surprises, and be ready to spend time fixing them. If there were
never any bugs discovered during final testing, there would be no point in doing a final test,
would there?
Testing in production
Huh -- what?
"Not until a program has been in production for at least six months will the most harmful
error be discovered."
-- Troutman's Programming Postulates
Yes, testing in production is now considered normal and desirable. Having been a tester
myself, this seems reasonable. "But wait! That's dangerous," you say. My experience is that it
is no more dangerous than extensive and rigorous testing in a dedicated test environment. In
some cases, there is no choice because there is no test environment -- only production.
Sysadmins are no strangers to the need to test new or revised scripts in production. Anytime
a script is moved into production, that becomes the ultimate test. The production environment
constitutes the most critical part of that test. Nothing that testers can dream up in a test
environment can fully replicate the true production environment.
The allegedly new practice of testing in production is just the recognition of what
sysadmins have known all along. The best test is production -- so long as it is not the only
test.
Fuzzy testing
This is another of those buzzwords that initially caused me to roll my eyes. Its essential
meaning is simple: have someone bang on the keys until something happens, and see how well the
program handles it. But there really is more to it than that.
Fuzzy testing is a bit like the time my son broke the code for a game in less than a minute
with random input. That pretty much ended my attempts to write games for him.
Most test plans utilize very specific input that generates a specific result or output.
Regardless of whether the test defines a positive or negative outcome as a success, it is still
controlled, and the inputs and results are specified and expected, such as a specific error
message for a specific failure mode.
Fuzzy testing is about dealing with randomness in all aspects of the test, such as starting
conditions, very random and unexpected input, random combinations of options selected, low
memory, high levels of CPU contending with other programs, multiple instances of the program
under test, and any other random conditions that you can think of to apply to the tests.
I try to do some fuzzy testing from the beginning. If the Bash script cannot deal with
significant randomness in its very early stages, then it is unlikely to get better as you add
more code. This is a good time to catch these problems and fix them while the code is
relatively simple. A bit of fuzzy testing at each stage is also useful in locating problems
before they get masked by even more code.
After the code is completed, I like to do some more extensive fuzzy testing. Always do some
fuzzy testing. I have certainly been surprised by some of the results. It is easy to test for
the expected things, but users do not usually do the expected things with a
script.
Previews of coming attractions
This article accomplished a little in the way of creating a template, but it mostly talked
about testing. This is because testing is a critical part of creating any kind of program. In
the next article in this series, you will add a basic Help function along with some code to
detect and act on options, such as -h , to your Bash script template.
Software developers writing applications in languages such as Java, Ruby, and Python have
sophisticated libraries to help them maintain their software's integrity over time. They create
tests that run applications through a series of executions in structured environments to ensure
all of their software's aspects work as expected.
These tests are even more powerful when they're automated in a continuous integration (CI)
system, where every push to the source repository causes the tests to run, and developers are
immediately notified when tests fail. This fast feedback increases developers' confidence in
the functional integrity of their applications.
The Bash Automated Testing System ( BATS ) enables developers writing Bash scripts and
libraries to apply the same practices used by Java, Ruby, Python, and other developers to their
Bash code.
Installing BATS
The BATS GitHub page includes installation instructions. There are two BATS helper libraries
that provide more powerful assertions or allow overrides to the Test Anything Protocol (
TAP ) output format used by BATS. These
can be installed in a standard location and sourced by all scripts. It may be more convenient
to include a complete version of BATS and its helper libraries in the Git repository for each
set of scripts or libraries being tested. This can be accomplished using the git submodule system.
The following commands will install BATS and its helper libraries into the test directory in
a Git repository.
To clone a Git repository and install its submodules at the same time, use the
--recurse-submodules flag to git clone .
Each BATS test script must be executed by the bats executable. If you installed BATS into
your source code repo's test/libs directory, you can invoke the test with:
./test/libs/bats/bin/bats <path to test script>
Alternatively, add the following to the beginning of each of your BATS test
scripts:
and chmod +x <path to test script> . This will a) make them executable with the BATS
installed in ./test/libs/bats and b) include these helper libraries. BATS test scripts are
typically stored in the test directory and named for the script being tested, but with the
.bats extension. For example, a BATS script that tests bin/build should be called
test/build.bats .
You can also run an entire set of BATS test files by passing a regular expression to BATS,
e.g., ./test/lib/bats/bin/bats test/*.bats .
Organizing libraries and scripts for BATS
coverage
Bash scripts and libraries must be organized in a way that efficiently exposes their inner
workings to BATS. In general, library functions and shell scripts that run many commands when
they are called or executed are not amenable to efficient BATS testing.
For example, build.sh is a typical script
that many people write. It is essentially a big pile of code. Some might even put this pile of
code in a function in a library. But it's impossible to run a big pile of code in a BATS test
and cover all possible types of failures it can encounter in separate test cases. The only way
to test this pile of code with sufficient coverage is to break it into many small, reusable,
and, most importantly, independently testable functions.
It's straightforward to add more functions to a library. An added benefit is that some of
these functions can become surprisingly useful in their own right. Once you have broken your
library function into lots of smaller functions, you can source the library in your BATS test
and run the functions as you would any other command to test them.
Bash scripts must also be broken down into multiple functions, which the main part of the
script should call when the script is executed. In addition, there is a very useful trick to
make it much easier to test Bash scripts with BATS: Take all the code that is executed in the
main part of the script and move it into a function, called something like run_main . Then, add
the following to the end of the script:
if [[ " ${BASH_SOURCE[0]} " == " ${0} " ]]
then
run_main
fi
This bit of extra code does something special. It makes the script behave differently when
it is executed as a script than when it is brought into the environment with source . This
trick enables the script to be tested the same way a library is tested, by sourcing it and
testing the individual functions. For example, here is build.sh refactored for better
BATS testability .
Writing and running tests
As mentioned above, BATS is a TAP-compliant testing framework with a syntax and output that
will be familiar to those who have used other TAP-compliant testing suites, such as JUnit,
RSpec, or Jest. Its tests are organized into individual test scripts. Test scripts are
organized into one or more descriptive @test blocks that describe the unit of the application
being tested. Each @test block will run a series of commands that prepares the test
environment, runs the command to be tested, and makes assertions about the exit and output of
the tested command. Many assertion functions are imported with the bats , bats-assert , and
bats-support libraries, which are loaded into the environment at the beginning of the BATS test
script. Here is a typical BATS test block:
@ test "requires CI_COMMIT_REF_SLUG environment
variable" {
unset CI_COMMIT_REF_SLUG
assert_empty " ${CI_COMMIT_REF_SLUG} "
run some_command
assert_failure
assert_output --partial "CI_COMMIT_REF_SLUG"
}
If a BATS script includes setup and/or teardown functions, they are automatically executed
by BATS before and after each test block runs. This makes it possible to create environment
variables, test files, and do other things needed by one or all tests, then tear them down
after each test runs. Build.bats is a full
BATS test of our newly formatted build.sh script. (The mock_docker command in this test will be
explained below, in the section on mocking/stubbing.)
When the test script runs, BATS uses exec to run each @test block as a separate subprocess.
This makes it possible to export environment variables and even functions in one @test without
affecting other @test s or polluting your current shell session. The output of a test run is a
standard format that can be understood by humans and parsed or manipulated programmatically by
TAP consumers. Here is an example of the output for the CI_COMMIT_REF_SLUG test block when it
fails:
✗ requires CI_COMMIT_REF_SLUG environment variable
( from function ` assert_output ' in file test/libs/bats-assert/src/assert.bash, line 231,
in test file test/ci_deploy.bats, line 26)
`assert_output --partial "CI_COMMIT_REF_SLUG"' failed
-- output does not contain substring --
substring ( 1 lines ) :
CI_COMMIT_REF_SLUG
output ( 3 lines ) :
. / bin / deploy.sh: join_string_by: command not found
oc error
Could not login
--
Like any shell script or library, BATS test scripts can include helper libraries to share
common code across tests or enhance their capabilities. These helper libraries, such as
bats-assert and bats-support , can even be tested with BATS.
Libraries can be placed in the same test directory as the BATS scripts or in the test/libs
directory if the number of files in the test directory gets unwieldy. BATS provides the load
function that takes a path to a Bash file relative to the script being tested (e.g., test , in
our case) and sources that file. Files must end with the prefix .bash , but the path to the
file passed to the load function can't include the prefix. build.bats loads the bats-assert and
bats-support libraries, a small helpers.bash library,
and a docker_mock.bash library (described below) with the following code placed at the
beginning of the test script below the interpreter magic line:
load
'libs/bats-support/load'
load 'libs/bats-assert/load'
load 'helpers'
load 'docker_mock' Stubbing test input and mocking external calls
The majority of Bash scripts and libraries execute functions and/or executables when they
run. Often they are programmed to behave in specific ways based on the exit status or output (
stdout , stderr ) of these functions or executables. To properly test these scripts, it is
often necessary to make fake versions of these commands that are designed to behave in a
specific way during a specific test, a process called "stubbing." It may also be necessary to
spy on the program being tested to ensure it calls a specific command, or it calls a specific
command with specific arguments, a process called "mocking." For more on this, check out this
great discussion of mocking and
stubbing in Ruby RSpec, which applies to any testing system.
The Bash shell provides tricks that can be used in your BATS test scripts to do mocking and
stubbing. All require the use of the Bash export command with the -f flag to export a function
that overrides the original function or executable. This must be done before the tested program
is executed. Here is a simple example that overrides the cat executable:
function cat () {
echo "THIS WOULD CAT ${*} " }
export -f cat
This method overrides a function in the same manner. If a test needs to override a function
within the script or library being tested, it is important to source the tested script or
library before the function is stubbed or mocked. Otherwise, the stub/mock will be replaced
with the actual function when the script is sourced. Also, make sure to stub/mock before you
run the command you're testing. Here is an example from build.bats that mocks the raise
function described in build.sh to ensure a specific error message is raised by the login
fuction:
@ test ".login raises on oc error" {
source ${profile_script}
function raise () { echo " ${1} raised" ; }
export -f raise
run login
assert_failure
assert_output -p "Could not login raised"
}
Normally, it is not necessary to unset a stub/mock function after the test, since export
only affects the current subprocess during the exec of the current @test block. However, it is
possible to mock/stub commands (e.g. cat , sed , etc.) that the BATS assert * functions use
internally. These mock/stub functions must be unset before these assert commands are run, or
they will not work properly. Here is an example from build.bats that mocks sed , runs the
build_deployable function, and unsets sed before running any assertions:
@ test
".build_deployable prints information, runs docker build on a modified Dockerfile.production
and publish_image when its not a dry_run" {
local expected_dockerfile = 'Dockerfile.production'
local application = 'application'
local environment = 'environment'
local expected_original_base_image = " ${application} "
local expected_candidate_image = " ${application} -candidate: ${environment} "
local expected_deployable_image = " ${application} : ${environment} "
source ${profile_script}
mock_docker build --build-arg OAUTH_CLIENT_ID --build-arg OAUTH_REDIRECT --build-arg
DDS_API_BASE_URL -t " ${expected_deployable_image} " -
function publish_image () { echo "publish_image ${*} " ; }
export -f publish_image
function sed () {
echo "sed ${*} " >& 2 ;
echo "FROM application-candidate:environment" ;
}
export -f sed
run build_deployable " ${application} " " ${environment} "
assert_success
unset sed
assert_output --regexp "sed.* ${expected_dockerfile} "
assert_output -p "Building ${expected_original_base_image} deployable
${expected_deployable_image} FROM ${expected_candidate_image} "
assert_output -p "FROM ${expected_candidate_image} piped"
assert_output -p "build --build-arg OAUTH_CLIENT_ID --build-arg OAUTH_REDIRECT --build-arg
DDS_API_BASE_URL -t ${expected_deployable_image} -"
assert_output -p "publish_image ${expected_deployable_image} "
}
Sometimes the same command, e.g. foo, will be invoked multiple times, with different
arguments, in the same function being tested. These situations require the creation of a set of
functions:
mock_foo: takes expected arguments as input, and persists these to a TMP file
foo: the mocked version of the command, which processes each call with the persisted list
of expected arguments. This must be exported with export -f.
cleanup_foo: removes the TMP file, for use in teardown functions. This can test to ensure
that a @test block was successful before removing.
Since this functionality is often reused in different tests, it makes sense to create a
helper library that can be loaded like other libraries.
A good example is docker_mock.bash
. It is loaded into build.bats and used in any test block that tests a function that calls the
Docker executable. A typical test block using docker_mock looks like:
@ test ".publish_image
fails if docker push fails" {
setup_publish
local expected_image = "image"
local expected_publishable_image = " ${CI_REGISTRY_IMAGE} / ${expected_image} "
source ${profile_script}
mock_docker tag " ${expected_image} " " ${expected_publishable_image} "
mock_docker push " ${expected_publishable_image} " and_fail
run publish_image " ${expected_image} "
assert_failure
assert_output -p "tagging ${expected_image} as ${expected_publishable_image} "
assert_output -p "tag ${expected_image} ${expected_publishable_image} "
assert_output -p "pushing image to gitlab registry"
assert_output -p "push ${expected_publishable_image} "
}
This test sets up an expectation that Docker will be called twice with different arguments.
With the second call to Docker failing, it runs the tested command, then tests the exit status
and expected calls to Docker.
One aspect of BATS introduced by mock_docker.bash is the ${BATS_TMPDIR} environment
variable, which BATS sets at the beginning to allow tests and helpers to create and destroy TMP
files in a standard location. The mock_docker.bash library will not delete its persisted mocks
file if a test fails, but it will print where it is located so it can be viewed and deleted.
You may need to periodically clean old mock files out of this directory.
One note of caution regarding mocking/stubbing: The build.bats test consciously violates a
dictum of testing that states: Don't
mock what you don't own! This dictum demands that calls to commands that the test's
developer didn't write, like docker , cat , sed , etc., should be wrapped in their own
libraries, which should be mocked in tests of scripts that use them. The wrapper libraries
should then be tested without mocking the external commands.
This is good advice and ignoring it comes with a cost. If the Docker CLI API changes, the
test scripts will not detect this change, resulting in a false positive that won't manifest
until the tested build.sh script runs in a production setting with the new version of Docker.
Test developers must decide how stringently they want to adhere to this standard, but they
should understand the tradeoffs involved with their decision.
Conclusion
Introducing a testing regime to any software development project creates a tradeoff between
a) the increase in time and organization required to develop and maintain code and tests and b)
the increased confidence developers have in the integrity of the application over its lifetime.
Testing regimes may not be appropriate for all scripts and libraries.
In general, scripts and libraries that meet one or more of the following should be tested
with BATS:
They are worthy of being stored in source control
They are used in critical processes and relied upon to run consistently for a long period
of time
They need to be modified periodically to add/remove/modify their function
They are used by others
Once the decision is made to apply a testing discipline to one or more Bash scripts or
libraries, BATS provides the comprehensive testing features that are available in other
software development environments.
Acknowledgment: I am indebted to Darrin Mann for introducing me to BATS testing.
How to add a Help facility to your Bash programIn the third article in this
series, learn about using functions as you create a simple Help facility for your Bash
script. 20 Dec 2019 David Both
(Correspondent) Feed 53
up Image by : Opensource.com x Subscribe now
In the first article
in this series, you created a very small, one-line Bash script and explored the reasons for
creating shell scripts and why they are the most efficient option for the system administrator,
rather than compiled programs. In the second article , you
began the task of creating a fairly simple template that you can use as a starting point for
other Bash programs, then explored ways to test it.
This third of the four articles in this series explains how to create and use a simple Help
function. While creating your Help facility, you will also learn about using functions and how
to handle command-line options such as -h .
Even fairly simple Bash programs should have some sort of Help facility, even if it is
fairly rudimentary. Many of the Bash shell programs I write are used so infrequently that I
forget the exact syntax of the command I need. Others are so complex that I need to review the
options and arguments even when I use them frequently.
Having a built-in Help function allows you to view those things without having to inspect
the code itself. A good and complete Help facility is also a part of program
documentation.
About functions
Shell functions are lists of Bash program statements that are stored in the shell's
environment and can be executed, like any other command, by typing their name at the command
line. Shell functions may also be known as procedures or subroutines, depending upon which
other programming language you are using.
Functions are called in scripts or from the command-line interface (CLI) by using their
names, just as you would for any other command. In a CLI program or a script, the commands in
the function execute when they are called, then the program flow sequence returns to the
calling entity, and the next series of program statements in that entity executes.
The syntax of a function is:
FunctionName(){program statements}
Explore this by creating a simple function at the CLI. (The function is stored in the shell
environment for the shell instance in which it is created.) You are going to create a function
called hw , which stands for "hello world." Enter the following code at the CLI and press Enter
. Then enter hw as you would any other shell command:
OK, so I am a little tired of the standard "Hello world" starter. Now, list all of the
currently defined functions. There are a lot of them, so I am showing just the new hw function.
When it is called from the command line or within a program, a function performs its programmed
task and then exits and returns control to the calling entity, the command line, or the next
Bash program statement in a script after the calling statement:
Remove that function because you do not need it anymore. You can do that with the unset
command:
[ student @ testvm1 ~ ] $ unset -f hw ; hw
bash: hw: command not found
[ student @ testvm1 ~ ] $ Creating the Help function
Open the hello program in an editor and add the Help function below to the hello program
code after the copyright statement but before the echo "Hello world!" statement. This Help
function will display a short description of the program, a syntax diagram, and short
descriptions of the available options. Add a call to the Help function to test it and some
comment lines that provide a visual demarcation between the functions and the main portion of
the
program:
################################################################################
# Help #
################################################################################
Help ()
{
# Display Help
echo "Add description of the script functions here."
echo
echo "Syntax: scriptTemplate [-g|h|v|V]"
echo "options:"
echo "g Print the GPL license notification."
echo "h Print this Help."
echo "v Verbose mode."
echo "V Print software version and exit."
echo
}
################################################################################
################################################################################
# Main program #
################################################################################
################################################################################
Help
echo "Hello world!"
The options described in this Help function are typical for the programs I write, although
none are in the code yet. Run the program to test it:
[ student @ testvm1 ~ ] $ . /
hello
Add description of the script functions here.
Syntax: scriptTemplate [ -g | h | v | V ]
options:
g Print the GPL license notification.
h Print this Help.
v Verbose mode.
V Print software version and exit.
Hello world !
[ student @ testvm1 ~ ] $
Because you have not added any logic to display Help only when you need it, the program will
always display the Help. Since the function is working correctly, read on to add some logic to
display the Help only when the -h option is used when you invoke the program at the command
line.
Handling options
A Bash script's ability to handle command-line options such as -h gives some powerful
capabilities to direct the program and modify what it does. In the case of the -h option, you
want the program to print the Help text to the terminal session and then quit without running
the rest of the program. The ability to process options entered at the command line can be
added to the Bash script using the while command (see How to program with Bash:
Loops to learn more about while ) in conjunction with the getops and case commands.
The getops command reads any and all options specified at the command line and creates a
list of those options. In the code below, the while command loops through the list of options
by setting the variable $options for each. The case statement is used to evaluate each option
in turn and execute the statements in the corresponding stanza. The while statement will
continue to evaluate the list of options until they have all been processed or it encounters an
exit statement, which terminates the program.
Be sure to delete the Help function call just before the echo "Hello world!" statement so
that the main body of the program now looks like
this:
################################################################################
################################################################################
# Main program #
################################################################################
################################################################################
################################################################################
# Process the input options. Add options as needed. #
################################################################################
# Get the options
while getopts ":h" option; do
case $option in
h ) # display Help
Help
exit ;;
esac
done
echo "Hello world!"
Notice the double semicolon at the end of the exit statement in the case option for -h .
This is required for each option added to this case statement to delineate the end of each
option.
Testing
Testing is now a little more complex. You need to test your program with a number of
different options -- and no options -- to see how it responds. First, test with no options to
ensure that it prints "Hello world!" as it should:
[ student @ testvm1 ~ ] $ . / hello
Hello world !
That works, so now test the logic that displays the Help text:
[ student @ testvm1 ~ ] $
. / hello -h
Add description of the script functions here.
Syntax: scriptTemplate [ -g | h | t | v | V ]
options:
g Print the GPL license notification.
h Print this Help.
v Verbose mode.
V Print software version and exit.
That works as expected, so try some testing to see what happens when you enter some
unexpected options:
Syntax: scriptTemplate [ -g | h | t | v | V ]
options:
g Print the GPL license notification.
h Print this Help.
v Verbose mode.
V Print software version and exit.
[ student @ testvm1 ~ ] $
The program just ignores any options without specific responses without generating any
errors. But notice the last entry (with -lkjsahdf for options): because there is an h in the
list of options, the program recognizes it and prints the Help text. This testing has shown
that the program doesn't have the ability to handle incorrect input and terminate the program
if any is detected.
You can add another case stanza to the case statement to match any option that doesn't have
an explicit match. This general case will match anything you have not provided a specific match
for. The case statement now looks like this, with the catch-all match of \? as the last case.
Any additional specific cases must precede this final one:
while getopts ":h" option; do
case $option in
h ) # display Help
Help
exit ;;
\? ) # incorrect option
echo "Error: Invalid option"
exit ;;
esac
done
Test the program again using the same options as before and see how it works
now.
Where you are
You have accomplished a good amount in this article by adding the capability to process
command-line options and a Help procedure. Your Bash script now looks like
this:
#!/usr/bin/bash
################################################################################
# scriptTemplate #
# #
# Use this template as the beginning of a new program. Place a short #
# description of the script here. #
# #
# Change History #
# 11/11/2019 David Both Original code. This is a template for creating #
# new Bash shell scripts. #
# Add new history entries as needed. #
# #
# #
################################################################################
################################################################################
################################################################################
# #
# Copyright (C) 2007, 2019 David Both #
# [email protected] #
# #
# This program is free software; you can redistribute it and/or modify #
# it under the terms of the GNU General Public License as published by #
# the Free Software Foundation; either version 2 of the License, or #
# (at your option) any later version. #
# #
# This program is distributed in the hope that it will be useful, #
# but WITHOUT ANY WARRANTY; without even the implied warranty of #
# MERCHANTABILITY or FITNESS FOR A PARTICULAR PURPOSE. See the #
# GNU General Public License for more details. #
# #
# You should have received a copy of the GNU General Public License #
# along with this program; if not, write to the Free Software #
# Foundation, Inc., 59 Temple Place, Suite 330, Boston, MA 02111-1307 USA #
# #
################################################################################
################################################################################
################################################################################
################################################################################
# Help #
################################################################################
Help ()
{
# Display Help
echo "Add description of the script functions here."
echo
echo "Syntax: scriptTemplate [-g|h|t|v|V]"
echo "options:"
echo "g Print the GPL license notification."
echo "h Print this Help."
echo "v Verbose mode."
echo "V Print software version and exit."
echo
}
################################################################################
################################################################################
# Main program #
################################################################################
################################################################################
################################################################################
# Process the input options. Add options as needed. #
################################################################################
# Get the options
while getopts ":h" option; do
case $option in
h ) # display Help
Help
exit ;;
\? ) # incorrect option
echo "Error: Invalid option"
exit ;;
esac
done
echo "Hello world!"
Be sure to test this version of the program very thoroughly. Use random inputs and see what
happens. You should also try testing valid and invalid options without using the dash ( - ) in
front.
Next time
In this article, you added a Help function as well as the ability to process command-line
options to display it selectively. The program is getting a little more complex, so testing is
becoming more important and requires more test paths in order to be complete.
The next article will look at initializing variables and doing a bit of sanity checking to
ensure that the program will run under the correct set of conditions.
Navigating the Bash shell with pushd and popdPushd and popd are the fastest
navigational commands you've never heard of. 07 Aug 2019 Seth Kenlon (Red Hat) Feed 71
up 7 comments Image by : Opensource.com x Subscribe now
The pushd and popd commands are built-in features of the Bash shell to help you "bookmark"
directories for quick navigation between locations on your hard drive. You might already feel
that the terminal is an impossibly fast way to navigate your computer; in just a few key
presses, you can go anywhere on your hard drive, attached storage, or network share. But that
speed can break down when you find yourself going back and forth between directories, or when
you get "lost" within your filesystem. Those are precisely the problems pushd and popd can help
you solve.
pushd
At its most basic, pushd is a lot like cd . It takes you from one directory to another.
Assume you have a directory called one , which contains a subdirectory called two , which
contains a subdirectory called three , and so on. If your current working directory is one ,
then you can move to two or three or anywhere with the cd command:
$ pwd
one
$ cd two / three
$ pwd
three
You can do the same with pushd :
$ pwd
one
$ pushd two / three
~ / one / two / three ~ / one
$ pwd
three
The end result of pushd is the same as cd , but there's an additional intermediate result:
pushd echos your destination directory and your point of origin. This is your directory
stack , and it is what makes pushd unique.
Stacks
A stack, in computer terminology, refers to a collection of elements. In the context of this
command, the elements are directories you have recently visited by using the pushd command. You
can think of it as a history or a breadcrumb trail.
You can move all over your filesystem with pushd ; each time, your previous and new
locations are added to the stack:
$ pushd four
~ / one / two / three / four ~ / one / two / three ~ / one
$ pushd five
~ / one / two / three / four / five ~ / one / two / three / four ~ / one / two / three ~ / one
Navigating the stack
Once you've built up a stack, you can use it as a collection of bookmarks or fast-travel
waypoints. For instance, assume that during a session you're doing a lot of work within the
~/one/two/three/four/five directory structure of this example. You know you've been to one
recently, but you can't remember where it's located in your pushd stack. You can view your
stack with the +0 (that's a plus sign followed by a zero) argument, which tells pushd not to
change to any directory in your stack, but also prompts pushd to echo your current stack:
$
pushd + 0
~ / one / two / three / four ~ / one / two / three ~ / one ~ / one / two / three / four / five
Alternatively, you can view the stack with the dirs command, and you can see the index
number for each directory by using the -v option:
$ dirs -v
0 ~ / one / two / three / four
1 ~ / one / two / three
2 ~ / one
3 ~ / one / two / three / four / five
The first entry in your stack is your current location. You can confirm that with pwd as
usual:
$ pwd
~ / one / two / three / four
Starting at 0 (your current location and the first entry of your stack), the second
element in your stack is ~/one , which is your desired destination. You can move forward in
your stack using the +2 option:
$ pushd + 2
~ / one ~ / one / two / three / four / five ~ / one / two / three / four ~ / one / two /
three
$ pwd
~ / one
This changes your working directory to ~/one and also has shifted the stack so that your new
location is at the front.
You can also move backward in your stack. For instance, to quickly get to ~/one/two/three
given the example output, you can move back by one, keeping in mind that pushd starts with
0:
$ pushd -0
~ / one / two / three ~ / one ~ / one / two / three / four / five ~ / one / two / three / four
Adding to the stack
You can continue to navigate your stack in this way, and it will remain a static listing of
your recently visited directories. If you want to add a directory, just provide the directory's
path. If a directory is new to the stack, it's added to the list just as you'd expect:
$
pushd / tmp
/ tmp ~ / one / two / three ~ / one ~ / one / two / three / four / five ~ / one / two / three /
four
But if it already exists in the stack, it's added a second time:
$ pushd ~ / one
~ / one / tmp ~ / one / two / three ~ / one ~ / one / two / three / four / five ~ / one / two /
three / four
While the stack is often used as a list of directories you want quick access to, it is
really a true history of where you've been. If you don't want a directory added redundantly to
the stack, you must use the +N and -N notation.
Removing directories from the stack
Your stack is, obviously, not immutable. You can add to it with pushd or remove items from
it with popd .
For instance, assume you have just used pushd to add ~/one to your stack, making ~/one your
current working directory. To remove the first (or "zeroeth," if you prefer) element:
$
pwd
~ / one
$ popd + 0
/ tmp ~ / one / two / three ~ / one ~ / one / two / three / four / five ~ / one / two / three /
four
$ pwd
~ / one
Of course, you can remove any element, starting your count at 0:
$ pwd ~ / one
$ popd + 2
/ tmp ~ / one / two / three ~ / one / two / three / four / five ~ / one / two / three /
four
$ pwd ~ / one
You can also use popd from the back of your stack, again starting with 0. For example, to
remove the final directory from your stack:
$ popd -0
/ tmp ~ / one / two / three ~ / one / two / three / four / five
When used like this, popd does not change your working directory. It only manipulates your
stack.
Navigating with popd
The default behavior of popd , given no arguments, is to remove the first (zeroeth) item
from your stack and make the next item your current working directory.
This is most useful as a quick-change command, when you are, for instance, working in two
different directories and just need to duck away for a moment to some other location. You don't
have to think about your directory stack if you don't need an elaborate history:
$ pwd
~ / one
$ pushd ~ / one / two / three / four / five
$ popd
$ pwd
~ / one
You're also not required to use pushd and popd in rapid succession. If you use pushd to
visit a different location, then get distracted for three hours chasing down a bug or doing
research, you'll find your directory stack patiently waiting (unless you've ended your terminal
session):
$ pwd ~ / one
$ pushd / tmp
$ cd { / etc, / var, / usr } ; sleep 2001
[ ... ]
$ popd
$ pwd
~ / one Pushd and popd in the real world
The pushd and popd commands are surprisingly useful. Once you learn them, you'll find
excuses to put them to good use, and you'll get familiar with the concept of the directory
stack. Getting comfortable with pushd was what helped me understand git stash , which is
entirely unrelated to pushd but similar in conceptual intangibility.
Using pushd and popd in shell scripts can be tempting, but generally, it's probably best to
avoid them. They aren't portable outside of Bash and Zsh, and they can be obtuse when you're
re-reading a script ( pushd +3 is less clear than cd $HOME/$DIR/$TMP or similar).
Thank you for the write up for pushd and popd. I gotta remember to use these when I'm
jumping around directories a lot. I got a hung up on a pushd example because my development
work using arrays differentiates between the index and the count. In my experience, a
zero-based array of A, B, C; C has an index of 2 and also is the third element. C would not
be considered the second element cause that would be confusing it's index and it's count.
Interesting point, Matt. The difference between count and index had not occurred to me,
but I'll try to internalise it. It's a great distinction, so thanks for bringing it up!
It can be, but start out simple: use pushd to change to one directory, and then use popd
to go back to the original. Sort of a single-use bookmark system.
Then, once you're comfortable with pushd and popd, branch out and delve into the
stack.
A tcsh shell I used at an old job didn't have pushd and popd, so I used to have functions
in my .cshrc to mimic just the back-and-forth use.
Thanks for that tip, Jake. I arguably should have included that in the article, but I
wanted to try to stay focused on just the two {push,pop}d commands. Didn't occur to me to
casually mention one use of dirs as you have here, so I've added it for posterity.
There's so much in the Bash man and info pages to talk about!
other_Stu on 11 Aug 2019
I use "pushd ." (dot for current directory) quite often. Like a working directory bookmark
when you are several subdirectories deep somewhere, and need to cd to couple of other places
to do some work or check something.
And you can use the cd command with your DIRSTACK as well, thanks to tilde expansion.
cd ~+3 will take you to the same directory as pushd +3 would.
An introduction to parameter expansion in BashGet started with this quick how-to
guide on expansion modifiers that transform Bash variables and other parameters into powerful
tools beyond simple value stores. 13 Jun 2017 James Pannacciulli Feed 366
up 4 comments Image by : Opensource.com x Subscribe now
In Bash, entities that store values are known as parameters. Their values can be strings or
arrays with regular syntax, or they can be integers or associative arrays when special
attributes are set with the declare built-in. There are three types of parameters:
positional parameters, special parameters, and variables.
For the sake of brevity, this article will focus on a few classes of expansion methods
available for string variables, though these methods apply equally to other types of
parameters.
Variable assignment and unadulterated expansion
When assigning a variable, its name must be comprised solely of alphanumeric and underscore
characters, and it may not begin with a numeral. There may be no spaces around the equal sign;
the name must immediately precede it and the value immediately follow:
$ variable_1="my content"
Storing a value in a variable is only useful if we recall that value later; in Bash,
substituting a parameter reference with its value is called expansion. To expand a parameter,
simply precede the name with the $ character, optionally enclosing the name in
braces:
$ echo $variable_1 ${variable_1} my content my content
Crucially, as shown in the above example, expansion occurs before the command is called, so
the command never sees the variable name, only the text passed to it as an argument that
resulted from the expansion. Furthermore, parameter expansion occurs before word
splitting; if the result of expansion contains spaces, the expansion should be quoted to
preserve parameter integrity, if desired:
$ printf "%s\n" ${variable_1} my content $ printf "%s\n" "${variable_1}" my content
Parameter expansion modifiers
Parameter expansion goes well beyond simple interpolation, however. Inside the braces of a
parameter expansion, certain operators, along with their arguments, may be placed after the
name, before the closing brace. These operators may invoke conditional, subset, substring,
substitution, indirection, prefix listing, element counting, and case modification expansion
methods, modifying the result of the expansion. With the exception of the reassignment
operators ( = and := ), these operators only affect the expansion of the
parameter without modifying the parameter's value for subsequent expansions.
About
conditional, substring, and substitution parameter expansion operatorsConditional
parameter expansion
Conditional parameter expansion allows branching on whether the parameter is unset, empty,
or has content. Based on these conditions, the parameter can be expanded to its value, a
default value, or an alternate value; throw a customizable error; or reassign the parameter to
a default value. The following table shows the conditional parameter expansions -- each row
shows a parameter expansion using an operator to potentially modify the expansion, with the
columns showing the result of that expansion given the parameter's status as indicated in the
column headers. Operators with the ':' prefix treat parameters with empty values as if they
were unset.
parameter expansion
unset var
var=""
var="gnu"
${var-default}
default
--
gnu
${var:-default}
default
default
gnu
${var+alternate}
--
alternate
alternate
${var:+alternate}
--
--
alternate
${var?error}
error
--
gnu
${var:?error}
error
error
gnu
The = and := operators in the table function identically to - and
:- , respectively, except that the = variants rebind the variable to the result
of the expansion.
As an example, let's try opening a user's editor on a file specified by the OUT_FILE
variable. If either the EDITOR environment variable or our OUT_FILE variable is
not specified, we will have a problem. Using a conditional expansion, we can ensure that when
the EDITOR variable is expanded, we get the specified value or at least a sane
default:
Parameters can be expanded to just part of their contents, either by offset or by removing
content matching a pattern. When specifying a substring offset, a length may optionally be
specified. If running Bash version 4.2 or greater, negative numbers may be used as offsets from
the end of the string. Note the parentheses used around the negative offset, which ensure that
Bash does not parse the expansion as having the conditional default expansion operator from
above:
$ location="CA 90095" $ echo "Zip Code: ${location:3}" Zip Code: 90095 $ echo "Zip Code: ${location:(-5)}" Zip Code: 90095 $ echo "State: ${location:0:2}" State: CA
Another way to take a substring is to remove characters from the string matching a pattern,
either from the left edge with the # and ## operators or from the right edge with
the % and % operators. A useful mnemonic is that # appears left of a
comment and % appears right of a number. When the operator is doubled, it matches
greedily, as opposed to the single version, which removes the most minimal set of characters
matching the pattern.
var="open source"
parameter expansion
offset of 5
length of 4
${var:offset}
source
${var:offset:length}
sour
pattern of *o?
${var#pattern}
en source
${var##pattern}
rce
pattern of ?e*
${var%pattern}
open sour
${var%pattern}
o
The pattern-matching used is the same as with filename globbing: * matches zero or
more of any character, ? matches exactly one of any character, [...] brackets
introduce a character class match against a single character, supporting negation ( ^ ),
as well as the posix character classes, e.g. [[:alnum:]] . By excising characters from our
string in this manner, we can take a substring without first knowing the offset of the data we
need:
$ echo $PATH /usr/local/bin:/usr/bin:/bin $ echo "Lowest priority in PATH: ${PATH##*:}" Lowest priority in PATH: /bin $ echo "Everything except lowest priority: ${PATH%:*}" Everything except lowest priority: /usr/local/bin:/usr/bin $ echo "Highest priority in PATH: ${PATH%:*}" Highest priority in PATH: /usr/local/bin
Substitution in parameter expansion
The same types of patterns are used for substitution in parameter expansion. Substitution is
introduced with the / or // operators, followed by two arguments separated by another
/ representing the pattern and the string to substitute. The pattern matching is always
greedy, so the doubled version of the operator, in this case, causes all matches of the pattern
to be replaced in the variable's expansion, while the singleton version replaces only the
leftmost.
var="free and open"
parameter expansion
pattern of [[:space:]]
string of _
${var/pattern/string}
free_and open
${var//pattern/string}
free_and_open
The wealth of parameter expansion modifiers transforms Bash variables and other parameters
into powerful tools beyond simple value stores. At the very least, it is important to
understand how parameter expansion works when reading Bash scripts, but I suspect that not
unlike myself, many of you will enjoy the conciseness and expressiveness that these expansion
modifiers bring to your scripts as well as your interactive sessions. TopicsLinuxAbout the author James
Pannacciulli - James Pannacciulli is an advocate for software freedom & user autonomy with
an MA in Linguistics. Employed as a Systems Engineer in Los Angeles, in his free time he
occasionally gives talks on bash usage at various conferences. James likes his beers sour and
his nettles stinging. More from James may be found on his home page . He has presented at conferences including SCALE ,...
You probably know that when you press the Up arrow key in Bash, you can see and reuse all
(well, many) of your previous commands. That is because those commands have been saved to a
file called .bash_history in your home directory. That history file comes with a bunch of
settings and commands that can be very useful.
First, you can view your entire recent command history by typing history , or
you can limit it to your last 30 commands by typing history 30 . But that's pretty
vanilla. You have more control over what Bash saves and how it saves it.
For example, if you add the following to your .bashrc, any commands that start with a space
will not be saved to the history list:
HISTCONTROL=ignorespace
This can be useful if you need to pass a password to a command in plaintext. (Yes, that is
horrible, but it still happens.)
If you don't want a frequently executed command to show up in your history, use:
HISTCONTROL=ignorespace:erasedups
With this, every time you use a command, all its previous occurrences are removed from the
history file, and only the last invocation is saved to your history list.
A history setting I particularly like is the HISTTIMEFORMAT setting. This will
prepend all entries in your history file with a timestamp. For example, I use:
HISTTIMEFORMAT="%F %T "
When I type history 5 , I get nice, complete information, like this:
That makes it a lot easier to browse my command history and find the one I used two days ago
to set up an SSH tunnel to my home lab (which I forget again, and again, and again
).
Best Bash practices
I'll wrap this up with my top 11 list of the best (or good, at least; I don't claim
omniscience) practices when writing Bash scripts.
Bash scripts can become complicated and comments are cheap. If you wonder whether to add
a comment, add a comment. If you return after the weekend and have to spend time figuring
out what you were trying to do last Friday, you forgot to add a comment.
Wrap all your variable names in curly braces, like ${myvariable} . Making
this a habit makes things like ${variable}_suffix possible and improves
consistency throughout your scripts.
Do not use backticks when evaluating an expression; use the $() syntax
instead. So use:
for file in $(ls); do
not
for file in `ls`; do
The former option is nestable, more easily readable, and keeps the general sysadmin
population happy. Do not use backticks.
Consistency is good. Pick one style of doing things and stick with it throughout your
script. Obviously, I would prefer if people picked the $() syntax over backticks
and wrapped their variables in curly braces. I would prefer it if people used two or four
spaces -- not tabs -- to indent, but even if you choose to do it wrong, do it wrong
consistently.
Use the proper shebang for a Bash script. As I'm writing Bash scripts with the intention
of only executing them with Bash, I most often use #!/usr/bin/bash as my
shebang. Do not use #!/bin/sh or #!/usr/bin/sh . Your script will
execute, but it'll run in compatibility mode -- potentially with lots of unintended side
effects. (Unless, of course, compatibility mode is what you want.)
When comparing strings, it's a good idea to quote your variables in if-statements,
because if your variable is empty, Bash will throw an error for lines like these: if [
${myvar} == "foo" ] ; then
echo "bar"
fi And will evaluate to false for a line like this: if [ " ${myvar} " == "foo" ] ; then
echo "bar"
fi Also, if you are unsure about the contents of a variable (e.g., when you are parsing user
input), quote your variables to prevent interpretation of some special characters and make
sure the variable is considered a single word, even if it contains whitespace.
This is a matter of taste, I guess, but I prefer using the double equals sign (
== ) even when comparing strings in Bash. It's a matter of consistency, and even
though -- for string comparisons only -- a single equals sign will work, my mind immediately
goes "single equals is an assignment operator!"
Use proper exit codes. Make sure that if your script fails to do something, you present
the user with a written failure message (preferably with a way to fix the problem) and send a
non-zero exit code: # we have failed
echo "Process has failed to complete, you need to manually restart the whatchamacallit"
exit 1 This makes it easier to programmatically call your script from yet another script and
verify its successful completion.
Use Bash's built-in mechanisms to provide sane defaults for your variables or throw
errors if variables you expect to be defined are not defined: # this sets the value of $myvar
to redhat, and prints 'redhat'
echo ${myvar:=redhat} # this throws an error reading 'The variable myvar is undefined, dear
reader' if $myvar is undefined
${myvar:?The variable myvar is undefined, dear reader}
Especially if you are writing a large script, and especially if you work on that large
script with others, consider using the local keyword when defining variables
inside functions. The local keyword will create a local variable, that is one
that's visible only within that function. This limits the possibility of clashing
variables.
Every sysadmin must do it sometimes: debug something on a console, either a real one in a
data center or a virtual one through a virtualization platform. If you have to debug a script
that way, you will thank yourself for remembering this: Do not make the lines in your scripts
too long!
On many systems, the default width of a console is still 80 characters. If you need to
debug a script on a console and that script has very long lines, you'll be a sad panda.
Besides, a script with shorter lines -- the default is still 80 characters -- is a lot
easier to read and understand in a normal editor, too!
I truly love Bash. I can spend hours writing about it or exchanging nice tricks with fellow
enthusiasts. Make sure you drop your favorites in the comments!
When you work with computers all day, it's fantastic to find repeatable commands and tag
them for easy use later on. They all sit there, tucked away in ~/.bashrc (or ~/.zshrc for
Zsh users
), waiting to help improve your day!
In this article, I share some of my favorite of these helper commands for things I forget a
lot, in hopes that they will save you, too, some heartache over time.
Say when it's
over
When I'm using longer-running commands, I often multitask and then have to go back and check
if the action has completed. But not anymore, with this helpful invocation of say (this is on
MacOS; change for your local equivalent):
This command marks the start and end time of a command, calculates the minutes it takes, and
speaks the command invoked, the time taken, and the exit code. I find this super helpful when a
simple console bell just won't do.
... ... ...
There are many Docker commands, but there are even more docker compose commands. I used to
forget the --rm flags, but not anymore with these useful aliases:
alias dc =
"docker-compose"
alias dcr = "docker-compose run --rm"
alias dcb = "docker-compose run --rm --build" gcurl helper for Google Cloud
This one is relatively new to me, but it's heavily
documented . gcurl is an alias to ensure you get all the correct flags when using local
curl commands with authentication headers when working with Google Cloud APIs.
Git and
~/.gitignore
I work a lot in Git, so I have a special section dedicated to Git helpers.
One of my most useful helpers is one I use to clone GitHub repos. Instead of having to
run:
These commands can tell you what key bindings you have in your bash shell by default.
bind -P | grep 'can be'
stty -a | grep ' = ..;'
Background
I'd aways wondered what key strokes did what in bash – I'd picked up some well-known
ones (CTRL-r, CTRL-v, CTRL-d etc) from bugging people when I saw them being used, but always
wondered whether there was a list of these I could easily get and comprehend. I found some, but
always forgot where it was when I needed them, and couldn't remember many of them anyway.
Then debugging a problem tab completion in 'here' documents, I stumbled across
bind.
bind and stty
'bind' is a bash builtin, which means it's not a program like awk or grep, but is picked up
and handled by the bash program itself.
It manages the various key bindings in the bash shell, covering everything from autocomplete
to transposing two characters on the command line. You can read all about it in the bash man
page (in the builtins section, near the end).
Bind is not responsible for all the key bindings in your shell – running the stty will
show the ones that apply to the terminal:
stty -a | grep ' = ..;'
These take precedence and can be confusing if you've tried to bind the same thing in your
shell! Further confusion is caused by the fact that '^D' means 'CTRL and d pressed together
whereas in bind output, it would be 'C-d'.
edit: am indebted to joepvd from hackernews for this beauty
Can be considered (almost) equivalent to a more instructive command:
bind -l | sed 's/.*/bind -q /' | /bin/bash 2>&1 | grep -v warning: | grep can
'bind -l' lists all the available keystroke functions. For example, 'complete' is the
auto-complete function normally triggered by hitting 'tab' twice. The output of this is passed
to a sed command which passes each function name to 'bind -q', which queries the bindings.
sed 's/.*/bind -q /'
The output of this is passed for running into /bin/bash.
/bin/bash 2>&1 | grep -v warning: | grep 'can be'
Note that this invocation of bash means that locally-set bindings will revert to the default
bash ones for the output.
The '2>&1' puts the error output (the warnings) to the same output channel, filtering
out warnings with a 'grep -v' and then filtering on output that describes how to trigger the
function.
In the output of bind -q, 'C-' means 'the ctrl key and'. So 'C-c' is the normal. Similarly,
't' means 'escape', so 'tt' means 'autocomplete', and 'e' means escape:
$ bind -q complete
complete can be invoked via "C-i", "ee".
and is also bound to 'C-i' (though on my machine I appear to need to press it twice –
not sure why).
Add to bashrc
I added this alias as 'binds' in my bashrc so I could easily get hold of this list in the
future.
alias binds="bind -P | grep 'can be'"
Now whenever I forget a binding, I type 'binds', and have a read :)
[adinserter block="1″]
The Zinger
Browsing through the bash manual, I noticed that an option to bind enables binding to
-x keyseq:shell-command
So now all I need to remember is one shortcut to get my list (CTRL-x, then CTRL-o):
bind -x '"C-xC-o":bind -P | grep can'
Of course, you can bind to a single key if you want, and any command you want. You could
also use this for practical jokes on your colleagues
Now I'm going to sort through my history to see what I type most often :)
This post is based on material from Docker in Practice ,
available on Manning's Early Access Program. Get 39% off with the code: 39miell
I'm often asked in my technical troubleshooting job to solve problems that development teams can't solve. Usually these do not
involve knowledge of API calls or syntax, rather some kind of insight into what the right tool to use is, and why and how to use
it. Probably because they're not taught in college, developers are often unaware that these tools exist, which is a shame, as playing
with them can give a much deeper understanding of what's going on and ultimately lead to better code.
My favourite secret weapon in this path to understanding is strace.
strace (or its Solaris equivalents, trussdtruss is a tool that tells you which operating system (OS)
calls your program is making.
An OS call (or just "system call") is your program asking the OS to provide some service for it. Since this covers a lot of the
things that cause problems not directly to do with the domain of your application development (I/O, finding files, permissions etc)
its use has a very high hit rate in resolving problems out of developers' normal problem space.
Usage Patterns
strace is useful in all sorts of contexts. Here's a couple of examples garnered from my experience.
My Netcat Server Won't Start!
Imagine you're trying to start an executable, but it's failing silently (no log file, no output at all). You don't have the source,
and even if you did, the source code is neither readily available, nor ready to compile, nor readily comprehensible.
Simply running through strace will likely give you clues as to what's gone on.
$ nc -l localhost 80
nc: Permission denied
Let's say someone's trying to run this and doesn't understand why it's not working (let's assume manuals are unavailable).
Simply put strace at the front of your command. Note that the following output has been heavily edited for space
reasons (deep breath):
To most people that see this flying up their terminal this initially looks like gobbledygook, but it's really quite easy to parse
when a few things are explained.
For each line:
the first entry on the left is the system call being performed
the bit in the parentheses are the arguments to the system call
the right side of the equals sign is the return value of the system call
open("/etc/gai.conf", O_RDONLY) = 3
Therefore for this particular line, the system call is open , the arguments are the string /etc/gai.conf
and the constant O_RDONLY , and the return value was 3 .
How to make sense of this?
Some of these system calls can be guessed or enough can be inferred from context. Most readers will figure out that the above
line is the attempt to open a file with read-only permission.
In the case of the above failure, we can see that before the program calls exit_group, there is a couple of calls to bind that
return "Permission denied":
We might therefore want to understand what "bind" is and why it might be failing.
You need to get a copy of the system call's documentation. On ubuntu and related distributions of linux, the documentation is
in the manpages-dev package, and can be invoked by eg man 2 bind (I just used strace to
determine which file man 2 bind opened and then did a dpkg -S to determine from which package it came!).
You can also look up online if you have access, but if you can auto-install via a package manager you're more likely to get docs
that match your installation.
Right there in my man 2 bind page it says:
ERRORS
EACCES The address is protected, and the user is not the superuser.
So there is the answer – we're trying to bind to a port that can only be bound to if you are the super-user.
My Library Is Not Loading!
Imagine a situation where developer A's perl script is working fine, but not on developer B's identical one is not (again, the
output has been edited).
In this case, we strace the output on developer B's computer to see how it's working:
We observe that the file is found in what looks like an unusual place.
open("/space/myperllib/blahlib.pm", O_RDONLY) = 4
Inspecting the environment, we see that:
$ env | grep myperl
PERL5LIB=/space/myperllib
So the solution is to set the same env variable before running:
export PERL5LIB=/space/myperllib
Get to know the internals bit by bit
If you do this a lot, or idly run strace on various commands and peruse the output, you can learn all sorts of things
about the internals of your OS. If you're like me, this is a great way to learn how things work. For example, just now I've had a
look at the file /etc/gai.conf , which I'd never come across before writing this.
Once your interest has been piqued, I recommend getting a copy of "Advanced Programming in the Unix Environment" by Stevens &
Rago, and reading it cover to cover. Not all of it will go in, but as you use strace more and more, and (hopefully)
browse C code more and more understanding will grow.
Gotchas
If you're running a program that calls other programs, it's important to run with the -f flag, which "follows" child processes
and straces them. -ff creates a separate file with the pid suffixed to the name.
If you're on solaris, this program doesn't exist – you need to use truss instead.
Many production environments will not have this program installed for security reasons. strace doesn't have many library dependencies
(on my machine it has the same dependencies as 'echo'), so if you have permission, (or are feeling sneaky) you can just copy the
executable up.
Other useful tidbits
You can attach to running processes (can be handy if your program appears to hang or the issue is not readily reproducible) with
-p .
If you're looking at performance issues, then the time flags ( -t , -tt , -ttt , and
-T ) can help significantly.
A failed access or open system call is not usually an error in the context of launching a program. Generally it is merely checking
if a config file exists.
exit takes only integer args in the range 0 - 255 (see
first footnote)
128+n
Fatal error signal "n"
kill -9$PPID of script
$? returns 137 (128 + 9)
130
Script terminated by Control-C
Ctl-C
Control-C is fatal error signal 2 , (130 = 128 + 2, see
above)
255*
Exit status out of range
exit -1
exit takes only integer args in the range 0 - 255
According to the above table, exit codes 1 - 2, 126 - 165, and 255 [1] have special meanings,
and should therefore be avoided for user-specified exit parameters. Ending a script with
exit 127 would certainly cause confusion when troubleshooting (is the error code a
"command not found" or a user-defined one?). However, many scripts use an exit 1 as a
general bailout-upon-error. Since exit code 1 signifies so many possible errors, it is not
particularly useful in debugging.
There has been an attempt to systematize exit status numbers (see
/usr/include/sysexits.h ), but this is intended for C and C++ programmers. A similar
standard for scripting might be appropriate. The author of this document proposes restricting
user-defined exit codes to the range 64 - 113 (in addition to 0 , for success), to conform with
the C/C++ standard. This would allot 50 valid codes, and make troubleshooting scripts more
straightforward. [2] All user-defined exit
codes in the accompanying examples to this document conform to this standard, except where
overriding circumstances exist, as in Example 9-2 .
Issuing a $? from the
command-line after a shell script exits gives results consistent with the table above only
from the Bash or sh prompt. Running the C-shell or tcsh may give
different values in some cases.
Out of range exit values can result in unexpected
exit codes. An exit value greater than 255 returns an exit code modulo 256 . For example, exit
3809 gives an exit code of 225 (3809 % 256 = 225).
An update of /usr/include/sysexits.h
allocates previously unused exit codes from 64 - 78 . It may be anticipated that the range
of unallotted exit codes will be further restricted in the future. The author of this
document will not do fixups on the scripting examples to conform to the changing
standard. This should not cause any problems, since there is no overlap or conflict in
usage of exit codes between compiled C/C++ binaries and shell scripts.
From bash manual: The exit status of an executed command is the value returned by the waitpid system
call or equivalent function. Exit statuses fall between 0 and 255, though, as explained below, the shell may use values above 125
specially. Exit statuses from shell builtins and compound commands are also limited to this range. Under certain circumstances,
the shell will use special values to indicate specific failure modes.
For the shell’s purposes, a command which exits with a zero exit status has succeeded. A non-zero exit status indicates failure.
This seemingly counter-intuitive scheme is used so there is one well-defined way to indicate success and a variety of ways to
indicate various failure modes. When a command terminates on a fatal signal whose number is N,
Bash uses the value 128+N as the exit status.
If a command is not found, the child process created to execute it returns a status of 127. If a command is found but is not
executable, the return status is 126.
If a command fails because of an error during expansion or redirection, the exit status is greater than zero.
The exit status is used by the Bash conditional commands (see Conditional
Constructs) and some of the list constructs (see Lists).
All of the Bash builtins return an exit status of zero if they succeed and a non-zero status on failure, so they may be used by
the conditional and list constructs. All builtins return an exit status of 2 to indicate incorrect usage, generally invalid
options or missing arguments.
Not everyone knows that every time you run a shell command in bash, an 'exit code' is
returned to bash.
Generally, if a command 'succeeds' you get an error code of 0 . If it doesn't
succeed, you get a non-zero code.
1 is a 'general error', and others can give you more information (e.g. which
signal killed it, for example). 255 is upper limit and is "internal error"
grep joeuser /etc/passwd # in case of success returns 0, otherwise 1
or
grep not_there /dev/null
echo $?
$? is a special bash variable that's set to the exit code of each command after
it runs.
Grep uses exit codes to indicate whether it matched or not. I have to look up every time
which way round it goes: does finding a match or not return 0 ?
Bash functions, unlike functions in most programming languages do not allow you to return a
value to the caller. When a bash function ends its return value is its status: zero for
success, non-zero for failure. To return values, you can set a global variable with the result,
or use command substitution, or you can pass in the name of a variable to use as the result
variable. The examples below describe these different mechanisms.
Although bash has a return statement, the only thing you can specify with it is the
function's status, which is a numeric value like the value specified in an exit
statement. The status value is stored in the $? variable. If a function does not
contain a return statement, its status is set based on the status of the last
statement executed in the function. To actually return arbitrary values to the caller you must
use other mechanisms.
The simplest way to return a value from a bash function is to just set a global variable to
the result. Since all variables in bash are global by default this is easy:
function myfunc()
{
myresult='some value'
}
myfunc
echo $myresult
The code above sets the global variable myresult to the function result. Reasonably
simple, but as we all know, using global variables, particularly in large programs, can lead to
difficult to find bugs.
A better approach is to use local variables in your functions. The problem then becomes how
do you get the result to the caller. One mechanism is to use command substitution:
function myfunc()
{
local myresult='some value'
echo "$myresult"
}
result=$(myfunc) # or result=`myfunc`
echo $result
Here the result is output to the stdout and the caller uses command substitution to capture
the value in a variable. The variable can then be used as needed.
The other way to return a value is to write your function so that it accepts a variable name
as part of its command line and then set that variable to the result of the function:
function myfunc()
{
local __resultvar=$1
local myresult='some value'
eval $__resultvar="'$myresult'"
}
myfunc result
echo $result
Since we have the name of the variable to set stored in a variable, we can't set the
variable directly, we have to use eval to actually do the setting. The eval
statement basically tells bash to interpret the line twice, the first interpretation above
results in the string result='some value' which is then interpreted once more and ends
up setting the caller's variable.
When you store the name of the variable passed on the command line, make sure you store it
in a local variable with a name that won't be (unlikely to be) used by the caller (which is why
I used __resultvar rather than just resultvar ). If you don't, and the caller
happens to choose the same name for their result variable as you use for storing the name, the
result variable will not get set. For example, the following does not work:
function myfunc()
{
local result=$1
local myresult='some value'
eval $result="'$myresult'"
}
myfunc result
echo $result
The reason it doesn't work is because when eval does the second interpretation and
evaluates result='some value' , result is now a local variable in the
function, and so it gets set rather than setting the caller's result variable.
For more flexibility, you may want to write your functions so that they combine both result
variables and command substitution:
function myfunc()
{
local __resultvar=$1
local myresult='some value'
if [[ "$__resultvar" ]]; then
eval $__resultvar="'$myresult'"
else
echo "$myresult"
fi
}
myfunc result
echo $result
result2=$(myfunc)
echo $result2
Here, if no variable name is passed to the function, the value is output to the standard
output.
Mitch Frazier is an embedded systems programmer at Emerson Electric Co. Mitch has been a contributor to and a friend
of Linux Journal since the early 2000s.
The only real issue I see with returning via echo is that forking the process means no
longer allowing it access to set 'global' variables. They are still global in the sense that
you can retrieve them and set them within the new forked process, but as soon as that process
is done, you will not see any of those changes.
e.g.
#!/bin/bash
myGlobal="very global"
call1() {
myGlobal="not so global"
echo "${myGlobal}"
}
tmp=$(call1) # keep in mind '$()' starts a new process
echo "${tmp}" # prints "not so global"
echo "${myGlobal}" # prints "very global"
i would caution against returning integers with "return $int". My code was working fine
until it came across a -2 (negative two), and treated it as if it were 254, which tells me
that bash functions return 8-bit unsigned ints that are not protected from overflow
A function behaves as any other Bash command, and indeed POSIX processes. That is, they
can write to stdout, read from stdin and have a return code. The return code is, as you have
already noticed, a value between 0 and 255. By convention 0 means success while any other
return code means failure.
This is also why Bash "if" statements treat 0 as success and non+zero as failure (most
other programming languages do the opposite).
Readline is one of those technologies that is so commonly used many users don't realise it's there.
I went looking for a good primer on it so I could understand it better, but failed to find one. This is an attempt to write a
primer that may help users get to grips with it, based on what I've managed to glean as I've tried to research and experiment with
it over the years.
Bash Without Readline
First you're going to see what bash looks like without readline.
In your 'normal' bash shell, hit the TAB key twice. You should see something like this:
Display all 2335 possibilities? (y or n)
That's because bash normally has an 'autocomplete' function that allows you to see what commands are available to you if you tap
tab twice.
Hit n to get out of that autocomplete.
Another useful function that's commonly used is that if you hit the up arrow key a few times, then the previously-run commands
should be brought back to the command line.
Now type:
$ bash --noediting
The --noediting flag starts up bash without the readline library enabled.
If you hit TAB twice now you will see something different: the shell no longer 'sees' your tab and just sends a tab
direct to the screen, moving your cursor along. Autocomplete has gone.
Autocomplete is just one of the things that the readline library gives you in the terminal. You might want to try hitting the
up or down arrows as you did above to see that that no longer works as well.
Hit return to get a fresh command line, and exit your non-readline-enabled bash shell:
$ exit
Other Shortcuts
There are a great many shortcuts like autocomplete available to you if readline is enabled. I'll quickly outline four of the most
commonly-used of these before explaining how you can find out more.
$ echo 'some command'
There should not be many surprises there. Now if you hit the 'up' arrow, you will see you can get the last command back on your
line. If you like, you can re-run the command, but there are other things you can do with readline before you hit return.
If you hold down the ctrl key and then hit a at the same time your cursor will return to the start of
the line. Another way of representing this 'multi-key' way of inputting is to write it like this: \C-a . This is one
conventional way to represent this kind of input. The \C represents the control key, and the -a represents
that the a key is depressed at the same time.
Now if you hit \C-e ( ctrl and e ) then your cursor has moved to the end of the line. I
use these two dozens of times a day.
Another frequently useful one is \C-l , which clears the screen, but leaves your command line intact.
The last one I'll show you allows you to search your history to find matching commands while you type. Hit \C-r ,
and then type ec . You should see the echo command you just ran like this:
(reverse-i-search)`ec': echo echo
Then do it again, but keep hitting \C-r over and over. You should see all the commands that have `ec` in them that
you've input before (if you've only got one echo command in your history then you will only see one). As you see them
you are placed at that point in your history and you can move up and down from there or just hit return to re-run if you want.
There are many more shortcuts that you can use that readline gives you. Next I'll show you how to view these. Using `bind`
to Show Readline Shortcuts
If you type:
$ bind -p
You will see a list of bindings that readline is capable of. There's a lot of them!
Have a read through if you're interested, but don't worry about understanding them all yet.
If you type:
$ bind -p | grep C-a
you'll pick out the 'beginning-of-line' binding you used before, and see the \C-a notation I showed you before.
As an exercise at this point, you might want to look for the \C-e and \C-r bindings we used previously.
If you want to look through the entirety of the bind -p output, then you will want to know that \M refers
to the Meta key (which you might also know as the Alt key), and \e refers to the Esc
key on your keyboard. The 'escape' key bindings are different in that you don't hit it and another key at the same time, rather you
hit it, and then hit another key afterwards. So, for example, typing the Esc key, and then the ? key also
tries to auto-complete the command you are typing. This is documented as:
"\e?": possible-completions
in the bind -p output.
Readline and Terminal Options
If you've looked over the possibilities that readline offers you, you might have seen the \C-r binding we looked
at earlier:
"\C-r": reverse-search-history
You might also have seen that there is another binding that allows you to search forward through your history too:
"\C-s": forward-search-history
What often happens to me is that I hit \C-r over and over again, and then go too fast through the history and fly
past the command I was looking for. In these cases I might try to hit \C-s to search forward and get to the one I missed.
Watch out though! Hitting \C-s to search forward through the history might well not work for you.
Why is this, if the binding is there and readline is switched on?
It's because something picked up the \C-sbefore it got to the readline library: the terminal settings.
The terminal program you are running in may have standard settings that do other things on hitting some of these shortcuts before
readline gets to see it.
You can see on the last four lines ( discard dsusp [...] ) there is a table of key bindings that your terminal will
pick up before readline sees them. The ^ character (known as the 'caret') here represents the ctrl key
that we previously represented with a \C .
If you think this is confusing I won't disagree. Unfortunately in the history of Unix and Linux documenters did not stick to one
way of describing these key combinations.
If you encounter a problem where the terminal options seem to catch a shortcut key binding before it gets to readline, then you
can use the stty program to unset that binding. In this case, we want to unset the 'stop' binding.
If you are in the same situation, type:
$ stty stop undef
Now, if you re-run stty -e , the last two lines might look like this:
[...]
min quit reprint start status stop susp time werase
1 ^\ ^R ^Q ^T <undef> ^Z 0 ^W
where the stop entry now has <undef> underneath it.
Strangely, for me C-r is also bound to 'reprint' above ( ^R ).
But (on my terminals at least) that gets to readline without issue as I search up the history. Why this is the case I haven't
been able to figure out. I suspect that reprint is ignored by modern terminals that don't need to 'reprint' the current line.
\C-d sends an 'end of file' character. It's often used to indicate to a program that input is over. If you type it
on a bash shell, the bash shell you are in will close.
Finally, \C-w deletes the word before the cursor
These are the most commonly-used shortcuts that are picked up by the terminal before they get to the readline library.
You might want to check out the 'rlwrap' program. It allows you to have readline behavior on programs that don't natively support
readline, but which have a 'type in a command' type interface. For instance, we use Oracle here (alas :-) ) and the 'sqlplus'
program, that lets you type SQL commands to an Oracle instance does not have anything like readline built into it, so you can't
go back to edit previous commands. But running 'rlwrap sqlplus' gives me readline behavior in sqlplus! It's fantastic to have.
I was told to use this in a class, and I didn't understand what I did. One rabbit hole later, I was shocked and amazed at how
advanced the readline library is. One thing I'd like to add is that you can write a '~/.inputrc' file and have those readline
commands sourced at startup!
I do not know exactly when or how the inputrc is read.
This blog post is the second of two
covering some practical tips and tricks to get the most out of the Bash shell. In
part
one
, I covered history, last argument, working with files and directories, reading files, and Bash functions.
In this segment, I cover shell variables, find, file descriptors, and remote operations.
Use shell variables
The Bash variables are set by the shell
when invoked. Why would I use
hostname
when
I can use $HOSTNAME, or why would I use
whoami
when
I can use $USER? Bash variables are very fast and do not require external applications.
These are a few frequently-used variables:
$PATH
$HOME
$USER
$HOSTNAME
$PS1
..
$PS4
Use the
echo
command
to expand variables. For example, the $PATH shell variable can be expanded by running:
The
find
command
is probably one of the most used tools within the Linux operating system. It is extremely useful in interactive
shells. It is also used in scripts. With
find
I
can list files older or newer than a specific date, delete them based on that date, change permissions of files or
directories, and so on.
While the above commands will delete files
older than 30 days, as written, they fork the
rm
command
each time they find a file. This search can be written more efficiently by using
xargs
:
In the Bash shell, file descriptors (FDs)
are important in managing the input and output of commands. Many people have issues understanding file descriptors
correctly. Each process has three default file descriptors, namely:
Code
Meaning
Location
Description
0
Standard input
/dev/stdin
Keyboard, file, or some stream
1
Standard output
/dev/stdout
Monitor, terminal, display
2
Standard error
/dev/stderr
Non-zero exit codes are usually >FD2, display
Now that you know what the default FDs do,
let's see them in action. I start by creating a directory named
foo
,
which contains
file1
.
$> ls foo/ bar/
ls: cannot access 'bar/': No such file or directory
foo/:
file1
The output
No
such file or directory
goes to Standard Error (stderr) and is also displayed on the screen. I will run the
same command, but this time use
2>
to
omit stderr:
$> ls foo/ bar/ 2>/dev/null
foo/:
file1
It is possible to send the output of
foo
to
Standard Output (stdout) and to a file simultaneously, and ignore stderr. For example:
$> { ls foo bar | tee -a ls_out_file ;} 2>/dev/null
foo:
file1
Then:
$> cat ls_out_file
foo:
file1
The following command sends stdout to a
file and stderr to
/dev/null
so
that the error won't display on the screen:
echo "Hello World" Go to file because FD 1 now points to the file
exec 1>&3 Copy FD 3 back to 1 (swap)
Three>&- Close file descriptor three (we don't need it
anymore)
Often it is handy to group commands, and
then send the Standard Output to a single file. For example:
$> { ls non_existing_dir; non_existing_command; echo "Hello world"; } 2> to_stderr
Hello world
As you can see, only "Hello world" is
printed on the screen, but the output of the failed commands is written to the to_stderr file.
Execute remote operations
I use Telnet, netcat, Nmap, and other
tools to test whether a remote service is up and whether I can connect to it. These tools are handy, but they
aren't installed by default on all systems.
Fortunately, there is a simple way to test
a connection without using external tools. To see if a remote server is running a web, database, SSH, or any other
service, run:
If the connection fails, the
Failed
to connect
message is displayed on your screen.
Assume
serverA
is
behind a firewall/NAT. I want to see if the firewall is configured to allow a database connection to
serverA
,
but I haven't installed a database server yet. To emulate a database port (or any other port), I can use the
following:
There are many other complex actions I can
perform on the remote host.
Wrap up
There is certainly more to Bash than I was
able to cover in this two-part blog post. I am sharing what I know and what I deal with daily. The idea is to
familiarize you with a few techniques that could make your work less error-prone and more fun.
[ Want to test your sysadmin skills? Take a
skills
assessment
today. ]
Valentin Bajrami
Valentin is a system engineer with more than six years
of experience in networking, storage, high-performing clusters, and automation. He is involved in different open source
projects like bash, Fedora, Ceph, FreeBSD and is a member of Red Hat Accelerators.
More
about me
In the Bash shell, file descriptors (FDs) are important in managing the input and output of
commands. Many people have issues understanding file descriptors correctly. Each process has
three default file descriptors, namely:
Code
Meaning
Location
Description
0
Standard input
/dev/stdin
Keyboard, file, or some stream
1
Standard output
/dev/stdout
Monitor, terminal, display
2
Standard error
/dev/stderr
Non-zero exit codes are usually >FD2, display
Now that you know what the default FDs do, let's see them in action. I start by creating a
directory named foo , which contains file1 .
$> ls foo/ bar/
ls: cannot access 'bar/': No such file or directory
foo/:
file1
The output No such file or directory goes to Standard Error (stderr) and is also
displayed on the screen. I will run the same command, but this time use 2> to
omit stderr:
$> ls foo/ bar/ 2>/dev/null
foo/:
file1
It is possible to send the output of foo to Standard Output (stdout) and to a
file simultaneously, and ignore stderr. For example:
$> { ls foo bar | tee -a ls_out_file ;} 2>/dev/null
foo:
file1
Then:
$> cat ls_out_file
foo:
file1
The following command sends stdout to a file and stderr to /dev/null so that
the error won't display on the screen:
The following will redirect program error message to a file called error.log: $ program-name 2> error.log
$ command1 2> error.log
For example, use the grep command for
recursive search in the $HOME directory and redirect all errors (stderr) to a file name
grep-errors.txt as follows: $ grep -R 'MASTER' $HOME 2> /tmp/grep-errors.txt
$ cat /tmp/grep-errors.txt
Sample outputs:
grep: /home/vivek/.config/google-chrome/SingletonSocket: No such device or address
grep: /home/vivek/.config/google-chrome/SingletonCookie: No such file or directory
grep: /home/vivek/.config/google-chrome/SingletonLock: No such file or directory
grep: /home/vivek/.byobu/.ssh-agent: No such device or address
Redirecting the standard error (stderr) and stdout to file
Use the following syntax: $ command-name &>file
We can als use the following syntax: $ command > file-name 2>&1
We can write both stderr and stdout to two different files too. Let us try out our previous
grep command example: $ grep -R 'MASTER' $HOME 2> /tmp/grep-errors.txt 1> /tmp/grep-outputs.txt
$ cat /tmp/grep-outputs.txt
Redirecting stderr to stdout to a file or another
command
Here is another useful example where both stderr and stdout sent to the more command instead
of a file: # find /usr/home -name .profile 2>&1 | more
Redirect stderr to
stdout
Use the command as follows: $ command-name 2>&1
$ command-name > file.txt 2>&1
## bash only ##
$ command2 &> filename
$ sudo find / -type f -iname ".env" &> /tmp/search.txt
Redirection takes from left to right. Hence, order matters. For example: command-name 2>&1 > file.txt ## wrong ##
command-name > file.txt 2>&1 ## correct ##
How to redirect stderr to
stdout in Bash script
A sample shell script used to update VM when created in the AWS/Linode server:
#!/usr/bin/env bash
# Author - nixCraft under GPL v2.x+
# Debian/Ubuntu Linux script for EC2 automation on first boot
# ------------------------------------------------------------
# My log file - Save stdout to $LOGFILE
LOGFILE="/root/logs.txt"
# My error file - Save stderr to $ERRFILE
ERRFILE="/root/errors.txt"
# Start it
printf "Starting update process ... \n" 1>"${LOGFILE}"
# All errors should go to error file
apt-get -y update 2>"${ERRFILE}"
apt-get -y upgrade 2>>"${ERRFILE}"
printf "Rebooting cloudserver ... \n" 1>>"${LOGFILE}"
shutdown -r now 2>>"${ERRFILE}"
Our last example uses the exec command and FDs along with trap and custom bash
functions:
#!/bin/bash
# Send both stdout/stderr to a /root/aws-ec2-debian.log file
# Works with Ubuntu Linux too.
# Use exec for FD and trap it using the trap
# See bash man page for more info
# Author: nixCraft under GPL v2.x+
# ---------------------------------------------
exec 3>&1 4>&2
trap 'exec 2>&4 1>&3' 0 1 2 3
exec 1>/root/aws-ec2-debian.log 2>&1
# log message
log(){
local m="$@"
echo ""
echo "*** ${m} ***"
echo ""
}
log "$(date) @ $(hostname)"
## Install stuff ##
log "Updating up all packages"
export DEBIAN_FRONTEND=noninteractive
apt-get -y clean
apt-get -y update
apt-get -y upgrade
apt-get -y --purge autoremove
## Update sshd config ##
log "Configuring sshd_config"
sed -i'.BAK' -e 's/PermitRootLogin yes/PermitRootLogin no/g' -e 's/#PasswordAuthentication yes/PasswordAuthentication no/g' /etc/ssh/sshd_config
## Hide process from other users ##
log "Update /proc/fstab to hide process from each other"
echo 'proc /proc proc defaults,nosuid,nodev,noexec,relatime,hidepid=2 0 0' >> /etc/fstab
## Install LXD and stuff ##
log "Installing LXD/wireguard/vnstat and other packages on this box"
apt-get -y install lxd wireguard vnstat expect mariadb-server
log "Configuring mysql with mysql_secure_installation"
SECURE_MYSQL_EXEC=$(expect -c "
set timeout 10
spawn mysql_secure_installation
expect \"Enter current password for root (enter for none):\"
send \"$MYSQL\r\"
expect \"Change the root password?\"
send \"n\r\"
expect \"Remove anonymous users?\"
send \"y\r\"
expect \"Disallow root login remotely?\"
send \"y\r\"
expect \"Remove test database and access to it?\"
send \"y\r\"
expect \"Reload privilege tables now?\"
send \"y\r\"
expect eof
")
# log to file #
echo " $SECURE_MYSQL_EXEC "
# We no longer need expect
apt-get -y remove expect
# Reboot the EC2 VM
log "END: Rebooting requested @ $(date) by $(hostname)"
reboot
WANT BOTH STDERR AND STDOUT TO THE TERMINAL AND A LOG FILE TOO?
Try the tee command as follows: command1 2>&1 | tee filename
Here is how to use it insider shell script too:
In this quick tutorial, you learned about three file descriptors, stdin, stdout, and stderr.
We can use these Bash descriptors to redirect stdout/stderr to a file or vice versa. See bash
man page here
:
Operator
Description
Examples
command>filename
Redirect stdout to file "filename."
date > output.txt
command>>filename
Redirect and append stdout to file "filename."
ls -l >> dirs.txt
command 2>filename
Redirect stderr to file "filename."
du -ch /snaps/ 2> space.txt
command 2>>filename
Redirect and append stderr to file "filename."
awk '{ print $4}' input.txt 2>> data.txt
command &>filename
command >filename 2>&1
Redirect both stdout and stderr to file "filename."
grep -R foo /etc/ &>out.txt
command &>>filename
command >>filename 2>&1
Redirect both stdout and stderr append to file "filename."
whois domain &>>log.txt
Vivek Gite is the creator of nixCraft and a seasoned sysadmin, DevOps engineer, and a
trainer for the Linux operating system/Unix shell scripting. Get the latest tutorials on
SysAdmin, Linux/Unix and open source topics via RSS/XML feed or weekly
email newsletter . RELATED TUTORIALS
because tee log's everything and prints to stdout . So you stil get to see everything!
You can even combine sudo to downgrade to a log user account and add date's subject and
store it in a default log directory :)
Whether we want it or not, bash is the
shell you face in Linux, and unfortunately, it is often misunderstood and misused. Issues
related to creating your bash environment are not well addressed in existing books. This book
fills the gap.
Few authors understand that bash is a complex, non-orthogonal language operating in a
complex Linux environment. To make things worse, bash is an evolution of Unix shell and is a
rather old language with warts and all. Using it properly as a programming language requires a
serious study, not just an introduction to the basic concepts. Even issues related to
customization of dotfiles are far from trivial, and you need to know quite a bit to do it
properly.
At the same time, proper customization of bash environment does increase your productivity
(or at least lessens the frustration of using Linux on the command line ;-)
The author covered the most important concepts related to this task, such as bash history,
functions, variables, environment inheritance, etc. It is really sad to watch like the majorly
of Linux users do not use these opportunities and forever remain on the "level zero" using
default dotfiles with bare minimum customization.
This book contains some valuable tips even for a seasoned sysadmin (for example, the use of
!& in pipes), and as such, is worth at least double of suggested price. It allows you
intelligently customize your bash environment after reading just 160 pages and doing the
suggested exercises.
set s we saw before
, but shopt s look very similar. Just inputting shopt shows a bunch of options:
$ shopt
cdable_vars off
cdspell on
checkhash off
checkwinsize on
cmdhist on
compat31 off
dotglob off
I found a set of answers here
. Essentially, it looks like it's a consequence of bash (and other shells) being built on sh, and adding shopt as
another way to set extra shell options. But I'm still unsure if you know the answer, let me know.
4) Here Docs and Here Strings
'Here docs' are files created inline in the shell.
The 'trick' is simple. Define a closing word, and the lines between that word and when it appears alone on a line become a
file.
Type this:
$ cat > afile << SOMEENDSTRING
> here is a doc
> it has three lines
> SOMEENDSTRING alone on a line will save the doc
> SOMEENDSTRING
$ cat afile
here is a doc
it has three lines
SOMEENDSTRING alone on a line will save the doc
Notice that:
the string could be included in the file if it was not 'alone' on the line
the string SOMEENDSTRING is more normally END , but that is just convention
Lesser known is the 'here string':
$ cat > asd <<< 'This file has one line'
5) String Variable Manipulation
You may have written code like this before, where you use tools like sed to manipulate strings:
$ VAR='HEADERMy voice is my passwordFOOTER'
$ PASS="$(echo $VAR | sed 's/^HEADER(.*)FOOTER/1/')"
$ echo $PASS
But you may not be aware that this is possible natively in bash .
This means that you can dispense with lots of sed and awk shenanigans.
One way to rewrite the above is:
$ VAR='HEADERMy voice is my passwordFOOTER'
$ PASS="${VAR#HEADER}"
$ PASS="${PASS%FOOTER}"
$ echo $PASS
The # means 'match and remove the following pattern from the start of the string'
The % means 'match and remove the following pattern from the end of the string
Now run chmod +x default.sh and run the script with ./default.sh first second .
Observer how the third argument's default has been assigned, but not the first two.
You can also assign directly with ${VAR: = defaultval} (equals sign, not dash) but note that this won't work with
positional variables in scripts or functions. Try changing the above script to see how it fails.
7) Traps
The trap built-in can be used to 'catch' when a
signal is sent to your script.
Note that there are two 'lines' above, even though you used ; to separate the commands.
TMOUT
You can timeout reads, which can be really handy in some scripts
#!/bin/bash
TMOUT=5
echo You have 5 seconds to respond...
read
echo ${REPLY:-noreply}
... ... ...
10) Associative Arrays
Talking of moving to other languages, a rule of thumb I use is that if I need arrays then I drop bash to go to python (I even
created a Docker container for a tool to help with this here
).
What I didn't know until I read up on it was that you can have associative arrays in bash.
"... I use "!*" for "all arguments". It doesn't have the flexibility of your approach but it's faster for my most common need. ..."
"... Provided that your shell is readline-enabled, I find it much easier to use the arrow keys and modifiers to navigate through history than type !:1 (or having to remeber what it means). ..."
7 Bash history shortcuts you will actually useSave time on the command line with these essential Bash shortcuts.
02 Oct 2019 Ian 205
up 12 comments Image by : Opensource.com x Subscribe now
Most guides to Bash history shortcuts exhaustively list every single one available. The problem with that is I would use a shortcut
once, then glaze over as I tried out all the possibilities. Then I'd move onto my working day and completely forget them, retaining
only the well-known !! trick I learned when I first
started using Bash.
This article outlines the shortcuts I actually use every day. It is based on some of the contents of my book,
Learn Bash the hard way ; (you can read a
preview of it to learn more).
When people see me use these shortcuts, they often ask me, "What did you do there!?" There's minimal effort or intelligence required,
but to really learn them, I recommend using one each day for a week, then moving to the next one. It's worth taking your time to
get them under your fingers, as the time you save will be significant in the long run.
1. The "last argument" one: !$
If you only take one shortcut from this article, make it this one. It substitutes in the last argument of the last command
into your line.
Consider this scenario:
$ mv / path / to / wrongfile / some / other / place
mv: cannot stat '/path/to/wrongfile' : No such file or directory
Ach, I put the wrongfile filename in my command. I should have put rightfile instead.
You might decide to retype the last command and replace wrongfile with rightfile completely. Instead, you can type:
$ mv / path / to / rightfile ! $
mv / path / to / rightfile / some / other / place
and the command will work.
There are other ways to achieve the same thing in Bash with shortcuts, but this trick of reusing the last argument of the last
command is one I use the most.
2. The " n th argument" one: !:2
Ever done anything like this?
$ tar -cvf afolder afolder.tar
tar: failed to open
Like many others, I get the arguments to tar (and ln ) wrong more often than I would like to admit.
The last command's items are zero-indexed and can be substituted in with the number after the !: .
Obviously, you can also use this to reuse specific arguments from the last command rather than all of them.
3. The "all the arguments": !*
Imagine I run a command like:
$ grep '(ping|pong)' afile
The arguments are correct; however, I want to match ping or pong in a file, but I used grep rather than egrep .
I start typing egrep , but I don't want to retype the other arguments. So I can use the !:1$ shortcut to ask for all the arguments
to the previous command from the second one (remember they're zero-indexed) to the last one (represented by the $ sign).
$ egrep ! : 1 -$
egrep '(ping|pong)' afile
ping
You don't need to pick 1-$ ; you can pick a subset like 1-2 or 3-9 (if you had that many arguments in the previous command).
4. The "last but n " : !-2:$
The shortcuts above are great when I know immediately how to correct my last command, but often I run commands after the
original one, which means that the last command is no longer the one I want to reference.
For example, using the mv example from before, if I follow up my mistake with an ls check of the folder's contents:
$ mv / path / to / wrongfile / some / other / place
mv: cannot stat '/path/to/wrongfile' : No such file or directory
$ ls / path / to /
rightfile
I can no longer use the !$ shortcut.
In these cases, I can insert a - n : (where n is the number of commands to go back in the history) after the ! to
grab the last argument from an older command:
$ mv / path / to / rightfile ! - 2 :$
mv / path / to / rightfile / some / other / place
Again, once you learn it, you may be surprised at how often you need it.
5. The "get me the folder" one: !$:h
This one looks less promising on the face of it, but I use it dozens of times daily.
Imagine I run a command like this:
$ tar -cvf system.tar / etc / system
tar: / etc / system: Cannot stat: No such file or directory
tar: Error exit delayed from previous errors.
The first thing I might want to do is go to the /etc folder to see what's in there and work out what I've done wrong.
I can do this at a stroke with:
$ cd ! $:h
cd / etc
This one says: "Get the last argument to the last command ( /etc/system ) and take off its last filename component, leaving only
the /etc ."
6. The "the current line" one: !#:1
For years, I occasionally wondered if I could reference an argument on the current line before finally looking it up and learning
it. I wish I'd done so a long time ago. I most commonly use it to make backup files:
$ cp / path / to / some / file ! #:1.bak
cp / path / to / some / file / path / to / some / file.bak
but once under the fingers, it can be a very quick alternative to
7. The "search and replace" one: !!:gs
This one searches across the referenced command and replaces what's in the first two / characters with what's in the second two.
Say I want to tell the world that my s key does not work and outputs f instead:
$ echo my f key doef not work
my f key doef not work
Then I realize that I was just hitting the f key by accident. To replace all the f s with s es, I can type:
$ !! :gs / f / s /
echo my s key does not work
my s key does not work
It doesn't work only on single characters; I can replace words or sentences, too:
$ !! :gs / does / did /
echo my s key did not work
my s key did not work Test them out
Just to show you how these shortcuts can be combined, can you work out what these toenail clippings will output?
Bash can be an elegant source of shortcuts for the day-to-day command-line user. While there are thousands of tips and tricks
to learn, these are my favorites that I frequently put to use.
This article was originally posted on Ian's blog,
Zwischenzugs.com
, and is reused with permission.
Orr, August 25, 2019 at 10:39 pm
BTW � you inspired me to try and understand how to repeat the nth command entered on command line. For example I type 'ls'
and then accidentally type 'clear'. !! will retype clear again but I wanted to retype ls instead using a shortcut.
Bash doesn't accept ':' so !:2 didn't work. !-2 did however, thank you!
Dima August 26, 2019 at 7:40 am
Nice article! Just another one cool and often used command: i.e.: !vi opens the last vi command with their arguments.
cbarrick on 03 Oct 2019
Your "current line" example is too contrived. Your example is copying to a backup like this:
$ cp /path/to/some/file !#:1.bak
But a better way to write that is with filename generation:
$ cp /path/to/some/file{,.bak}
That's not a history expansion though... I'm not sure I can come up with a good reason to use `!#:1`.
Darryl Martin August 26, 2019 at 4:41 pm
I seldom get anything out of these "bash commands you didn't know" articles, but you've got some great tips here. I'm writing
several down and sticking them on my terminal for reference.
A couple additions I'm sure you know.
I use "!*" for "all arguments". It doesn't have the flexibility of your approach but it's faster for my most common need.
I recently started using Alt-. as a substitute for "!$" to get the last argument. It expands the argument on the line, allowing
me to modify it if necessary.
The problem with bash's history shorcuts for me is... that I never had the need to learn them.
Provided that your shell is readline-enabled, I find it much easier to use the arrow keys and modifiers to navigate through
history than type !:1 (or having to remeber what it means).
Examples:
Ctrl+R for a Reverse search
Ctrl+A to move to the begnining of the line (Home key also)
Ctrl+E to move to the End of the line (End key also)
Ctrl+K to Kill (delete) text from the cursor to the end of the line
Ctrl+U to kill text from the cursor to the beginning of the line
Alt+F to move Forward one word (Ctrl+Right arrow also)
Alt+B to move Backward one word (Ctrl+Left arrow also)
etc.
You may already be familiar with 2>&1 , which redirects standard error
to standard output, but until I stumbled on it in the manual, I had no idea that you can pipe
both standard output and standard error into the next stage of the pipeline like this:
if doesnotexist |& grep 'command not found' >/dev/null
then
echo oops
fi
3) $''
This construct allows you to specify specific bytes in scripts without fear of triggering
some kind of encoding problem. Here's a command that will grep through files
looking for UK currency ('£') signs in hexadecimal recursively:
grep -r $'\xc2\xa3' *
You can also use octal:
grep -r $'\302\243' *
4) HISTIGNORE
If you are concerned about security, and ever type in commands that might have sensitive
data in them, then this one may be of use.
This environment variable does not put the commands specified in your history file
if you type them in. The commands are separated by colons:
HISTIGNORE="ls *:man *:history:clear:AWS_KEY*"
You have to specify the whole line, so a glob character may be needed if you want
to exclude commands and their arguments or flags.
5) fc
If readline key bindings
aren't under your fingers, then this one may come in handy.
It calls up the last command you ran, and places it into your preferred editor (specified by
the EDITOR variable). Once edited, it re-runs the command.
6) ((i++))
If you can't be bothered with faffing around with variables in bash with the
$[] construct, you can use the C-style compound command.
So, instead of:
A=1
A=$[$A+1]
echo $A
you can do:
A=1
((A++))
echo $A
which, especially with more complex calculations, might be easier on the eye.
7)
caller
Another builtin bash command, caller gives context about the context of your
shell's
SHLVL is a related shell variable which gives the level of depth of the calling
stack.
This can be used to create stack traces for more complex bash scripts.
Here's a die function, adapted from the bash hackers' wiki that gives a stack
trace up through the calling frames:
#!/bin/bash
die() {
local frame=0
((FRAMELEVEL=SHLVL - frame))
echo -n "${FRAMELEVEL}: "
while caller $frame; do
((frame++));
((FRAMELEVEL=SHLVL - frame))
if [[ ${FRAMELEVEL} -gt -1 ]]
then
echo -n "${FRAMELEVEL}: "
fi
done
echo "$*"
exit 1
}
which outputs:
3: 17 f1 ./caller.sh
2: 18 f2 ./caller.sh
1: 19 f3 ./caller.sh
0: 20 main ./caller.sh
*** an error occured ***
8) /dev/tcp/host/port
This one can be particularly handy if you find yourself on a container running within a
Kubernetes cluster service
mesh without any network tools (a frustratingly common experience).
Bash provides you with some virtual files which, when referenced, can create socket
connections to other servers.
This snippet, for example, makes a web request to a site and returns the output.
The first line opens up file descriptor 9 to the host brvtsdflnxhkzcmw.neverssl.com on port
80 for reading and writing. Line two sends the raw HTTP request to that socket
connection's file descriptor. The final line retrieves the response.
Obviously, this doesn't handle SSL for you, so its use is limited now that pretty much
everyone is running on https, but when running from application containers within a service
mesh can still prove invaluable, as requests there are initiated using HTTP.
9)
Co-processes
Since version 4 of bash it has offered the capability to run named
coprocesses.
It seems to be particularly well-suited to managing the inputs and outputs to other
processes in a fine-grained way. Here's an annotated and trivial example:
coproc testproc (
i=1
while true
do
echo "iteration:${i}"
((i++))
read -r aline
echo "${aline}"
done
)
This sets up the coprocess as a subshell with the name testproc .
Within the subshell, there's a never-ending while loop that counts its own iterations with
the i variable. It outputs two lines: the iteration number, and a line read in
from standard input.
After creating the coprocess, bash sets up an array with that name with the file descriptor
numbers for the standard input and standard output. So this:
echo "${testproc[@]}"
in my terminal outputs:
63 60
Bash also sets up a variable with the process identifier for the coprocess, which you can
see by echoing it:
echo "${testproc_PID}"
You can now input data to the standard input of this coprocess at will like this:
echo input1 >&"${testproc[1]}"
In this case, the command resolves to: echo input1 >&60 , and the
>&[INTEGER] construct ensures the redirection goes to the coprocess's
standard input.
Now you can read the output of the coprocess's two lines in a similar way, like this:
You might use this to create an expect -like script if you were so inclined, but it
could be generally useful if you want to manage inputs and outputs. Named pipes are another
way to achieve a similar result.
Here's a complete listing for those who want to cut and paste:
Most shells offer the ability to create, manipulate, and query indexed arrays. In plain
English, an indexed array is a list of things prefixed with a number. This list of things,
along with their assigned number, is conveniently wrapped up in a single variable, which makes
it easy to "carry" it around in your code.
Bash, however, includes the ability to create associative arrays and treats these arrays the
same as any other array. An associative array lets you create lists of key and value pairs,
instead of just numbered values.
The nice thing about associative arrays is that keys can be arbitrary:
$ declare -A
userdata
$ userdata [ name ] =seth
$ userdata [ pass ] =8eab07eb620533b083f241ec4e6b9724
$ userdata [ login ] = ` date --utc + % s `
Source is
like a Python import or a Java include. Learn it to expand your Bash prowess.Seth Kenlon (Red Hat) Feed 25
up 2 comments Image by : Opensource.com x Subscribe now
When you log into a Linux shell, you inherit a specific working environment. An
environment , in the context of a shell, means that there are certain variables already
set for you, which ensures your commands work as intended. For instance, the PATH environment variable defines
where your shell looks for commands. Without it, nearly everything you try to do in Bash would
fail with a command not found error. Your environment, while mostly invisible to you as you go
about your everyday tasks, is vitally important.
There are many ways to affect your shell environment. You can make modifications in
configuration files, such as ~/.bashrc and ~/.profile , you can run
services at startup, and you can create your own custom commands or script your own Bash functions
.
Add to your environment with source
Bash (along with some other shells) has a built-in command called source . And
here's where it can get confusing: source performs the same function as the
command . (yes, that's but a single dot), and it's not the same
source as the Tcl command (which may come up on your screen if you
type man source ). The built-in source command isn't in your
PATH at all, in fact. It's a command that comes included as a part of Bash, and to
get further information about it, you can type help source .
The . command is POSIX
-compliant. The source command is not defined by POSIX but is interchangeable with
the . command.
According to Bash help , the source command executes a file in
your current shell. The clause "in your current shell" is significant, because it means it
doesn't launch a sub-shell; therefore, whatever you execute with source happens
within and affects your current environment.
Before exploring how source can affect your environment, try
source on a test file to ensure that it executes code as expected. First, create a
simple Bash script and save it as a file called hello.sh :
#!/usr/bin/env
bash
echo "hello world"
Using source , you can run this script even without setting the executable
bit:
$ source hello.sh
hello world
You can also use the built-in . command for the same results:
$ .
hello.sh
hello world
The source and . commands successfully execute the contents of the
test file.
Set variables and import functions
You can use source to "import" a file into your shell environment, just as you
might use the include keyword in C or C++ to reference a library or the
import keyword in Python to bring in a module. This is one of the most common uses
for source , and it's a common default inclusion in .bashrc files to
source a file called .bash_aliases so that any custom aliases you
define get imported into your environment when you log in.
Here's an example of importing a Bash function. First, create a function in a file called
myfunctions . This prints your public IP address and your local IP
address:
When you use source in Bash, it searches your current directory for the file
you reference. This doesn't happen in all shells, so check your documentation if you're not
using Bash.
If Bash can't find the file to execute, it searches your PATH instead. Again,
this isn't the default for all shells, so check your documentation if you're not using
Bash.
These are both nice convenience features in Bash. This behavior is surprisingly powerful
because it allows you to store common functions in a centralized location on your drive and
then treat your environment like an integrated development environment (IDE). You don't have to
worry about where your functions are stored, because you know they're in your local equivalent
of /usr/include , so no matter where you are when you source them, Bash finds
them.
For instance, you could create a directory called ~/.local/include as a storage
area for common functions and then put this block of code into your .bashrc
file:
for i in $HOME / .local / include /* ; do
source $i
done
This "imports" any file containing custom functions in ~/.local/include into
your shell environment.
Bash is the only shell that searches both the current directory and your PATH
when you use either the source or the . command.
Using source
for open source
Using source or . to execute files can be a convenient way to
affect your environment while keeping your alterations modular. The next time you're thinking
of copying and pasting big blocks of code into your .bashrc file, consider placing
related functions or groups of aliases into dedicated files, and then use source
to ingest them.
Bash tells me the sshd service is not running, so the next thing I want to do is start the service. I had checked its status
with my previous command. That command was saved in history , so I can reference it. I simply run:
$> !!:s/status/start/
sudo systemctl start sshd
The above expression has the following content:
!! - repeat the last command from history
:s/status/start/ - substitute status with start
The result is that the sshd service is started.
Next, I increase the default HISTSIZE value from 500 to 5000 by using the following command:
What if I want to display the last three commands in my history? I enter:
$> history 3
1002 ls
1003 tail audit.log
1004 history 3
I run tail on audit.log by referring to the history line number. In this case, I use line 1003:
$> !1003
tail audit.log
Reference the last argument of the previous command
When I want to list directory contents for different directories, I may change between directories quite often. There is a
nice trick you can use to refer to the last argument of the previous command. For example:
$> pwd
/home/username/
$> ls some/very/long/path/to/some/directory
foo-file bar-file baz-file
In the above example, /some/very/long/path/to/some/directory is the last argument of the previous command.
If I want to cd (change directory) to that location, I enter something like this:
$> cd $_
$> pwd
/home/username/some/very/long/path/to/some/directory
Now simply use a dash character to go back to where I was:
If you're looking for an interactive web portal to learn shell scripting and also try it online, Learn Shell is a great place to
start.
It covers the basics and offers some advanced exercises as well. The content is usually brief and to the point � hence, I'd
recommend you to check this out.
Shell scripting tutorial is web resource that's completely dedicated for shell scripting. You can choose to read the resource for
free or can opt to purchase the PDF, book, or the e-book to support it.
Of course, paying for the paperback edition or the e-book is optional. But, the resource should come in handy for free.
Udemy
is unquestionably one of the most popular platforms for online courses. And, in addition to the paid certified courses, it
also offers some free stuff that does not include certifications.
Shell Scripting is one of the most recommended free course available on Udemy for free. You can enroll in it without spending
anything.
Yet another interesting free course focused on bash shell scripting on Udemy. Compared to the previous one, this resource seems
to be more popular. So, you can enroll in it and see what it has to offer.
Not to forget that the free Udemy course does not offer any certifications. But, it's indeed an impressive free shell scripting
learning resource.
As the name suggests, the bash academy is completely focused on educating the users about bash shell.
It's suitable for both beginners and experienced users even though it does not offer a lot of content. Not just limited to the
guide -- but it also used to offer an interactive game to practice which no longer works.
Hence, if this is interesting enough, you can also check out its
GitHub page
and fork it to improve the existing resources if you want.
LinkedIn offers a number of free courses to help you improve your skills and get ready for more job opportunities. You will also
find a couple of courses focused on shell scripting to brush up some basic skills or gain some advanced knowledge in the process.
Here, I've linked a course for bash scripting, you can find some other similar courses for free as well.
An impressive advanced bash scripting guide available in the form of PDF for free. This PDF resource does not enforce any
copyrights and is completely free in the public domain.
Even though the resource is focused on providing advanced insights. It's also suitable for beginners to refer this resource and
start to learn shell scripting.
Tutorialspoint is a quite popular web portal to learn a variety of
programming languages
. I would say this is quite good for starters to learn the fundamentals and the basics.
This may not be suitable as a detailed resource -- but it should be a useful one for free.
Tutorialspoint
10. City College of San Francisco Online Notes [Web portal]
<img data-attachment-id="80382" data-permalink="https://itsfoss.com/shell-scripting-resources/scripting-notes-ccsf/" data-orig-file="https://i2.wp.com/itsfoss.com/wp-content/uploads/2020/06/scripting-notes-ccsf.png?fit=800%2C291&ssl=1" data-orig-size="800,291" data-comments-opened="1" data-image-meta="{"aperture":"0","credit":"","camera":"","caption":"","created_timestamp":"0","copyright":"","focal_length":"0","iso":"0","shutter_speed":"0","title":"","orientation":"0"}" data-image-title="scripting-notes-ccsf" data-image-description="" data-medium-file="https://i2.wp.com/itsfoss.com/wp-content/uploads/2020/06/scripting-notes-ccsf.png?fit=300%2C109&ssl=1" data-large-file="https://i2.wp.com/itsfoss.com/wp-content/uploads/2020/06/scripting-notes-ccsf.png?fit=800%2C291&ssl=1" src="https://i2.wp.com/itsfoss.com/wp-content/uploads/2020/06/scripting-notes-ccsf.png?ssl=1" alt="Scripting Notes Ccsf" srcset="https://i2.wp.com/itsfoss.com/wp-content/uploads/2020/06/scripting-notes-ccsf.png?w=800&ssl=1 800w, https://i2.wp.com/itsfoss.com/wp-content/uploads/2020/06/scripting-notes-ccsf.png?resize=300%2C109&ssl=1 300w, https://i2.wp.com/itsfoss.com/wp-content/uploads/2020/06/scripting-notes-ccsf.png?resize=768%2C279&ssl=1 768w" sizes="(max-width: 800px) 100vw, 800px" data-recalc-dims="1" />
This may not be the best free resource there is -- but if you're ready to explore every type of resource to learn shell scripting,
why not refer to the online notes of City College of San Francisco?
I came across this with a random search on the Internet about shell scripting resources.
Again, it's important to note that the online notes could be a bit dated. But, it should be an interesting resource to explore.
City College of San Francisco Notes
Honorable mention: Linux Man Page
<img data-attachment-id="80383" data-permalink="https://itsfoss.com/shell-scripting-resources/bash-linux-man-page/" data-orig-file="https://i2.wp.com/itsfoss.com/wp-content/uploads/2020/06/bash-linux-man-page.png?fit=800%2C437&ssl=1" data-orig-size="800,437" data-comments-opened="1" data-image-meta="{"aperture":"0","credit":"","camera":"","caption":"","created_timestamp":"0","copyright":"","focal_length":"0","iso":"0","shutter_speed":"0","title":"","orientation":"0"}" data-image-title="bash-linux-man-page" data-image-description="" data-medium-file="https://i2.wp.com/itsfoss.com/wp-content/uploads/2020/06/bash-linux-man-page.png?fit=300%2C164&ssl=1" data-large-file="https://i2.wp.com/itsfoss.com/wp-content/uploads/2020/06/bash-linux-man-page.png?fit=800%2C437&ssl=1" src="https://i2.wp.com/itsfoss.com/wp-content/uploads/2020/06/bash-linux-man-page.png?ssl=1" alt="Bash Linux Man Page" srcset="https://i2.wp.com/itsfoss.com/wp-content/uploads/2020/06/bash-linux-man-page.png?w=800&ssl=1 800w, https://i2.wp.com/itsfoss.com/wp-content/uploads/2020/06/bash-linux-man-page.png?resize=300%2C164&ssl=1 300w, https://i2.wp.com/itsfoss.com/wp-content/uploads/2020/06/bash-linux-man-page.png?resize=768%2C420&ssl=1 768w" sizes="(max-width: 800px) 100vw, 800px" data-recalc-dims="1" />
Not to forget, the man page for bash should also be a fantastic free resource to explore more about the commands and how it
works.
Even if it's not tailored as something that lets you master shell scripting, it is still an important web resource that you can
use for free. You can either choose to visit the man page online or just head to the terminal and type the following command to get
help:
man bash
Wrapping Up
There are also a lot of popular paid resources just like some of the
best Linux books
available out there. It's easy to start learning about shell scripting using some free resources available
across the web.
In addition to the ones I've mentioned, I'm sure there must be numerous other resources available online to help you learn shell
scripting.
Do you like the resources mentioned above? Also, if you're aware of a fantastic free resource that I possibly missed, feel free
to tell me about it in the comments below.
<img alt='' src='https://secure.gravatar.com/avatar/d098097d2a43d2fc1f0d31327f8288a6?s=90&d=mm&r=g' srcset='https://secure.gravatar.com/avatar/d098097d2a43d2fc1f0d31327f8288a6?s=180&d=mm&r=g 2x' class='avatar avatar-90 photo' height='90' width='90' />
About
Ankush Das
A passionate technophile who also happens to be a Computer Science graduate. You will usually see cats dancing to the beautiful
tunes sung by him.
comment_count comments
Newest
Newest
Oldest
Most Liked
Comment as a guest:
One quick way to determine whether the command you are using is a bash built-in or not is to
use the command "command". Yes, the command is called "command". Try it with a -V (capital V)
option like this:
$ command -V command
command is a shell builtin
$ command -V echo
echo is a shell builtin
$ command -V date
date is hashed (/bin/date)
When you see a "command is hashed" message like the one above, that means that the command
has been put into a hash table for quicker lookup.
... ... ...How to tell what
shell you're currently using
If you switch shells you can't depend on $SHELL to tell you what shell you're currently
using because $SHELL is just an environment variable that is set when you log in and doesn't
necessarily reflect your current shell. Try ps -p $$ instead as shown in these examples:
Built-ins are extremely useful and give each shell a lot of its character. If you use some
particular shell all of the time, it's easy to lose track of which commands are part of your
shell and which are not.
Differentiating a shell built-in from a Linux executable requires only a little extra
effort.
For security reasons, it defaults to "" , which disables explainshell integration. When set, this extension will
send requests to the endpoint and displays documentation for flags.
Once https://github.com/idank/explainshell/pull/125
is merged, it would be possible to set this to "https://explainshell.com" , however doing this is not recommended as
it will leak all your shell scripts to a third party -- do this at your own risk, or better always use a locally running
Docker image.
I had to use file recovery software when I accidentally formatted my backup. It worked, but
I now have 37,000 text files with numbers where names used to be.
If I name each file with the first 20-30 characters, I can sort the text-wheat from the
bit-chaff.
I have the vague idea of using whatever the equivalent of
head
is on Windows, but that's as far as I got. I'm not so hot on bash scripting either.
9 comments
54% Upvoted
This thread is archived
New comments cannot be posted and votes cannot be cast
Sort by
level 1
Answer: not really. The environment and script's working, but whenever
there's a forward slash or non-escaping character in the text, it chokes when it tries to set up a new
directory, and it deletes the file suffix. :-/ Good thing I used a copy of the data.
Need something to strip out the characters and spaces, and add the file
suffix, before it tries to rename.
sed
? Also needs
file
to identify it as true text. I can do the suffix at least:
for i in *; do mv $i "$(head -c 30 "$i").txt"; done
I recommend you use 'head -1', which will make the first line of the file
the filename and you won't have to worry about newlines. Then you can change the spaces to underscores with:
There's the
file
program on
*nix that'll tell you, in a verbose manner, the type of the file you give it as an argument, irregardless of
its file extension. Example:
$ file test.mp3
test.mp3: , 48 kHz, JntStereo
$ file mbr.bin
mbr.bin: data
$ file CalendarExport.ics
CalendarExport.ics: HTML document, UTF-8 Unicode text, with very long lines, with CRLF, LF line terminators
$ file jmk.doc
jmk.doc: Composite Document File V2 Document, Little Endian, Os: Windows, Version 6.0, Code page: 1250, Title: xx, Author: xx, Template: Normal, Last Saved By: xx, Revision Number: 4, Name of Creating Application: Microsoft Office Word, Total Editing Time: 2d+03:32:00, Last Printed: Fri Feb 22 11:29:00 2008, Create Time/Date: Fri Jan 4 12:57:00 2013, Last Saved Time/Date: Sun Jan 6 16:30:00 2013, Number of Pages: 6, Number of Words: 1711, Number of Characters: 11808, Security: 0
Thank you, but the software I used to recover (R-Undelete) sorted them
already. I found another program, RenameMaestro, that renames according to metadata in zip, rar, pdf, doc and
other files, but text files are too basic.
Not command line, but you could probably do this pretty easily in python,
using "glob" to get filenames, and os read and move/rename functions to get the text and change filenames.
level 1
So far, you're not getting many windows command line ideas
:(. I don't have any either, but here's an idea:
Use one of the live Linux distributions (Porteus is pretty
cool, but there're a slew of others). In that Linux environment, you can mount your Windows
hard drive, and use Linux tools, maybe something like
/u/tatumc
suggested.
r/commandline
Tired of typing the same long commands over
and over? Do you feel inefficient working on the command line? Bash aliases can make a world of
difference.
28 comments
A Bash alias is a method of supplementing or overriding Bash commands with new ones. Bash
aliases make it easy for users to customize their experience in a POSIX terminal.
They are often defined in $HOME/.bashrc or $HOME/bash_aliases (which must be loaded by
$HOME/.bashrc ).
Most distributions add at least some popular aliases in the default .bashrc file of any new
user account. These are simple ones to demonstrate the syntax of a Bash alias:
alias ls =
'ls -F'
alias ll = 'ls -lh'
Not all distributions ship with pre-populated aliases, though. If you add aliases manually,
then you must load them into your current Bash session:
$ source ~/.bashrc
Otherwise, you can close your terminal and re-open it so that it reloads its configuration
file.
With those aliases defined in your Bash initialization script, you can then type ll and get
the results of ls -l , and when you type ls you get, instead of the output of plain old
ls .
Those aliases are great to have, but they just scratch the surface of what's possible. Here
are the top 10 Bash aliases that, once you try them, you won't be able to live
without.
Set up first
Before beginning, create a file called ~/.bash_aliases :
$ touch ~/.bash_aliases
Then, make sure that this code appears in your ~/.bashrc file:
if [ -e $HOME /
.bash_aliases ] ; then
source $HOME / .bash_aliases
fi
If you want to try any of the aliases in this article for yourself, enter them into your
.bash_aliases file, and then load them into your Bash session with the source ~/.bashrc
command.
Sort by file size
If you started your computing life with GUI file managers like Nautilus in GNOME, the Finder
in MacOS, or Explorer in Windows, then you're probably used to sorting a list of files by their
size. You can do that in a terminal as well, but it's not exactly succinct.
Add this alias to your configuration on a GNU system:
alias lt = 'ls --human-readable
--size -1 -S --classify'
This alias replaces lt with an ls command that displays the size of each item, and then
sorts it by size, in a single column, with a notation to indicate the kind of file. Load your
new alias, and then try it out:
In fact, even on Linux, that command is useful, because using ls lists directories and
symlinks as being 0 in size, which may not be the information you actually want. It's your
choice.
Thanks to Brad Alexander for this alias idea.
View only mounted drives
The mount command used to be so simple. With just one command, you could get a list of all
the mounted filesystems on your computer, and it was frequently used for an overview of what
drives were attached to a workstation. It used to be impressive to see more than three or four
entries because most computers don't have many more USB ports than that, so the results were
manageable.
Computers are a little more complicated now, and between LVM, physical drives, network
storage, and virtual filesystems, the results of mount can be difficult to parse:
sysfs on
/sys type sysfs (rw,nosuid,nodev,noexec,relatime,seclabel)
proc on /proc type proc (rw,nosuid,nodev,noexec,relatime)
devtmpfs on /dev type devtmpfs
(rw,nosuid,seclabel,size=8131024k,nr_inodes=2032756,mode=755)
securityfs on /sys/kernel/security type securityfs (rw,nosuid,nodev,noexec,relatime)
[...]
/dev/nvme0n1p2 on /boot type ext4 (rw,relatime,seclabel)
/dev/nvme0n1p1 on /boot/efi type vfat
(rw,relatime,fmask=0077,dmask=0077,codepage=437,iocharset=ascii,shortname=winnt,errors=remount-ro)
[...]
gvfsd-fuse on /run/user/100977/gvfs type fuse.gvfsd-fuse
(rw,nosuid,nodev,relatime,user_id=100977,group_id=100977)
/dev/sda1 on /run/media/seth/pocket type ext4
(rw,nosuid,nodev,relatime,seclabel,uhelper=udisks2)
/dev/sdc1 on /run/media/seth/trip type ext4
(rw,nosuid,nodev,relatime,seclabel,uhelper=udisks2)
binfmt_misc on /proc/sys/fs/binfmt_misc type binfmt_misc (rw,relatime)
This alias uses awk to parse the output of mount by column, reducing the output to what you
probably looking for (what hard drives, and not file systems, are mounted):
On MacOS, the mount command doesn't provide terribly verbose output, so an alias may be
overkill. However, if you prefer a succinct report, try this:
alias mnt = 'mount | grep -E
^/dev | column -t'
The results:
$ mnt
/dev/disk1s1 on / (apfs, local, journaled)
/dev/disk1s4 on /private/var/vm (apfs, local, noexec, journaled, noatime, nobrowse) Find a
command in your grep history
Sometimes you figure out how to do something in the terminal, and promise yourself that
you'll never forget what you've just learned. Then an hour goes by, and you've completely
forgotten what you did.
Searching through your Bash history is something everyone has to do from time to time. If
you know exactly what you're searching for, you can use Ctrl+R to do a reverse search through
your history, but sometimes you can't remember the exact command you want to find.
Here's an alias to make that task a little easier:
It happens every Monday: You get to work, you sit down at your computer, you open a
terminal, and you find you've forgotten what you were doing last Friday. What you need is an
alias to list the most recently modified files.
You can use the ls command to create an alias to help you find where you left off:
alias
left = 'ls -t -1'
The output is simple, although you can extend it with the -- long option if you prefer. The
alias, as listed, displays this:
$ left
demo.jpeg
demo.xcf
design-proposal.md
rejects.txt
brainstorm.txt
query-letter.xml Count files
If you need to know how many files you have in a directory, the solution is one of the most
classic examples of UNIX command construction: You list files with the ls command, control its
output to be only one column with the -1 option, and then pipe that output to the wc (word
count) command to count how many lines of single files there are.
It's a brilliant demonstration of how the UNIX philosophy allows users to build their own
solutions using small system components. This command combination is also a lot to type if you
happen to do it several times a day, and it doesn't exactly work for a directory of directories
without using the -R option, which introduces new lines to the output and renders the exercise
useless.
Instead, this alias makes the process easy:
alias count = 'find . -type f | wc -l'
This one counts files, ignoring directories, but not the contents of directories. If
you have a project folder containing two directories, each of which contains two files, the
alias returns four, because there are four files in the entire project.
$ ls
foo bar
$ count
4 Create a Python virtual environment
Do you code in Python?
Do you code in Python a lot?
If you do, then you know that creating a Python virtual environment requires, at the very
least, 53 keystrokes.
That's 49 too many, but that's easily circumvented with two new aliases called ve and va
:
alias ve = 'python3 -m venv ./venv'
alias va = 'source ./venv/bin/activate'
Running ve creates a new directory, called venv , containing the usual virtual environment
filesystem for Python3. The va alias activates the environment in your current shell:
$ cd
my-project
$ ve
$ va
(venv) $ Add a copy progress bar
Everybody pokes fun at progress bars because they're infamously inaccurate. And yet, deep
down, we all seem to want them. The UNIX cp command has no progress bar, but it does have a -v
option for verbosity, meaning that it echoes the name of each file being copied to your
terminal. That's a pretty good hack, but it doesn't work so well when you're copying one big
file and want some indication of how much of the file has yet to be transferred.
The pv command provides a progress bar during copy, but it's not common as a default
application. On the other hand, the rsync command is included in the default installation of
nearly every POSIX system available, and it's widely recognized as one of the smartest ways to
copy files both remotely and locally.
Better yet, it has a built-in progress bar.
alias cpv = 'rsync -ah --info=progress2'
Using this alias is the same as using the cp command:
An interesting side effect of using this command is that rsync copies both files and
directories without the -r flag that cp would otherwise require.
Protect yourself from
file removal accidents
You shouldn't use the rm command. The rm manual even says so:
Warning : If you use 'rm' to remove a file, it is usually possible to recover the
contents of that file. If you want more assurance that the contents are truly unrecoverable,
consider using 'shred'.
If you want to remove a file, you should move the file to your Trash, just as you do when
using a desktop.
POSIX makes this easy, because the Trash is an accessible, actual location in your
filesystem. That location may change, depending on your platform: On a FreeDesktop , the Trash is located at
~/.local/share/Trash , while on MacOS it's ~/.Trash , but either way, it's just a directory
into which you place files that you want out of sight until you're ready to erase them
forever.
This simple alias provides a way to toss files into the Trash bin from your
terminal:
alias tcn = 'mv --force -t ~/.local/share/Trash '
This alias uses a little-known mv flag that enables you to provide the file you want to move
as the final argument, ignoring the usual requirement for that file to be listed first. Now you
can use your new command to move files and folders to your system Trash:
$ ls
foo bar
$ tcn foo
$ ls
bar
Now the file is "gone," but only until you realize in a cold sweat that you still need it.
At that point, you can rescue the file from your system Trash; be sure to tip the Bash and mv
developers on the way out.
Note: If you need a more robust Trash command with better FreeDesktop compliance, see
Trashy .
Simplify your Git
workflow
Everyone has a unique workflow, but there are usually repetitive tasks no matter what. If
you work with Git on a regular basis, then there's probably some sequence you find yourself
repeating pretty frequently. Maybe you find yourself going back to the master branch and
pulling the latest changes over and over again during the day, or maybe you find yourself
creating tags and then pushing them to the remote, or maybe it's something else entirely.
No matter what Git incantation you've grown tired of typing, you may be able to alleviate
some pain with a Bash alias. Largely thanks to its ability to pass arguments to hooks, Git has
a rich set of introspective commands that save you from having to perform uncanny feats in
Bash.
For instance, while you might struggle to locate, in Bash, a project's top-level directory
(which, as far as Bash is concerned, is an entirely arbitrary designation, since the absolute
top level to a computer is the root directory), Git knows its top level with a simple query. If
you study up on Git hooks, you'll find yourself able to find out all kinds of information that
Bash knows nothing about, but you can leverage that information with a Bash alias.
Here's an alias to find the top level of a Git project, no matter where in that project you
are currently working, and then to change directory to it, change to the master branch, and
perform a Git pull:
This kind of alias is by no means a universally useful alias, but it demonstrates how a
relatively simple alias can eliminate a lot of laborious navigation, commands, and waiting for
prompts.
A simpler, and probably more universal, alias returns you to the Git project's top level.
This alias is useful because when you're working on a project, that project more or less
becomes your "temporary home" directory. It should be as simple to go "home" as it is to go to
your actual home, and here's an alias to do it:
alias cg = 'cd `git rev-parse
--show-toplevel`'
Now the command cg takes you to the top of your Git project, no matter how deep into its
directory structure you have descended.
Change directories and view the contents at the
same time
It was once (allegedly) proposed by a leading scientist that we could solve many of the
planet's energy problems by harnessing the energy expended by geeks typing cd followed by ls
.
It's a common pattern, because generally when you change directories, you have the impulse or
the need to see what's around.
But "walking" your computer's directory tree doesn't have to be a start-and-stop
process.
This one's cheating, because it's not an alias at all, but it's a great excuse to explore
Bash functions. While aliases are great for quick substitutions, Bash allows you to add local
functions in your .bashrc file (or a separate functions file that you load into .bashrc , just
as you do your aliases file).
To keep things modular, create a new file called ~/.bash_functions and then have your
.bashrc load it:
if [ -e $HOME / .bash_functions ] ; then
source $HOME / .bash_functions
fi
In the functions file, add this code:
function cl () {
DIR = "$*" ;
# if no DIR given, go home
if [ $# -lt 1 ] ; then
DIR = $HOME ;
fi ;
builtin cd " ${DIR} " && \
# use your preferred ls command
ls -F --color =auto
}
Load the function into your Bash session and then try it out:
Functions are much more flexible than aliases, but with that flexibility comes the
responsibility for you to ensure that your code makes sense and does what you expect. Aliases
are meant to be simple, so keep them easy, but useful. For serious modifications to how Bash
behaves, use functions or custom shell scripts saved to a location in your PATH .
For the record, there are some clever hacks to implement the cd and ls sequence as an
alias, so if you're patient enough, then the sky is the limit even using humble
aliases.
Start aliasing and functioning
Customizing your environment is what makes Linux fun, and increasing your efficiency is what
makes Linux life-changing. Get started with simple aliases, graduate to functions, and post
your must-have aliases in the comments!
My backup tool of choice (rdiff-backup) handles these sorts of comparisons pretty well, so
I tend to be confident in my backup files. That said, there's always the edge case, and this
kind of function is a great solution for those. Thanks!
A few of my "cannot-live-withouts" are regex based:
Decomment removes full-line comments and blank lines. For example, when looking at a
"stock" /etc/httpd/whatever.conf file that has a gazillion lines in it,
alias decomment='egrep -v "^[[:space:]]*((#|;|//).*)?$" '
will show you that only four lines in the file actually DO anything, and the gazillion
minus four are comments. I use this ALL the time with config files, Python (and other
languages) code, and god knows where else.
Then there's unprintables and expletives which are both very similar:
alias unprintable='grep --color="auto" -P -n "[\x00-\x1E]"'
alias expletives='grep --color="auto" -P -n "[^\x00-\x7E]" '
The first shows which lines (with line numbers) in a file contain control characters, and
the second shows which lines in a file contain anything "above" a RUBOUT, er, excuse me, I
mean above ASCII 127. (I feel old.) ;-) Handy when, for example, someone gives you a program
that they edited or created with LibreOffice, and oops... half of the quoted strings have
"real" curly opening and closing quote marks instead of ASCII 0x22 "straight" quote mark
delimiters... But there's actually a few curlies you want to keep, so a "nuke 'em all in one
swell foop" approach won't work.
Thanks for this post! I have created a Github repo- https://github.com/bhuvana-guna/awesome-bash-shortcuts
with a motive to create an extended list of aliases/functions for various programs. As I am a
newbie to terminal and linux, please do contribute to it with these and other super awesome
utilities and help others easily access them.
Your Linux terminal probably supports Unicode, so why not take advantage of that and add
a seasonal touch to your prompt? 11 Dec 2018 Jason Baker (Red Hat) Feed 84
up 3 comments Image credits : Jason Baker x Subscribe now
Hello once again for another installment of the Linux command-line toys advent calendar. If
this is your first visit to the series, you might be asking yourself what a command-line toy
even is? Really, we're keeping it pretty open-ended: It's anything that's a fun diversion at
the terminal, and we're giving bonus points for anything holiday-themed.
Maybe you've seen some of these before, maybe you haven't. Either way, we hope you have
fun.
Today's toy is super-simple: It's your Bash prompt. Your Bash prompt? Yep! We've got a few
more weeks of the holiday season left to stare at it, and even more weeks of winter here in the
northern hemisphere, so why not have some fun with it.
Your Bash prompt currently might be a simple dollar sign ( $ ), or more likely, it's
something a little longer. If you're not sure what makes up your Bash prompt right now, you can
find it in an environment variable called $PS1. To see it, type:
echo $PS1
For me, this returns:
[\u@\h \W]\$
The \u , \h , and \W are special characters for username, hostname, and working directory.
There are others you can use as well; for help building out your Bash prompt, you can use
EzPrompt , an online generator of PS1
configurations that includes lots of options including date and time, Git status, and more.
You may have other variables that make up your Bash prompt set as well; $PS2 for me contains
the closing brace of my command prompt. See this article for more information.
To change your prompt, simply set the environment variable in your terminal like this:
$
PS1 = '\u is cold: '
jehb is cold:
To set it permanently, add the same code to your /etc/bashrc using your favorite text
editor.
So what does this have to do with winterization? Well, chances are on a modern machine, your
terminal support Unicode, so you're not limited to the standard ASCII character set. You can
use any emoji that's a part of the Unicode specification, including a snowflake ❄, a
snowman ☃, or a pair of skis 🎿. You've got plenty of wintery options to choose
from.
🎄 Christmas Tree
🧥 Coat
🦌 Deer
🧤 Gloves
🤶 Mrs. Claus
🎅 Santa Claus
🧣 Scarf
🎿 Skis
🏂 Snowboarder
❄ Snowflake
☃ Snowman
⛄ Snowman Without Snow
🎁 Wrapped Gift
Pick your favorite, and enjoy some winter cheer. Fun fact: modern filesystems also support
Unicode characters in their filenames, meaning you can technically name your next program
"❄❄❄❄❄.py" . That said, please don't.
Do you have a favorite command-line toy that you think I ought to include? The calendar for
this series is mostly filled out but I've got a few spots left. Let me know in the comments
below, and I'll check it out. If there's space, I'll try to include it. If not, but I get some
good submissions, I'll do a round-up of honorable mentions at the end.
**PS1** - The value of this parameter is expanded and used as the primary prompt string. The default value is \u@\h \W\\$ .
**PS2** - The value of this parameter is expanded as with PS1 and used as the secondary prompt string. The default is ]
**PS3** - The value of this parameter is used as the prompt for the select command
**PS4** - The value of this parameter is expanded as with PS1 and the value is printed before each command bash displays during an execution trace. The first character of PS4 is replicated multiple times, as necessary, to indicate multiple levels of indirection. The default is +
PS1
is a primary prompt variable which holds
\u@\h \W\\$
special bash
characters. This is the default structure of the bash prompt and is displayed every time a user logs in
using a terminal. These default values are set in the
/etc/bashrc
file.
The special characters in the default prompt are as follows:
This solution is part of Red Hat's fast-track publication program, providing a huge library of solutions
that Red Hat engineers have created while supporting our customers. To give you the knowledge you need the
instant it becomes available, these articles may be presented in a raw and unedited form.
2 Comments
Log in to comment
MW
Community Member
48
points
# It's NOT a good idea to change this file unless you know what you
# are doing. It's much better to create a custom.sh shell script in
# /etc/profile.d/ to make custom changes to your environment, as this
# will prevent the need for merging in future updates.
On RHEL 7 instead of the solution suggested above create a /etc/profile.d/custom.sh which
contains
Hello Red Hat community! I also found this useful:
Raw
Special prompt variable characters:
\d The date, in "Weekday Month Date" format (e.g., "Tue May 26").
\h The hostname, up to the first . (e.g. deckard)
\H The hostname. (e.g. deckard.SS64.com)
\j The number of jobs currently managed by the shell.
\l The basename of the shell's terminal device name.
\s The name of the shell, the basename of $0 (the portion following
the final slash).
\t The time, in 24-hour HH:MM:SS format.
\T The time, in 12-hour HH:MM:SS format.
\@ The time, in 12-hour am/pm format.
\u The username of the current user.
\v The version of Bash (e.g., 2.00)
\V The release of Bash, version + patchlevel (e.g., 2.00.0)
\w The current working directory.
\W The basename of $PWD.
\! The history number of this command.
\# The command number of this command.
\$ If you are not root, inserts a "$"; if you are root, you get a "#" (root uid = 0)
\nnn The character whose ASCII code is the octal value nnn.
\n A newline.
\r A carriage return.
\e An escape character (typically a color code).
\a A bell character.
\\ A backslash.
\[ Begin a sequence of non-printing characters. (like color escape sequences). This
allows bash to calculate word wrapping correctly.
\] End a sequence of non-printing characters.
Using single quotes instead of double quotes when exporting your PS variables is recommended, it makes the prompt a tiny bit faster to evaluate plus you can then do an echo $PS1 to see the current prompt settings.
To explain the above, I'm builidng my bash prompt by executing a function stored in a
string, which was a decision made as the result of
this question . Let's pretend like it works fine, because it does, except when unicode
characters get involved
I am trying to find the proper way to escape a unicode character, because right now it
messes with the bash line length. An easy way to test if it's broken is to type a long
command, execute it, press CTRL-R and type to find it, and then pressing CTRL-A CTRL-E to
jump to the beginning / end of the line. If the text gets garbled then it's not working.
I have tried several things to properly escape the unicode character in the function
string, but nothing seems to be working.
Which is the main reason I made the prompt a function string. That escape sequence does
NOT mess with the line length, it's just the unicode character.
The \[...\] sequence says to ignore this part of the string completely, which is
useful when your prompt contains a zero-length sequence, such as a control sequence which
changes the text color or the title bar, say. But in this case, you are printing a character,
so the length of it is not zero. Perhaps you could work around this by, say, using a no-op
escape sequence to fool Bash into calculating the correct line length, but it sounds like
that way lies madness.
The correct solution would be for the line length calculations in Bash to correctly grok
UTF-8 (or whichever Unicode encoding it is that you are using). Uhm, have you tried without
the \[...\] sequence?
Edit: The following implements the solution I propose in the comments below. The cursor
position is saved, then two spaces are printed, outside of \[...\] , then the
cursor position is restored, and the Unicode character is printed on top of the two spaces.
This assumes a fixed font width, with double width for the Unicode character.
PS1='\['"`tput sc`"'\] \['"`tput rc`"'༇ \] \$ '
At least in the OSX Terminal, Bash 3.2.17(1)-release, this passes cursory [sic]
testing.
In the interest of transparency and legibility, I have ignored the requirement to have the
prompt's functionality inside a function, and the color coding; this just changes the prompt
to the character, space, dollar prompt, space. Adapt to suit your somewhat more complex
needs.
The trick as pointed out in @tripleee's link is the use of the commands tput
sc and tput rc which save and then restore the cursor position. The code
is effectively saving the cursor position, printing two spaces for width, restoring the
cursor position to before the spaces, then printing the special character so that the width
of the line is from the two spaces, not the character.
> ,
(Not the answer to your problem, but some pointers and general experience related to your
issue.)
I see the behaviour you describe about cmd-line editing (Ctrl-R, ... Cntrl-A Ctrl-E ...)
all the time, even without unicode chars.
At one work-site, I spent the time to figure out the diff between the terminals
interpretation of the TERM setting VS the TERM definition used by the OS (well, stty I
suppose).
NOW, when I have this problem, I escape out of my current attempt to edit the line, bring
the line up again, and then immediately go to the 'vi' mode, which opens the vi editor.
(press just the 'v' char, right?). All the ease of use of a full-fledged session of vi; why
go with less ;-)?
Looking again at your problem description, when you say
That is just a string definition, right? and I'm assuming your simplifying the problem
definition by assuming this is the output of your my_function . It seems very
likely in the steps of creating the function definition, calling the function AND using the
values returned are a lot of opportunities for shell-quoting to not work the way you want it
to.
If you edit your question to include the my_function definition, and its
complete use (reducing your function to just what is causing the problem), it may be easier
for others to help with this too. Finally, do you use set -vx regularly? It can
help show how/wnen/what of variable expansions, you may find something there.
Failing all of those, look at Orielly termcap & terminfo
. You may need to look at the man page for your local systems stty and related
cmds AND you may do well to look for user groups specific to you Linux system (I'm assuming
you use a Linux variant).
$ find . -size +10M -type f -print0 | xargs -0 ls -Ssh | sort -z
For those wondering, the above command will find and list files bigger than 10 MB in the
current directory and sort them by size. I admit that I couldn't remember this command. I guess
some of you can't remember this command either. This is why we are going to apply a tag to such
kind of commands.
To apply a tag, just type the command and add the comment ( i.e. tag) at the end of the
command as shown below.
$ find . -size +10M -type f -print0 | xargs -0 ls -Ssh | sort -z #ListFilesBiggerThanXSize
Here, #ListFilesBiggerThanXSize is the tag name to the above command. Make sure you have
given a space between the command and tag name. Also, please use the tag name as simple, short
and clear as possible to easily remember it later. Otherwise, you may need another tool to
recall the tags.
To run it again, simply use the tag name like below.
$ !? #ListFilesBiggerThanXSize
Here, the ! (Exclamation mark) and ? (Question mark) operators are used to fetch and run the
command which we tagged earlier from the BASH history.
Given a filename in the form
someletters_12345_moreleters.ext
, I want to extract the 5
digits and put them into a variable.
So to emphasize the point, I have a filename with x number of
characters then a five digit sequence surrounded by a single underscore on either side then another
set of x number of characters. I want to take the 5 digit number and put that into a variable.
I am very interested in the number of different ways that this can be accomplished.
If
x
is constant, the following parameter expansion performs substring extraction:
b=${a:12:5}
where
12
is the offset (zero-based) and
5
is the length
If the underscores around the digits are the only ones in the input, you can strip off the
prefix and suffix (respectively) in two steps:
tmp=${a#*_} # remove prefix ending in "_"
b=${tmp%_*} # remove suffix starting with "_"
If there are other underscores, it's probably feasible anyway, albeit more tricky. If anyone
knows how to perform both expansions in a single expression, I'd like to know too.
Both solutions presented are pure bash, with no process spawning involved, hence very fast.
In case someone wants more rigorous information, you can also search it in man bash like this
$ man bash [press return key]
/substring [press return key]
[press "n" key]
[press "n" key]
[press "n" key]
[press "n" key]
Result:
${parameter:offset}
${parameter:offset:length}
Substring Expansion. Expands to up to length characters of
parameter starting at the character specified by offset. If
length is omitted, expands to the substring of parameter start‐
ing at the character specified by offset. length and offset are
arithmetic expressions (see ARITHMETIC EVALUATION below). If
offset evaluates to a number less than zero, the value is used
as an offset from the end of the value of parameter. Arithmetic
expressions starting with a - must be separated by whitespace
from the preceding : to be distinguished from the Use Default
Values expansion. If length evaluates to a number less than
zero, and parameter is not @ and not an indexed or associative
array, it is interpreted as an offset from the end of the value
of parameter rather than a number of characters, and the expan‐
sion is the characters between the two offsets. If parameter is
@, the result is length positional parameters beginning at off‐
set. If parameter is an indexed array name subscripted by @ or
*, the result is the length members of the array beginning with
${parameter[offset]}. A negative offset is taken relative to
one greater than the maximum index of the specified array. Sub‐
string expansion applied to an associative array produces unde‐
fined results. Note that a negative offset must be separated
from the colon by at least one space to avoid being confused
with the :- expansion. Substring indexing is zero-based unless
the positional parameters are used, in which case the indexing
starts at 1 by default. If offset is 0, and the positional
parameters are used, $0 is prefixed to the list.
Note: the above is a regular expression and is restricted to your specific scenario of five
digits surrounded by underscores. Change the regular expression if you need different matching.
I have a filename with x number of characters then a five digit sequence surrounded by a
single underscore on either side then another set of x number of characters. I want to take
the 5 digit number and put that into a variable.
Here's a prefix-suffix solution (similar to the solutions given by JB and Darron) that matches
the first block of digits and does not depend on the surrounding underscores:
str='someletters_12345_morele34ters.ext'
s1="${str#"${str%%[[:digit:]]*}"}" # strip off non-digit prefix from str
s2="${s1%%[^[:digit:]]*}" # strip off non-digit suffix from s1
echo "$s2" # 12345
A slightly more general option would be
not
to assume that you have an
underscore
_
marking the start of your digits sequence, hence for instance stripping
off all non-numbers you get before your sequence:
s/[^0-9]\+\([0-9]\+\).*/\1/p
.
> man sed | grep s/regexp/replacement -A 2
s/regexp/replacement/
Attempt to match regexp against the pattern space. If successful, replace that portion matched with replacement. The replacement may contain the special character & to
refer to that portion of the pattern space which matched, and the special escapes \1 through \9 to refer to the corresponding matching sub-expressions in the regexp.
More on this, in case you're not too confident with regexps:
s
is for _s_ubstitute
[0-9]+
matches 1+ digits
\1
links to the group n.1 of the regex output (group 0 is the whole match,
group 1 is the match within parentheses in this case)
p
flag is for _p_rinting
All escapes
\
are there to make
sed
's regexp processing work.
This will be more efficient if you want to extract something that has any chars like
abc
or any special characters like
_
or
-
. For example: If your string is
like this and you want everything that is after
someletters_
and before
_moreleters.ext
:
str="someletters_123-45-24a&13b-1_moreleters.ext"
With my code you can mention what exactly you want. Explanation:
#*
It will remove the preceding string including the matching key. Here the key
we mentioned is
_
%
It will remove the following string including the
matching key. Here the key we mentioned is '_more*'
Do some experiments yourself and you would find this interesting.
Ok, here goes pure Parameter Substitution with an empty string. Caveat is that I have defined
someletters
and
moreletters
as only characters. If they are
alphanumeric, this will not work as it is.
Can anyone recommend a safe solution to recursively replace spaces with underscores in file
and directory names starting from a given root directory? For example:
$ tree
.
|-- a dir
| `-- file with spaces.txt
`-- b dir
|-- another file with spaces.txt
`-- yet another file with spaces.pdf
Use rename (aka prename ) which is a Perl script
which may be on
your system already. Do it in two steps:
find -name "* *" -type d | rename 's/ /_/g' # do the directories first
find -name "* *" -type f | rename 's/ /_/g'
Based on Jürgen's answer and able to handle multiple layers of files and directories
in a single bound using the "Revision 1.5 1998/12/18 16:16:31 rmb1" version of
/usr/bin/rename (a Perl script):
This one does a little bit more. I use it to rename my downloaded torrents (no special
characters (non-ASCII), spaces, multiple dots, etc.).
#!/usr/bin/perl
&rena(`find . -type d`);
&rena(`find . -type f`);
sub rena
{
($elems)=@_;
@t=split /\n/,$elems;
for $e (@t)
{
$_=$e;
# remove ./ of find
s/^\.\///;
# non ascii transliterate
tr [\200-\377][_];
tr [\000-\40][_];
# special characters we do not want in paths
s/[ \-\,\;\?\+\'\"\!\[\]\(\)\@\#]/_/g;
# multiple dots except for extension
while (/\..*\./)
{
s/\./_/;
}
# only one _ consecutive
s/_+/_/g;
next if ($_ eq $e ) or ("./$_" eq $e);
print "$e -> $_\n";
rename ($e,$_);
}
}
I just make one for my own purpose. You may can use it as reference.
#!/bin/bash
cd /vzwhome/c0cheh1/dev_source/UB_14_8
for file in *
do
echo $file
cd "/vzwhome/c0cheh1/dev_source/UB_14_8/$file/Configuration/$file"
echo "==> `pwd`"
for subfile in *\ *; do [ -d "$subfile" ] && ( mv "$subfile" "$(echo $subfile | sed -e 's/ /_/g')" ); done
ls
cd /vzwhome/c0cheh1/dev_source/UB_14_8
done
for i in `IFS="";find /files -name *\ *`
do
echo $i
done > /tmp/list
while read line
do
mv "$line" `echo $line | sed 's/ /_/g'`
done < /tmp/list
rm /tmp/list
If you want to match the pattern regardless of it's case (Capital letters or lowercase
letters) you can set the nocasematch shell option with the shopt builtin. You can do
this as the first line of your script. Since the script will run in a subshell it won't effect
your normal environment.
#!/bin/bash
shopt -s nocasematch
read -p "Name a Star Trek character: " CHAR
case $CHAR in
"Seven of Nine" | Neelix | Chokotay | Tuvok | Janeway )
echo "$CHAR was in Star Trek Voyager"
;;&
Archer | Phlox | Tpol | Tucker )
echo "$CHAR was in Star Trek Enterprise"
;;&
Odo | Sisko | Dax | Worf | Quark )
echo "$CHAR was in Star Trek Deep Space Nine"
;;&
Worf | Data | Riker | Picard )
echo "$CHAR was in Star Trek The Next Generation" && echo "/etc/redhat-release"
;;
*) echo "$CHAR is not in this script."
;;
esac
Is there any directory bookmarking utility for bash to allow move around faster on the command
line?
UPDATE
Thanks guys for the feedback however I created my own simple shell script (feel free to modify/expand
it)
function cdb() {
USAGE="Usage: cdb [-c|-g|-d|-l] [bookmark]" ;
if [ ! -e ~/.cd_bookmarks ] ; then
mkdir ~/.cd_bookmarks
fi
case $1 in
# create bookmark
-c) shift
if [ ! -f ~/.cd_bookmarks/$1 ] ; then
echo "cd `pwd`" > ~/.cd_bookmarks/"$1" ;
else
echo "Try again! Looks like there is already a bookmark '$1'"
fi
;;
# goto bookmark
-g) shift
if [ -f ~/.cd_bookmarks/$1 ] ; then
source ~/.cd_bookmarks/"$1"
else
echo "Mmm...looks like your bookmark has spontaneously combusted. What I mean to say is that your bookmark does not exist." ;
fi
;;
# delete bookmark
-d) shift
if [ -f ~/.cd_bookmarks/$1 ] ; then
rm ~/.cd_bookmarks/"$1" ;
else
echo "Oops, forgot to specify the bookmark" ;
fi
;;
# list bookmarks
-l) shift
ls -l ~/.cd_bookmarks/ ;
;;
*) echo "$USAGE" ;
;;
esac
}
INSTALL
1./ create a file ~/.cdb and copy the above script into it.
A colon-separated list of search paths available to the cd command, similar in function to
the $PATH variable for binaries. The $CDPATH variable may be set in the local ~/.bashrc file.
ash$ cd bash-doc
bash: cd: bash-doc: No such file or directory
bash$ CDPATH=/usr/share/doc
bash$ cd bash-doc
/usr/share/doc/bash-doc
bash$ echo $PWD
/usr/share/doc/bash-doc
and
cd -
It's the command-line equivalent of the back button (takes you to the previous directory you
were in).
It primarily allows you to "fuzzy-find" files in a number of ways, but it also allows to feed
arbitrary text data to it and filter this data. So, the shortcuts idea is simple: all we need
is to maintain a file with paths (which are shortcuts), and fuzzy-filter this file. Here's how
it looks: we type cdg command (from "cd global", if you like), get a list of our
bookmarks, pick the needed one in just a few keystrokes, and press Enter. Working directory is
changed to the picked item:
It is extremely fast and convenient: usually I just type 3-4 letters of the needed item, and
all others are already filtered out. Additionally, of course we can move through list with arrow
keys or with vim-like keybindings Ctrl+j / Ctrl+k .
It is possible to use it for GUI applications as well (via xterm): I use that for my GUI file
manager Double Commander . I have
plans to write an article about this use case, too.
Inspired by the question and answers here, I added the lines below to my ~/.bashrc
file.
With this you have a favdir command (function) to manage your favorites and a
autocompletion function to select an item from these favorites.
# ---------
# Favorites
# ---------
__favdirs_storage=~/.favdirs
__favdirs=( "$HOME" )
containsElement () {
local e
for e in "${@:2}"; do [[ "$e" == "$1" ]] && return 0; done
return 1
}
function favdirs() {
local cur
local IFS
local GLOBIGNORE
case $1 in
list)
echo "favorite folders ..."
printf -- ' - %s\n' "${__favdirs[@]}"
;;
load)
if [[ ! -e $__favdirs_storage ]] ; then
favdirs save
fi
# mapfile requires bash 4 / my OS-X bash vers. is 3.2.53 (from 2007 !!?!).
# mapfile -t __favdirs < $__favdirs_storage
IFS=$'\r\n' GLOBIGNORE='*' __favdirs=($(< $__favdirs_storage))
;;
save)
printf -- '%s\n' "${__favdirs[@]}" > $__favdirs_storage
;;
add)
cur=${2-$(pwd)}
favdirs load
if containsElement "$cur" "${__favdirs[@]}" ; then
echo "'$cur' allready exists in favorites"
else
__favdirs+=( "$cur" )
favdirs save
echo "'$cur' added to favorites"
fi
;;
del)
cur=${2-$(pwd)}
favdirs load
local i=0
for fav in ${__favdirs[@]}; do
if [ "$fav" = "$cur" ]; then
echo "delete '$cur' from favorites"
unset __favdirs[$i]
favdirs save
break
fi
let i++
done
;;
*)
echo "Manage favorite folders."
echo ""
echo "usage: favdirs [ list | load | save | add | del ]"
echo ""
echo " list : list favorite folders"
echo " load : load favorite folders from $__favdirs_storage"
echo " save : save favorite directories to $__favdirs_storage"
echo " add : add directory to favorites [default pwd $(pwd)]."
echo " del : delete directory from favorites [default pwd $(pwd)]."
esac
} && favdirs load
function __favdirs_compl_command() {
COMPREPLY=( $( compgen -W "list load save add del" -- ${COMP_WORDS[COMP_CWORD]}))
} && complete -o default -F __favdirs_compl_command favdirs
function __favdirs_compl() {
local IFS=$'\n'
COMPREPLY=( $( compgen -W "${__favdirs[*]}" -- ${COMP_WORDS[COMP_CWORD]}))
}
alias _cd='cd'
complete -F __favdirs_compl _cd
Within the last two lines, an alias to change the current directory (with autocompletion) is
created. With this alias ( _cd ) you are able to change to one of your favorite directories.
May you wan't to change this alias to something which fits your needs .
With the function favdirs you can manage your favorites (see usage).
$ favdirs
Manage favorite folders.
usage: favdirs [ list | load | save | add | del ]
list : list favorite folders
load : load favorite folders from ~/.favdirs
save : save favorite directories to ~/.favdirs
add : add directory to favorites [default pwd /tmp ].
del : delete directory from favorites [default pwd /tmp ].
@getmizanur I used your cdb script. I enhanced it slightly by adding bookmarks tab completion.
Here's my version of your cdb script.
_cdb()
{
local _script_commands=$(ls -1 ~/.cd_bookmarks/)
local cur=${COMP_WORDS[COMP_CWORD]}
COMPREPLY=( $(compgen -W "${_script_commands}" -- $cur) )
}
complete -F _cdb cdb
function cdb() {
local USAGE="Usage: cdb [-h|-c|-d|-g|-l|-s] [bookmark]\n
\t[-h or no args] - prints usage help\n
\t[-c bookmark] - create bookmark\n
\t[-d bookmark] - delete bookmark\n
\t[-g bookmark] - goto bookmark\n
\t[-l] - list bookmarks\n
\t[-s bookmark] - show bookmark location\n
\t[bookmark] - same as [-g bookmark]\n
Press tab for bookmark completion.\n"
if [ ! -e ~/.cd_bookmarks ] ; then
mkdir ~/.cd_bookmarks
fi
case $1 in
# create bookmark
-c) shift
if [ ! -f ~/.cd_bookmarks/$1 ] ; then
echo "cd `pwd`" > ~/.cd_bookmarks/"$1"
complete -F _cdb cdb
else
echo "Try again! Looks like there is already a bookmark '$1'"
fi
;;
# goto bookmark
-g) shift
if [ -f ~/.cd_bookmarks/$1 ] ; then
source ~/.cd_bookmarks/"$1"
else
echo "Mmm...looks like your bookmark has spontaneously combusted. What I mean to say is that your bookmark does not exist." ;
fi
;;
# show bookmark
-s) shift
if [ -f ~/.cd_bookmarks/$1 ] ; then
cat ~/.cd_bookmarks/"$1"
else
echo "Mmm...looks like your bookmark has spontaneously combusted. What I mean to say is that your bookmark does not exist." ;
fi
;;
# delete bookmark
-d) shift
if [ -f ~/.cd_bookmarks/$1 ] ; then
rm ~/.cd_bookmarks/"$1" ;
else
echo "Oops, forgot to specify the bookmark" ;
fi
;;
# list bookmarks
-l) shift
ls -1 ~/.cd_bookmarks/ ;
;;
-h) echo -e $USAGE ;
;;
# goto bookmark by default
*)
if [ -z "$1" ] ; then
echo -e $USAGE
elif [ -f ~/.cd_bookmarks/$1 ] ; then
source ~/.cd_bookmarks/"$1"
else
echo "Mmm...looks like your bookmark has spontaneously combusted. What I mean to say is that your bookmark does not exist." ;
fi
;;
esac
}
Anc stands for anchor, but anc's anchors are really just bookmarks.
It's designed for ease of use and there're multiple ways of navigating, either by giving a
text pattern, using numbers, interactively, by going back, or using [TAB] completion.
I'm actively working on it and open to input on how to make it better.
Allow me to paste the examples from anc's github page here:
# make the current directory the default anchor:
$ anc s
# go to /etc, then /, then /usr/local and then back to the default anchor:
$ cd /etc; cd ..; cd usr/local; anc
# go back to /usr/local :
$ anc b
# add another anchor:
$ anc a $HOME/test
# view the list of anchors (the default one has the asterisk):
$ anc l
(0) /path/to/first/anchor *
(1) /home/usr/test
# jump to the anchor we just added:
# by using its anchor number
$ anc 1
# or by jumping to the last anchor in the list
$ anc -1
# add multiple anchors:
$ anc a $HOME/projects/first $HOME/projects/second $HOME/documents/first
# use text matching to jump to $HOME/projects/first
$ anc pro fir
# use text matching to jump to $HOME/documents/first
$ anc doc fir
# add anchor and jump to it using an absolute path
$ anc /etc
# is the same as
$ anc a /etc; anc -1
# add anchor and jump to it using a relative path
$ anc ./X11 #note that "./" is required for relative paths
# is the same as
$ anc a X11; anc -1
# using wildcards you can add many anchors at once
$ anc a $HOME/projects/*
# use shell completion to see a list of matching anchors
# and select the one you want to jump to directly
$ anc pro[TAB]
Bashmarks
is an amazingly simple and intuitive utility. In short, after installation, the usage is:
s <bookmark_name> - Saves the current directory as "bookmark_name"
g <bookmark_name> - Goes (cd) to the directory associated with "bookmark_name"
p <bookmark_name> - Prints the directory associated with "bookmark_name"
d <bookmark_name> - Deletes the bookmark
l - Lists all available bookmarks
,
For short term shortcuts, I have a the following in my respective init script (Sorry. I can't
find the source right now and didn't bother then):
function b() {
alias $1="cd `pwd -P`"
}
Usage:
In any directory that you want to bookmark type
b THEDIR # <THEDIR> being the name of your 'bookmark'
It will create an alias to cd (back) to here.
To return to a 'bookmarked' dir type
THEDIR
It will run the stored alias and cd back there.
Caution: Use only if you understand that this might override existing shell aliases
and what that means.
Switch statement for bash script
<a rel='nofollow' target='_blank'
href='//rev.linuxquestions.org/www/delivery/ck.php?n=a054b75'><img border='0'
alt=''
src='//rev.linuxquestions.org/www/delivery/avw.php?zoneid=10&n=a054b75'
/></a>
[ Log in to get rid of
this advertisement] Hello, i am currently trying out the switch statement using
bash script.
while true
do
showmenu
read choice
echo "Enter a choice:"
case "$choice" in
"1")
echo "Number One"
;;
"2")
echo "Number Two"
;;
"3")
echo "Number Three"
;;
"4")
echo "Number One, Two, Three"
;;
"5")
echo "Program Exited"
exit 0
;;
*)
echo "Please enter number ONLY ranging from 1-5!"
;;
esac
done
OUTPUT:
1. Number1
2. Number2
3. Number3
4. All
5. Quit
Enter a choice:
So, when the code is run, a menu with option 1-5 will be shown, then the user
will be asked to enter a choice and finally an output is shown. But it is possible
if the user want to enter multiple choices. For example, user enter choice "1" and
"3", so the output will be "Number One" and "Number Three". Any idea?
Just something to get you started.
Code:
#! /bin/bash
showmenu ()
{
typeset ii
typeset -i jj=1
typeset -i kk
typeset -i valid=0 # valid=1 if input is good
while (( ! valid ))
do
for ii in "${options[@]}"
do
echo "$jj) $ii"
let jj++
done
read -e -p 'Select a list of actions : ' -a answer
jj=0
valid=1
for kk in "${answer[@]}"
do
if (( kk < 1 || kk > "${#options[@]}" ))
then
echo "Error Item $jj is out of bounds" 1>&2
valid=0
break
fi
let jj++
done
done
}
typeset -r c1=Number1
typeset -r c2=Number2
typeset -r c3=Number3
typeset -r c4=All
typeset -r c5=Quit
typeset -ra options=($c1 $c2 $c3 $c4 $c5)
typeset -a answer
typeset -i kk
while true
do
showmenu
for kk in "${answer[@]}"
do
case $kk in
1)
echo 'Number One'
;;
2)
echo 'Number Two'
;;
3)
echo 'Number Three'
;;
4)
echo 'Number One, Two, Three'
;;
5)
echo 'Program Exit'
exit 0
;;
esac
done
done
Parsing bash script options with getopts Posted on January 4, 2015 | 5 minutes |
Kevin Sookocheff A common task in shell scripting is to parse command line arguments to your
script. Bash provides the getopts built-in function to do just that. This tutorial
explains how to use the getopts built-in function to parse arguments and options
to a bash script.
The getopts function takes three parameters. The first is a specification of
which options are valid, listed as a sequence of letters. For example, the string
'ht' signifies that the options -h and -t are valid.
The second argument to getopts is a variable that will be populated with the
option or argument to be processed next. In the following loop, opt will hold the
value of the current option that has been parsed by getopts .
while getopts ":ht" opt; do
case ${opt} in
h ) # process option a
;;
t ) # process option t
;;
\? ) echo "Usage: cmd [-h] [-t]"
;;
esac
done
This example shows a few additional features of getopts . First, if an invalid
option is provided, the option variable is assigned the value ? . You can catch
this case and provide an appropriate usage message to the user. Second, this behaviour is only
true when you prepend the list of valid options with : to disable the default
error handling of invalid options. It is recommended to always disable the default error
handling in your scripts.
The third argument to getopts is the list of arguments and options to be
processed. When not provided, this defaults to the arguments and options provided to the
application ( $@ ). You can provide this third argument to use
getopts to parse any list of arguments and options you provide.
Shifting
processed options
The variable OPTIND holds the number of options parsed by the last call to
getopts . It is common practice to call the shift command at the end
of your processing loop to remove options that have already been handled from $@
.
shift $((OPTIND -1))
Parsing options with arguments
Options that themselves have arguments are signified with a : . The argument to
an option is placed in the variable OPTARG . In the following example, the option
t takes an argument. When the argument is provided, we copy its value to the
variable target . If no argument is provided getopts will set
opt to : . We can recognize this error condition by catching the
: case and printing an appropriate error message.
while getopts ":t:" opt; do
case ${opt} in
t )
target=$OPTARG
;;
\? )
echo "Invalid option: $OPTARG" 1>&2
;;
: )
echo "Invalid option: $OPTARG requires an argument" 1>&2
;;
esac
done
shift $((OPTIND -1))
An extended example – parsing nested arguments and options
Let's walk through an extended example of processing a command that takes options, has a
sub-command, and whose sub-command takes an additional option that has an argument. This is a
mouthful so let's break it down using an example. Let's say we are writing our own version of
the pip command . In
this version you can call pip with the -h option to display a help
message.
> pip -h
Usage:
pip -h Display this help message.
pip install Install a Python package.
We can use getopts to parse the -h option with the following
while loop. In it we catch invalid options with \? and
shift all arguments that have been processed with shift $((OPTIND
-1)) .
while getopts ":h" opt; do
case ${opt} in
h )
echo "Usage:"
echo " pip -h Display this help message."
echo " pip install Install a Python package."
exit 0
;;
\? )
echo "Invalid Option: -$OPTARG" 1>&2
exit 1
;;
esac
done
shift $((OPTIND -1))
Now let's add the sub-command install to our script. install takes
as an argument the Python package to install.
> pip install urllib3
install also takes an option, -t . -t takes as an
argument the location to install the package to relative to the current directory.
> pip install urllib3 -t ./src/lib
To process this line we must find the sub-command to execute. This value is the first
argument to our script.
subcommand=$1
shift # Remove `pip` from the argument list
Now we can process the sub-command install . In our example, the option
-t is actually an option that follows the package argument so we begin by removing
install from the argument list and processing the remainder of the line.
case "$subcommand" in
install)
package=$1
shift # Remove `install` from the argument list
;;
esac
After shifting the argument list we can process the remaining arguments as if they are of
the form package -t src/lib . The -t option takes an argument itself.
This argument will be stored in the variable OPTARG and we save it to the variable
target for further work.
case "$subcommand" in
install)
package=$1
shift # Remove `install` from the argument list
while getopts ":t:" opt; do
case ${opt} in
t )
target=$OPTARG
;;
\? )
echo "Invalid Option: -$OPTARG" 1>&2
exit 1
;;
: )
echo "Invalid Option: -$OPTARG requires an argument" 1>&2
exit 1
;;
esac
done
shift $((OPTIND -1))
;;
esac
Putting this all together, we end up with the following script that parses arguments to our
version of pip and its sub-command install .
package="" # Default to empty package
target="" # Default to empty target
# Parse options to the `pip` command
while getopts ":h" opt; do
case ${opt} in
h )
echo "Usage:"
echo " pip -h Display this help message."
echo " pip install <package> Install <package>."
exit 0
;;
\? )
echo "Invalid Option: -$OPTARG" 1>&2
exit 1
;;
esac
done
shift $((OPTIND -1))
subcommand=$1; shift # Remove 'pip' from the argument list
case "$subcommand" in
# Parse options to the install sub command
install)
package=$1; shift # Remove 'install' from the argument list
# Process package options
while getopts ":t:" opt; do
case ${opt} in
t )
target=$OPTARG
;;
\? )
echo "Invalid Option: -$OPTARG" 1>&2
exit 1
;;
: )
echo "Invalid Option: -$OPTARG requires an argument" 1>&2
exit 1
;;
esac
done
shift $((OPTIND -1))
;;
esac
After processing the above sequence of commands, the variable package will hold
the package to install and the variable target will hold the target to install the
package to. You can use this as a template for processing any set of arguments and options to
your scripts.
Update: It's been more than 5 years since I started this answer. Thank you for LOTS of great
edits/comments/suggestions. In order save maintenance time, I've modified the code block to
be 100% copy-paste ready. Please do not post comments like "What if you changed X to Y ".
Instead, copy-paste the code block, see the output, make the change, rerun the script, and
comment "I changed X to Y and " I don't have time to test your ideas and tell you if they
work.
Method #1: Using bash without getopt[s]
Two common ways to pass key-value-pair arguments are:
cat >/tmp/demo-space-separated.sh <<'EOF'
#!/bin/bash
POSITIONAL=()
while [[ $# -gt 0 ]]
do
key="$1"
case $key in
-e|--extension)
EXTENSION="$2"
shift # past argument
shift # past value
;;
-s|--searchpath)
SEARCHPATH="$2"
shift # past argument
shift # past value
;;
-l|--lib)
LIBPATH="$2"
shift # past argument
shift # past value
;;
--default)
DEFAULT=YES
shift # past argument
;;
*) # unknown option
POSITIONAL+=("$1") # save it in an array for later
shift # past argument
;;
esac
done
set -- "${POSITIONAL[@]}" # restore positional parameters
echo "FILE EXTENSION = ${EXTENSION}"
echo "SEARCH PATH = ${SEARCHPATH}"
echo "LIBRARY PATH = ${LIBPATH}"
echo "DEFAULT = ${DEFAULT}"
echo "Number files in SEARCH PATH with EXTENSION:" $(ls -1 "${SEARCHPATH}"/*."${EXTENSION}" | wc -l)
if [[ -n $1 ]]; then
echo "Last line of file specified as non-opt/last argument:"
tail -1 "$1"
fi
EOF
chmod +x /tmp/demo-space-separated.sh
/tmp/demo-space-separated.sh -e conf -s /etc -l /usr/lib /etc/hosts
output from copy-pasting the block above:
FILE EXTENSION = conf
SEARCH PATH = /etc
LIBRARY PATH = /usr/lib
DEFAULT =
Number files in SEARCH PATH with EXTENSION: 14
Last line of file specified as non-opt/last argument:
#93.184.216.34 example.com
cat >/tmp/demo-equals-separated.sh <<'EOF'
#!/bin/bash
for i in "$@"
do
case $i in
-e=*|--extension=*)
EXTENSION="${i#*=}"
shift # past argument=value
;;
-s=*|--searchpath=*)
SEARCHPATH="${i#*=}"
shift # past argument=value
;;
-l=*|--lib=*)
LIBPATH="${i#*=}"
shift # past argument=value
;;
--default)
DEFAULT=YES
shift # past argument with no value
;;
*)
# unknown option
;;
esac
done
echo "FILE EXTENSION = ${EXTENSION}"
echo "SEARCH PATH = ${SEARCHPATH}"
echo "LIBRARY PATH = ${LIBPATH}"
echo "DEFAULT = ${DEFAULT}"
echo "Number files in SEARCH PATH with EXTENSION:" $(ls -1 "${SEARCHPATH}"/*."${EXTENSION}" | wc -l)
if [[ -n $1 ]]; then
echo "Last line of file specified as non-opt/last argument:"
tail -1 $1
fi
EOF
chmod +x /tmp/demo-equals-separated.sh
/tmp/demo-equals-separated.sh -e=conf -s=/etc -l=/usr/lib /etc/hosts
output from copy-pasting the block above:
FILE EXTENSION = conf
SEARCH PATH = /etc
LIBRARY PATH = /usr/lib
DEFAULT =
Number files in SEARCH PATH with EXTENSION: 14
Last line of file specified as non-opt/last argument:
#93.184.216.34 example.com
To better understand ${i#*=} search for "Substring Removal" in this guide . It is
functionally equivalent to `sed 's/[^=]*=//' <<< "$i"` which calls a
needless subprocess or `echo "$i" | sed 's/[^=]*=//'` which calls two
needless subprocesses.
More recent getopt versions don't have these limitations.
Additionally, the POSIX shell (and others) offer getopts which doesn't have
these limitations. I've included a simplistic getopts example.
Usage demo-getopts.sh -vf /etc/hosts foo bar
cat >/tmp/demo-getopts.sh <<'EOF'
#!/bin/sh
# A POSIX variable
OPTIND=1 # Reset in case getopts has been used previously in the shell.
# Initialize our own variables:
output_file=""
verbose=0
while getopts "h?vf:" opt; do
case "$opt" in
h|\?)
show_help
exit 0
;;
v) verbose=1
;;
f) output_file=$OPTARG
;;
esac
done
shift $((OPTIND-1))
[ "${1:-}" = "--" ] && shift
echo "verbose=$verbose, output_file='$output_file', Leftovers: $@"
EOF
chmod +x /tmp/demo-getopts.sh
/tmp/demo-getopts.sh -vf /etc/hosts foo bar
output from copy-pasting the block above:
verbose=1, output_file='/etc/hosts', Leftovers: foo bar
The advantages of getopts are:
It's more portable, and will work in other shells like dash .
It can handle multiple single options like -vf filename in the typical
Unix way, automatically.
The disadvantage of getopts is that it can only handle short options (
-h , not --help ) without additional code.
There is a getopts tutorial which explains
what all of the syntax and variables mean. In bash, there is also help getopts ,
which might be informative.
No answer mentions enhanced getopt . And the top-voted answer is misleading: It either
ignores -vfd style short options (requested by the OP) or options after
positional arguments (also requested by the OP); and it ignores parsing-errors. Instead:
Use enhanced getopt from util-linux or formerly GNU glibc .
1
It works with getopt_long() the C function of GNU glibc.
Has all useful distinguishing features (the others don't have them):
handles spaces, quoting characters and even binary in arguments
2 (non-enhanced getopt can't do this)
it can handle options at the end: script.sh -o outFile file1 file2 -v
( getopts doesn't do this)
allows = -style long options: script.sh --outfile=fileOut
--infile fileIn (allowing both is lengthy if self parsing)
allows combined short options, e.g. -vfd (real work if self
parsing)
allows touching option-arguments, e.g. -oOutfile or
-vfdoOutfile
Is so old already 3 that no GNU system is missing this (e.g. any
Linux has it).
You can test for its existence with: getopt --test → return value
4.
Other getopt or shell-builtin getopts are of limited
use.
verbose: y, force: y, debug: y, in: ./foo/bar/someFile, out: /fizz/someOtherFile
with the following myscript
#!/bin/bash
# saner programming env: these switches turn some bugs into errors
set -o errexit -o pipefail -o noclobber -o nounset
# -allow a command to fail with !'s side effect on errexit
# -use return value from ${PIPESTATUS[0]}, because ! hosed $?
! getopt --test > /dev/null
if [[ ${PIPESTATUS[0]} -ne 4 ]]; then
echo 'I'm sorry, `getopt --test` failed in this environment.'
exit 1
fi
OPTIONS=dfo:v
LONGOPTS=debug,force,output:,verbose
# -regarding ! and PIPESTATUS see above
# -temporarily store output to be able to check for errors
# -activate quoting/enhanced mode (e.g. by writing out "--options")
# -pass arguments only via -- "$@" to separate them correctly
! PARSED=$(getopt --options=$OPTIONS --longoptions=$LONGOPTS --name "$0" -- "$@")
if [[ ${PIPESTATUS[0]} -ne 0 ]]; then
# e.g. return value is 1
# then getopt has complained about wrong arguments to stdout
exit 2
fi
# read getopt's output this way to handle the quoting right:
eval set -- "$PARSED"
d=n f=n v=n outFile=-
# now enjoy the options in order and nicely split until we see --
while true; do
case "$1" in
-d|--debug)
d=y
shift
;;
-f|--force)
f=y
shift
;;
-v|--verbose)
v=y
shift
;;
-o|--output)
outFile="$2"
shift 2
;;
--)
shift
break
;;
*)
echo "Programming error"
exit 3
;;
esac
done
# handle non-option arguments
if [[ $# -ne 1 ]]; then
echo "$0: A single input file is required."
exit 4
fi
echo "verbose: $v, force: $f, debug: $d, in: $1, out: $outFile"
1 enhanced getopt is available on most "bash-systems", including
Cygwin; on OS X try brew install gnu-getopt or sudo port
install getopt 2 the POSIX exec() conventions have no reliable way to
pass binary NULL in command line arguments; those bytes prematurely end the argument 3 first version released in 1997 or before (I only tracked it back to
1997)
#!/bin/bash
for i in "$@"
do
case $i in
-p=*|--prefix=*)
PREFIX="${i#*=}"
;;
-s=*|--searchpath=*)
SEARCHPATH="${i#*=}"
;;
-l=*|--lib=*)
DIR="${i#*=}"
;;
--default)
DEFAULT=YES
;;
*)
# unknown option
;;
esac
done
echo PREFIX = ${PREFIX}
echo SEARCH PATH = ${SEARCHPATH}
echo DIRS = ${DIR}
echo DEFAULT = ${DEFAULT}
To better understand ${i#*=} search for "Substring Removal" in this guide . It is
functionally equivalent to `sed 's/[^=]*=//' <<< "$i"` which calls a
needless subprocess or `echo "$i" | sed 's/[^=]*=//'` which calls two
needless subprocesses.
I'm about 4 years late to this question, but want to give back. I used the earlier answers as
a starting point to tidy up my old adhoc param parsing. I then refactored out the following
template code. It handles both long and short params, using = or space separated arguments,
as well as multiple short params grouped together. Finally it re-inserts any non-param
arguments back into the $1,$2.. variables. I hope it's useful.
#!/usr/bin/env bash
# NOTICE: Uncomment if your script depends on bashisms.
#if [ -z "$BASH_VERSION" ]; then bash $0 $@ ; exit $? ; fi
echo "Before"
for i ; do echo - $i ; done
# Code template for parsing command line parameters using only portable shell
# code, while handling both long and short params, handling '-f file' and
# '-f=file' style param data and also capturing non-parameters to be inserted
# back into the shell positional parameters.
while [ -n "$1" ]; do
# Copy so we can modify it (can't modify $1)
OPT="$1"
# Detect argument termination
if [ x"$OPT" = x"--" ]; then
shift
for OPT ; do
REMAINS="$REMAINS \"$OPT\""
done
break
fi
# Parse current opt
while [ x"$OPT" != x"-" ] ; do
case "$OPT" in
# Handle --flag=value opts like this
-c=* | --config=* )
CONFIGFILE="${OPT#*=}"
shift
;;
# and --flag value opts like this
-c* | --config )
CONFIGFILE="$2"
shift
;;
-f* | --force )
FORCE=true
;;
-r* | --retry )
RETRY=true
;;
# Anything unknown is recorded for later
* )
REMAINS="$REMAINS \"$OPT\""
break
;;
esac
# Check for multiple short options
# NOTICE: be sure to update this pattern to match valid options
NEXTOPT="${OPT#-[cfr]}" # try removing single short opt
if [ x"$OPT" != x"$NEXTOPT" ] ; then
OPT="-$NEXTOPT" # multiple short opts, keep going
else
break # long form, exit inner loop
fi
done
# Done with that param. move to next
shift
done
# Set the non-parameters back into the positional parameters ($1 $2 ..)
eval set -- $REMAINS
echo -e "After: \n configfile='$CONFIGFILE' \n force='$FORCE' \n retry='$RETRY' \n remains='$REMAINS'"
for i ; do echo - $i ; done
> ,
I have found the matter to write portable parsing in scripts so frustrating that I have
written Argbash - a FOSS
code generator that can generate the arguments-parsing code for your script plus it has some
nice features:
~/.config/gogo/gogo.conf
file (which should be auto created if it doesn't exist) and has the following syntax.
# Comments are lines that start from '#' character.
default = ~/something
alias = /desired/path
alias2 = /desired/path with space
alias3 = "/this/also/works"
zażółć = "unicode/is/also/supported/zażółć gęślą jaźń"
If you run gogo run without any arguments, it will go to the directory specified in default;
this alias is always available, even if it's not in the configuration file, and points to $HOME
directory.
To display the current aliases, use the -l switch. From the following
screenshot, you can see that default points to ~/home/tecmint which is user
tecmint's home directory on the system.
You can also create aliases for connecting directly into directories on a remote Linux
servers. To do this, simple add the following lines to gogo configuration file, which can be
accessed using -e flag, this will use the editor specified in the $EDITOR env variable.
$ gogo -e
One configuration file opens, add these following lines to it.
The bulk of what this tool does can be replaced with a shell function that does `
cd $(grep -w ^$1 ~/.config/gogo.conf | cut -f2 -d' ') `, where
`$1` is the argument supplied to the function.
If you've already installed fzf (and you really should), then you can get a far better
experience than even zsh's excellent "completion" facilities. I use something like `
cd $(fzf -1 +m -q "$1" < ~/.cache/to) ` (My equivalent of gogo.conf is `
~/.cache/to `).
Tutorial on using exit codes from Linux or UNIX commands. Examples of how to get the exit code of a command,
how to set the exit code and how to suppress exit codes.
Estimated reading time: 3 minutes
Table of contents
What is an exit code in the UNIX or Linux shell?
An exit code, or sometimes known as a return code, is the code returned to a parent process by an executable. On
POSIX
systems the standard exit code is
0
for success and any number from
1
to
255
for
anything else.
Exit codes can be interpreted by machine scripts to adapt in the event of successes of failures. If exit codes are not set the
exit code will be the exit code of the last run command.
How to get the exit code of a command
To get the exit code of a command type
echo $?
at the command prompt. In the following example a file is printed
to the terminal using the
cat
command.
cat file.txt
hello world
echo $?
0
The command was successful. The file exists and there are no errors in reading the file or writing it to the terminal. The
exit code is therefore
0
.
In the following example the file does not exist.
cat doesnotexist.txt
cat: doesnotexist.txt: No such file or directory
echo $?
1
The exit code is
1
as the operation was not successful.
How to use exit codes in scripts
To use exit codes in scripts an
if
statement can be used to see if an operation was successful.
#!/bin/bash
cat file.txt
if [ $? -eq 0 ]
then
echo "The script ran ok"
exit 0
else
echo "The script failed" >&2
exit 1
fi
If the command was unsuccessful the exit code will be
0
and 'The script ran ok' will be printed to the terminal.
How to set an exit code
To set an exit code in a script use
exit 0
where
0
is the number you want to return. In the
following example a shell script exits with a
1
. This file is saved as
exit.sh
.
#!/bin/bash
exit 1
Executing this script shows that the exit code is correctly set.
bash exit.sh
echo $?
1
What exit code should I use?
The Linux Documentation Project has a list of
reserved codes
that also offers advice on what code to use for specific scenarios. These are the standard error codes in
Linux or UNIX.
1
- Catchall for general errors
2
- Misuse of shell builtins (according to Bash documentation)
126
- Command invoked cannot execute
127
- "command not found"
128
- Invalid argument to exit
128+n
- Fatal error signal "n"
130
- Script terminated by Control-C
255\*
- Exit status out of range
How to suppress exit statuses
Sometimes there may be a requirement to suppress an exit status. It may be that a command is being run within another script
and that anything other than a
0
status is undesirable.
In the following example a file is printed to the terminal using
cat
.
This file does not exist so will cause an exit status of
1
.
To suppress the error message any output to standard error is sent to
/dev/null
using
2>/dev/null
.
If the cat command fails an
OR
operation can be used to provide a fallback -
cat file.txt || exit 0
.
In this case an exit code of
0
is returned even if there is an error.
Combining both the suppression of error output and the
OR
operation the following script returns a status code of
0
with no output even though the file does not exist.
Exit codes are a number between 0 and 255, which is returned by any Unix command when it
returns control to its parent process.
Other numbers can be used, but these are treated modulo 256, so exit -10 is
equivalent to exit 246 , and exit 257 is equivalent to exit
1 .
These can be used within a shell script to change the flow of execution depending on the
success or failure of commands executed. This was briefly introduced in Variables - Part II . Here we shall look
in more detail in the available interpretations of exit codes.
Success is traditionally represented with exit 0 ; failure is
normally indicated with a non-zero exit-code. This value can indicate different reasons for
failure.
For example, GNU grep returns 0 on success, 1 if no
matches were found, and 2 for other errors (syntax errors, non-existent input
files, etc).
We shall look at three different methods for checking error status, and discuss the pros and
cons of each approach.
Firstly, the simple approach:
#!/bin/sh
# First attempt at checking return codes
USERNAME=`grep "^${1}:" /etc/passwd|cut -d":" -f1`
if [ "$?" -ne "0" ]; then
echo "Sorry, cannot find user ${1} in /etc/passwd"
exit 1
fi
NAME=`grep "^${1}:" /etc/passwd|cut -d":" -f5`
HOMEDIR=`grep "^${1}:" /etc/passwd|cut -d":" -f6`
echo "USERNAME: $USERNAME"
echo "NAME: $NAME"
echo "HOMEDIR: $HOMEDIR"
This script works fine if you supply a valid username in /etc/passwd . However, if
you enter an invalid code, it does not do what you might at first expect - it keeps running,
and just shows:
USERNAME:
NAME:
HOMEDIR:
Why is this? As mentioned, the $? variable is set to the return code of the
last executed command . In this case, that is cut . cut had no
problems which it feels like reporting - as far as I can tell from testing it, and reading the
documentation, cut returns zero whatever happens! It was fed an empty string, and
did its job - returned the first field of its input, which just happened to be the empty
string.
So what do we do? If we have an error here, grep will report it, not
cut . Therefore, we have to test grep 's return code, not
cut 's.
#!/bin/sh
# Second attempt at checking return codes
grep "^${1}:" /etc/passwd > /dev/null 2>&1
if [ "$?" -ne "0" ]; then
echo "Sorry, cannot find user ${1} in /etc/passwd"
exit 1
fi
USERNAME=`grep "^${1}:" /etc/passwd|cut -d":" -f1`
NAME=`grep "^${1}:" /etc/passwd|cut -d":" -f5`
HOMEDIR=`grep "^${1}:" /etc/passwd|cut -d":" -f6`
echo "USERNAME: $USERNAME"
echo "NAME: $NAME"
echo "HOMEDIR: $HOMEDIR"
This fixes the problem for us, though at the expense of slightly longer code.
That is the basic way which textbooks might show you, but it is far from being all there is to
know about error-checking in shell scripts. This method may not be the most suitable to your
particular command-sequence, or may be unmaintainable. Below, we shall investigate two
alternative approaches.
As a second approach, we can tidy this somewhat by putting the test into a separate
function, instead of littering the code with lots of 4-line tests:
#!/bin/sh
# A Tidier approach
check_errs()
{
# Function. Parameter 1 is the return code
# Para. 2 is text to display on failure.
if [ "${1}" -ne "0" ]; then
echo "ERROR # ${1} : ${2}"
# as a bonus, make our script exit with the right error code.
exit ${1}
fi
}
### main script starts here ###
grep "^${1}:" /etc/passwd > /dev/null 2>&1
check_errs $? "User ${1} not found in /etc/passwd"
USERNAME=`grep "^${1}:" /etc/passwd|cut -d":" -f1`
check_errs $? "Cut returned an error"
echo "USERNAME: $USERNAME"
check_errs $? "echo returned an error - very strange!"
This allows us to test for errors 3 times, with customised error messages, without having to
write 3 individual tests. By writing the test routine once. we can call it as many times as we
wish, creating a more intelligent script, at very little expense to the programmer. Perl
programmers will recognise this as being similar to the die command in Perl.
As a third approach, we shall look at a simpler and cruder method. I tend to use this for
building Linux kernels - simple automations which, if they go well, should just get on with it,
but when things go wrong, tend to require the operator to do something intelligent (ie, that
which a script cannot do!):
#!/bin/sh
cd /usr/src/linux && \
make dep && make bzImage && make modules && make modules_install && \
cp arch/i386/boot/bzImage /boot/my-new-kernel && cp System.map /boot && \
echo "Your new kernel awaits, m'lord."
This script runs through the various tasks involved in building a Linux kernel (which can
take quite a while), and uses the && operator to check for success. To do this
with if would involve:
#!/bin/sh
cd /usr/src/linux
if [ "$?" -eq "0" ]; then
make dep
if [ "$?" -eq "0" ]; then
make bzImage
if [ "$?" -eq "0" ]; then
make modules
if [ "$?" -eq "0" ]; then
make modules_install
if [ "$?" -eq "0" ]; then
cp arch/i386/boot/bzImage /boot/my-new-kernel
if [ "$?" -eq "0" ]; then
cp System.map /boot/
if [ "$?" -eq "0" ]; then
echo "Your new kernel awaits, m'lord."
fi
fi
fi
fi
fi
fi
fi
fi
... which I, personally, find pretty difficult to follow.
The && and || operators are the shell's equivalent of AND and
OR tests. These can be thrown together as above, or:
Only one command can be in each part. This method is handy for simple success / fail
scenarios, but if you want to check on the status of the echo commands themselves,
it is easy to quickly become confused about which && and ||
applies to which command. It is also very difficult to maintain. Therefore this construct is
only recommended for simple sequencing of commands.
In earlier versions, I had suggested that you can use a subshell to execute multiple
commands depending on whether the cp command succeeded or failed:
cp /foo /bar && ( echo Success ; echo Success part II; ) || ( echo Failed ; echo Failed part II )
But in fact, Marcel found that this does not work properly. The syntax for a subshell
is:
( command1 ; command2; command3 )
The return code of the subshell is the return code of the final command (
command3 in this example). That return code will affect the overall command. So
the output of this script:
cp /foo /bar && ( echo Success ; echo Success part II; /bin/false ) || ( echo Failed ; echo Failed part II )
Is that it runs the Success part (because cp succeeded, and then - because
/bin/false returns failure, it also executes the Failure part:
Success
Success part II
Failed
Failed part II
So if you need to execute multiple commands as a result of the status of some other
condition, it is better (and much clearer) to use the standard if ,
then , else syntax.
As I understand pipes and commands, bash takes each command, spawns a process for each one
and connects stdout of the previous one with the stdin of the next one.
For example, in "ls -lsa | grep feb", bash will create two processes, and connect the
output of "ls -lsa" to the input of "grep feb".
When you execute a background command like "sleep 30 &" in bash, you get the pid of
the background process running your command. Surprisingly for me, when I wrote "ls -lsa |
grep feb &" bash returned only one PID.
How should this be interpreted? A process runs both "ls -lsa" and "grep feb"? Several
process are created but I only get the pid of one of them?
When you run a job in the background, bash prints the process ID of its subprocess, the one
that runs the command in that job. If that job happens to create more subprocesses, that's
none of the parent shell's business.
When the background job is a pipeline (i.e. the command is of the form something1 |
something2 & , and not e.g. { something1 | something2; } & ),
there's an optimization which is strongly suggested by POSIX and performed by most shells
including bash: each of the elements of the pipeline are executed directly as subprocesses of
the original shell. What POSIX mandates is that the variable
$! is set to the last command in the pipeline in this case. In most shells,
that last command is a subprocess of the original process, and so are the other commands in
the pipeline.
When you run ls -lsa | grep feb , there are three processes involved: the one
that runs the left-hand side of the pipe (a subshell that finishes setting up the pipe then
executes ls ), the one that runs the right-hand side of the pipe (a subshell
that finishes setting up the pipe then executes grep ), and the original process
that waits for the pipe to finish.
You can watch what happens by tracing the processes:
use grep [n]ame to remove that grep -v name this is first... Sec using xargs in the way how
it is up there is wrong to rnu whatever it is piped you have to use -i ( interactive mode)
otherwise you may have issues with the command.
I start a background process from my shell script, and I would like to kill this process when my script finishes.
How to get the PID of this process from my shell script? As far as I can see variable $! contains the PID of the
current script, not the background process.
You need to save the PID of the background process at the time you start it:
foo &
FOO_PID=$!
# do other stuff
kill $FOO_PID
You cannot use job control, since that is an interactive feature and tied to a controlling terminal. A script will not necessarily
have a terminal attached at all so job control will not necessarily be available.
An even simpler way to kill all child process of a bash script:
pkill -P $$
The -P flag works the same way with pkill and pgrep - it gets child processes, only
with pkill the child processes get killed and with pgrep child PIDs are printed to stdout.
this is what I have done. Check it out, hope it can help.
#!/bin/bash
#
# So something to show.
echo "UNO" > UNO.txt
echo "DOS" > DOS.txt
#
# Initialize Pid List
dPidLst=""
#
# Generate background processes
tail -f UNO.txt&
dPidLst="$dPidLst $!"
tail -f DOS.txt&
dPidLst="$dPidLst $!"
#
# Report process IDs
echo PID=$$
echo dPidLst=$dPidLst
#
# Show process on current shell
ps -f
#
# Start killing background processes from list
for dPid in $dPidLst
do
echo killing $dPid. Process is still there.
ps | grep $dPid
kill $dPid
ps | grep $dPid
echo Just ran "'"ps"'" command, $dPid must not show again.
done
Then just run it as: ./bgkill.sh with proper permissions of course
root@umsstd22 [P]:~# ./bgkill.sh
PID=23757
dPidLst= 23758 23759
UNO
DOS
UID PID PPID C STIME TTY TIME CMD
root 3937 3935 0 11:07 pts/5 00:00:00 -bash
root 23757 3937 0 11:55 pts/5 00:00:00 /bin/bash ./bgkill.sh
root 23758 23757 0 11:55 pts/5 00:00:00 tail -f UNO.txt
root 23759 23757 0 11:55 pts/5 00:00:00 tail -f DOS.txt
root 23760 23757 0 11:55 pts/5 00:00:00 ps -f
killing 23758. Process is still there.
23758 pts/5 00:00:00 tail
./bgkill.sh: line 24: 23758 Terminated tail -f UNO.txt
Just ran 'ps' command, 23758 must not show again.
killing 23759. Process is still there.
23759 pts/5 00:00:00 tail
./bgkill.sh: line 24: 23759 Terminated tail -f DOS.txt
Just ran 'ps' command, 23759 must not show again.
root@umsstd22 [P]:~# ps -f
UID PID PPID C STIME TTY TIME CMD
root 3937 3935 0 11:07 pts/5 00:00:00 -bash
root 24200 3937 0 11:56 pts/5 00:00:00 ps -f
This typically gives a text representation of all the processes for the "user" and the -p option gives the process-id. It does
not depend, as far as I understand, on having the processes be owned by the current shell. It also shows forks.
pgrep can get you all of the child PIDs of a parent process. As mentioned earlier $$ is the current
scripts PID. So, if you want a script that cleans up after itself, this should do the trick:
[ -n file.txt ] doesn't check its size , it checks that the string file.txt is
non-zero length, so it will always succeed.
If you want to say " size is non-zero", you need [ -s file.txt ] .
To get a file's size , you can use wc -c to get the size ( file length) in bytes:
file=file.txt
minimumsize=90000
actualsize=$(wc -c <"$file")
if [ $actualsize -ge $minimumsize ]; then
echo size is over $minimumsize bytes
else
echo size is under $minimumsize bytes
fi
In this case, it sounds like that's what you want.
But FYI, if you want to know how much disk space the file is using, you could use du -k to get the
size (disk space used) in kilobytes:
file=file.txt
minimumsize=90
actualsize=$(du -k "$file" | cut -f 1)
if [ $actualsize -ge $minimumsize ]; then
echo size is over $minimumsize kilobytes
else
echo size is under $minimumsize kilobytes
fi
If you need more control over the output format, you can also look at stat . On Linux, you'd start with something
like stat -c '%s' file.txt , and on BSD/Mac OS X, something like stat -f '%z' file.txt .
--Mikel
5 Why du -b "$file" | cut -f 1 instead of stat -c '%s' "$file" ? Or stat --printf="%s" "$file"
? � mivk Dec
14 '13 at 11:00
It surprises me that no one mentioned stat to check file size. Some methods are definitely better: using -s
to find out whether the file is empty or not is easier than anything else if that's all you want. And if you want to
find files of a size, then find is certainly the way to go.
I also like du a lot to get file size in kb, but, for bytes, I'd use stat :
size=$(stat -f%z $filename) # BSD stat
size=$(stat -c%s $filename) # GNU stat?
alternative solution with awk and double parenthesis:
FILENAME=file.txt
SIZE=$(du -sb $FILENAME | awk '{ print $1 }')
if ((SIZE<90000)) ; then
echo "less";
else
echo "not less";
fi
The choice of shell as a programming language is strange, but the idea is good...
Notable quotes:
"... The tool is developed by Igor Chubin, also known for its console-oriented weather forecast service wttr.in , which can be used to retrieve the weather from the console using only cURL or Wget. ..."
While it does have its own cheat sheet repository too, the project is actually concentrated around the creation of a unified mechanism
to access well developed and maintained cheat sheet repositories.
The tool is developed by Igor Chubin, also known for its
console-oriented weather forecast
service wttr.in , which can be used to retrieve the weather from the console using
only cURL or Wget.
It's worth noting that cheat.sh is not new. In fact it had its initial commit around May, 2017, and is a very popular repository
on GitHub. But I personally only came across it recently, and I found it very useful, so I figured there must be some Linux Uprising
readers who are not aware of this cool gem.
cheat.sh features & more
cheat.sh major features:
Supports 58 programming
languages , several DBMSes, and more than 1000 most important UNIX/Linux commands
Very fast, returns answers within 100ms
Simple curl / browser interface
An optional command line client (cht.sh) is available, which allows you to quickly search cheat sheets and easily copy
snippets without leaving the terminal
Can be used from code editors, allowing inserting code snippets without having to open a web browser, search for the code,
copy it, then return to your code editor and paste it. It supports Vim, Emacs, Visual Studio Code, Sublime Text and IntelliJ Idea
Comes with a special stealth mode in which any text you select (adding it into the selection buffer of X Window System
or into the clipboard) is used as a search query by cht.sh, so you can get answers without touching any other keys
The command line client features a special shell mode with a persistent queries context and readline support. It also has a query
history, it integrates with the clipboard, supports tab completion for shells like Bash, Fish and Zsh, and it includes the stealth
mode I mentioned in the cheat.sh features.
The web, curl and cht.sh (command line) interfaces all make use of https://cheat.sh/
but if you prefer, you can self-host it .
It should be noted that each editor plugin supports a different feature set (configurable server, multiple answers, toggle comments,
and so on). You can view a feature comparison of each cheat.sh editor plugin on the
Editors integration section of the project's
GitHub page.
Want to contribute a cheat sheet? See the cheat.sh guide on
editing or adding a new cheat sheet.
cheat.sh curl / command line client usage examples Examples of using cheat.sh using the curl interface (this requires having curl installed as you'd expect) from the command
line:
Show the tar command cheat sheet:
curl cheat.sh/tar
Example with output:
$ curl cheat.sh/tar
# To extract an uncompressed archive:
tar -xvf /path/to/foo.tar
# To create an uncompressed archive:
tar -cvf /path/to/foo.tar /path/to/foo/
# To extract a .gz archive:
tar -xzvf /path/to/foo.tgz
# To create a .gz archive:
tar -czvf /path/to/foo.tgz /path/to/foo/
# To list the content of an .gz archive:
tar -ztvf /path/to/foo.tgz
# To extract a .bz2 archive:
tar -xjvf /path/to/foo.tgz
# To create a .bz2 archive:
tar -cjvf /path/to/foo.tgz /path/to/foo/
# To extract a .tar in specified Directory:
tar -xvf /path/to/foo.tar -C /path/to/destination/
# To list the content of an .bz2 archive:
tar -jtvf /path/to/foo.tgz
# To create a .gz archive and exclude all jpg,gif,... from the tgz
tar czvf /path/to/foo.tgz --exclude=\*.{jpg,gif,png,wmv,flv,tar.gz,zip} /path/to/foo/
# To use parallel (multi-threaded) implementation of compression algorithms:
tar -z ... -> tar -Ipigz ...
tar -j ... -> tar -Ipbzip2 ...
tar -J ... -> tar -Ipixz ...
cht.sh also works instead of cheat.sh:
curl cht.sh/tar
Want to search for a keyword in all cheat sheets? Use:
curl cheat.sh/~keyword
List the Python programming language cheat sheet for random list :
curl cht.sh/python/random+list
Example with output:
$ curl cht.sh/python/random+list
# python - How to randomly select an item from a list?
#
# Use random.choice
# (https://docs.python.org/2/library/random.htmlrandom.choice):
import random
foo = ['a', 'b', 'c', 'd', 'e']
print(random.choice(foo))
# For cryptographically secure random choices (e.g. for generating a
# passphrase from a wordlist), use random.SystemRandom
# (https://docs.python.org/2/library/random.htmlrandom.SystemRandom)
# class:
import random
foo = ['battery', 'correct', 'horse', 'staple']
secure_random = random.SystemRandom()
print(secure_random.choice(foo))
# [Pēteris Caune] [so/q/306400] [cc by-sa 3.0]
Replace python with some other programming language supported by cheat.sh, and random+list with the cheat
sheet you want to show.
Want to eliminate the comments from your answer? Add ?Q at the end of the query (below is an example using the same
/python/random+list):
For more flexibility and tab completion you can use cht.sh, the command line cheat.sh client; you'll find instructions for how to
install it further down this article. Examples of using the cht.sh command line client:
Show the tar command cheat sheet:
cht.sh tar
List the Python programming language cheat sheet for random list :
cht.sh python random list
There is no need to use quotes with multiple keywords.
You can start the cht.sh client in a special shell mode using:
cht.sh --shell
And then you can start typing your queries. Example:
$ cht.sh --shell
cht.sh> bash loop
If all your queries are about the same programming language, you can start the client in the special shell mode, directly in that
context. As an example, start it with the Bash context using:
cht.sh --shell bash
Example with output:
$ cht.sh --shell bash
cht.sh/bash> loop
...........
cht.sh/bash> switch case
Want to copy the previously listed answer to the clipboard? Type c , then press Enter to copy the whole
answer, or type C and press Enter to copy it without comments.
Type help in the cht.sh interactive shell mode to see all available commands. Also look under the
Usage section from the cheat.sh GitHub project page for more
options and advanced usage.
How to install cht.sh command line client
You can use cheat.sh in a web browser, from the command line with the help of curl and without having to install anything else, as
explained above, as a code editor plugin, or using its command line client which has some extra features, which I already mentioned.
The steps below are for installing this cht.sh command line client.
If you'd rather install a code editor plugin for cheat.sh, see the
Editors integration page.
1. Install dependencies.
To install the cht.sh command line client, the curl command line tool will be used, so this needs to be installed
on your system. Another dependency is rlwrap , which is required by the cht.sh special shell mode. Install these dependencies
as follows.
Debian, Ubuntu, Linux Mint, Pop!_OS, and any other Linux distribution based on Debian or Ubuntu:
sudo apt install curl rlwrap
Fedora:
sudo dnf install curl rlwrap
Arch Linux, Manjaro:
sudo pacman -S curl rlwrap
openSUSE:
sudo zypper install curl rlwrap
The packages seem to be named the same on most (if not all) Linux distributions, so if your Linux distribution is not on this list,
just install the curl and rlwrap packages using your distro's package manager.
2. Download and install the cht.sh command line interface.
You can install this either for your user only (so only you can run it), or for all users:
Install it for your user only. The command below assumes you have a ~/.bin folder added to your PATH
(and the folder exists). If you have some other local folder in your PATH where you want to install cht.sh, change
install path in the commands:
Install it for all users (globally, in /usr/local/bin ):
curl https://cht.sh/:cht.sh | sudo tee /usr/local/bin/cht.sh
sudo chmod +x /usr/local/bin/cht.sh
If the first command appears to have frozen displaying only the cURL output, press the Enter key and you'll be prompted
to enter your password in order to save the file to /usr/local/bin .
You may also download and install the cheat.sh command completion for Bash or Zsh:
In technical terms, "/dev/null" is a virtual device file. As far as programs are concerned, these are treated just like real files.
Utilities can request data from this kind of source, and the operating system feeds them data. But, instead of reading from disk,
the operating system generates this data dynamically. An example of such a file is "/dev/zero."
In this case, however, you will write to a device file. Whatever you write to "/dev/null" is discarded, forgotten, thrown into
the void. To understand why this is useful, you must first have a basic understanding of standard output and standard error in Linux
or *nix type operating systems.
A command-line utility can generate two types of output. Standard output is sent to stdout. Errors are sent to stderr.
By default, stdout and stderr are associated with your terminal window (or console). This means that anything sent to stdout and
stderr is normally displayed on your screen. But through shell redirections, you can change this behavior. For example, you can redirect
stdout to a file. This way, instead of displaying output on the screen, it will be saved to a file for you to read later � or you
can redirect stdout to a physical device, say, a digital LED or LCD display.
Since there are two types of output, standard output and standard error, the first use case is to filter out one type or the other.
It's easier to understand through a practical example. Let's say you're looking for a string in "/sys" to find files that refer to
power settings.
grep -r power /sys/
There will be a lot of files that a regular, non-root user cannot read. This will result in many "Permission denied" errors.
These clutter the output and make it harder to spot the results that you're looking for. Since "Permission denied"
errors are part of stderr, you can redirect them to "/dev/null."
grep -r power /sys/ 2>/dev/null
As you can see, this is much easier to read.
In other cases, it might be useful to do the reverse: filter out standard output so you can only see errors.
ping google.com 1>/dev/null
The screenshot above shows that, without redirecting, ping displays its normal output when it can reach the destination
machine. In the second command, nothing is displayed while the network is online, but as soon as it gets disconnected, only error
messages are displayed.
You can redirect both stdout and stderr to two different locations.
ping google.com 1>/dev/null 2>error.log
In this case, stdout messages won't be displayed at all, and error messages will be saved to the "error.log" file.
Redirect All Output to /dev/null
Sometimes it's useful to get rid of all output. There are two ways to do this.
grep -r power /sys/ >/dev/null 2>&1
The string >/dev/null means "send stdout to /dev/null," and the second part, 2>&1 , means send stderr
to stdout. In this case you have to refer to stdout as "&1" instead of simply "1." Writing "2>1" would just redirect stdout to a
file named "1."
What's important to note here is that the order is important. If you reverse the redirect parameters like this:
grep -r power /sys/ 2>&1 >/dev/null
it won't work as intended. That's because as soon as 2>&1 is interpreted, stderr is sent to stdout and displayed
on screen. Next, stdout is supressed when sent to "/dev/null." The final result is that you will see errors on the screen instead
of suppressing all output. If you can't remember the correct order, there's a simpler redirect that is much easier to type:
grep -r power /sys/ &>/dev/null
In this case, &>/dev/null is equivalent to saying "redirect both stdout and stderr to this location."
Other Examples Where It Can Be Useful to Redirect to /dev/null
Say you want to see how fast your disk can read sequential data. The test is not extremely accurate but accurate enough. You can
use dd for this, but dd either outputs to stdout or can be instructed to write to a file. With of=/dev/null
you can tell dd to write to this virtual file. You don't even have to use shell redirections here. if= specifies
the location of the input file to be read; of= specifies the name of the output file, where to write.
In some scenarios, you may want to see how fast you can download from a server. But you don't want to write to your disk unnecessarily.
Simply enough, don't write to a regular file, write to "/dev/null."
Before proceeding further, let me give you one tip. In the example above the shell tried to
expand a non-existing variable, producing a blank result. This can be very dangerous,
especially when working with path names, therefore, when writing scripts, it's always
recommended to use the nounset option which causes the shell to exit with error
whenever a non existing variable is referenced:
$ set -o nounset
$ echo "You are reading this article on $site_!"
bash: site_: unbound variable
Working with indirection
The use of the ${!parameter} syntax, adds a level of indirection to our
parameter expansion. What does it mean? The parameter which the shell will try to expand is not
parameter ; instead it will try to use the the value of parameter as
the name of the variable to be expanded. Let's explain this with an example. We all know the
HOME variable expands in the path of the user home directory in the system,
right?
$ echo "${HOME}"
/home/egdoc
Very well, if now we assign the string "HOME", to another variable, and use this type of
expansion, we obtain:
As you can see in the example above, instead of obtaining "HOME" as a result, as it would
have happened if we performed a simple expansion, the shell used the value of
variable_to_inspect as the name of the variable to expand, that's why we talk
about a level of indirection.
Case modification expansion
This parameter expansion syntax let us change the case of the alphabetic characters inside
the string resulting from the expansion of the parameter. Say we have a variable called
name ; to capitalize the text returned by the expansion of the variable we would
use the ${parameter^} syntax:
$ name="egidio"
$ echo "${name^}"
Egidio
What if we want to uppercase the entire string, instead of capitalize it? Easy! we use the
${parameter^^} syntax:
$ echo "${name^^}"
EGIDIO
Similarly, to lowercase the first character of a string, we use the
${parameter,} expansion syntax:
$ name="EGIDIO"
$ echo "${name,}"
eGIDIO
To lowercase the entire string, instead, we use the ${parameter,,} syntax:
$ name="EGIDIO"
$ echo "${name,,}"
egidio
In all cases a pattern to match a single character can also be provided. When
the pattern is provided the operation is applied only to the parts of the original string that
matches it:
In the example above we enclose the characters in square brackets: this causes anyone of
them to be matched as a pattern.
When using the expansions we explained in this paragraph and the parameter is
an array subscripted by @ or * , the operation is applied to all the
elements contained in it:
$ my_array=(one two three)
$ echo "${my_array[@]^^}"
ONE TWO THREE
When the index of a specific element in the array is referenced, instead, the operation is
applied only to it:
$ my_array=(one two three)
$ echo "${my_array[2]^^}"
THREE
Substring removal
The next syntax we will examine allows us to remove a pattern from the
beginning or from the end of string resulting from the expansion of a parameter.
Remove
matching pattern from the beginning of the string
The next syntax we will examine, ${parameter#pattern} , allows us to remove a
pattern from the beginning of the string resulting from the parameter
expansion:
$ name="Egidio"
$ echo "${name#Egi}"
dio
A similar result can be obtained by using the "${parameter##pattern}" syntax,
but with one important difference: contrary to the one we used in the example above, which
removes the shortest matching pattern from the beginning of the string, it removes the longest
one. The difference is clearly visible when using the * character in the
pattern :
$ name="Egidio Docile"
$ echo "${name#*i}"
dio Docile
In the example above we used * as part of the pattern that should be removed
from the string resulting by the expansion of the name variable. This
wildcard matches any character, so the pattern itself translates in "'i' character
and everything before it". As we already said, when we use the
${parameter#pattern} syntax, the shortest matching pattern is removed, in this
case it is "Egi". Let's see what happens when we use the "${parameter##pattern}"
syntax instead:
$ name="Egidio Docile"
$ echo "${name##*i}"
le
This time the longest matching pattern is removed ("Egidio Doci"): the longest possible
match includes the third 'i' and everything before it. The result of the expansion is just
"le".
Remove matching pattern from the end of the string
The syntax we saw above remove the shortest or longest matching pattern from the beginning
of the string. If we want the pattern to be removed from the end of the string, instead, we
must use the ${parameter%pattern} or ${parameter%%pattern}
expansions, to remove, respectively, the shortest and longest match from the end of the
string:
In this example the pattern we provided roughly translates in "'i' character and everything
after it starting from the end of the string". The shortest match is "ile", so what is returned
is "Egidio Doc". If we try the same example but we use the syntax which removes the longest
match we obtain:
$ name="Egidio Docile"
$ echo "${name%%i*}"
Eg
In this case the once the longest match is removed, what is returned is "Eg".
In all the expansions we saw above, if parameter is an array and it is
subscripted with * or @ , the removal of the matching pattern is
applied to all its elements:
$ my_array=(one two three)
$ echo "${my_array[@]#*o}"
ne three
We used the previous syntax to remove a matching pattern from the beginning or from the end
of the string resulting from the expansion of a parameter. What if we want to replace
pattern with something else? We can use the
${parameter/pattern/string} or ${parameter//pattern/string} syntax.
The former replaces only the first occurrence of the pattern, the latter all the
occurrences:
$ phrase="yellow is the sun and yellow is the
lemon"
$ echo "${phrase/yellow/red}"
red is the sun and yellow is the lemon
The parameter (phrase) is expanded, and the longest match of the
pattern (yellow) is matched against it. The match is then replaced by the provided
string (red). As you can observe only the first occurrence is replaced, so the
lemon remains yellow! If we want to change all the occurrences of the pattern, we must prefix
it with the / character:
$ phrase="yellow is the sun and yellow is the
lemon"
$ echo "${phrase//yellow/red}"
red is the sun and red is the lemon
This time all the occurrences of "yellow" has been replaced by "red". As you can see the
pattern is matched wherever it is found in the string resulting from the expansion of
parameter . If we want to specify that it must be matched only at the beginning or
at the end of the string, we must prefix it respectively with the # or
% character.
Just like in the previous cases, if parameter is an array subscripted by either
* or @ , the substitution happens in each one of its elements:
$ my_array=(one two three)
$ echo "${my_array[@]/o/u}"
une twu three
Substring expansion
The ${parameter:offset} and ${parameter:offset:length} expansions
let us expand only a part of the parameter, returning a substring starting at the specified
offset and length characters long. If the length is not specified the
expansion proceeds until the end of the original string. This type of expansion is called
substring expansion :
$ name="Egidio Docile"
$ echo "${name:3}"
dio Docile
In the example above we provided just the offset , without specifying the
length , therefore the result of the expansion was the substring obtained by
starting at the character specified by the offset (3).
If we specify a length, the substring will start at offset and will be
length characters long:
$ echo "${name:3:3}"
dio
If the offset is negative, it is calculated from the end of the string. In this
case an additional space must be added after : otherwise the shell will consider
it as another type of expansion identified by :- which is used to provide a
default value if the parameter to be expanded doesn't exist (we talked about it in the
article
about managing the expansion of empty or unset bash variables ):
$ echo "${name: -6}"
Docile
If the provided length is negative, instead of being interpreted as the total
number of characters the resulting string should be long, it is considered as an offset to be
calculated from the end of the string. The result of the expansion will therefore be a
substring starting at offset and ending at length characters from the
end of the original string:
$ echo "${name:7:-3}"
Doc
When using this expansion and parameter is an indexed array subscribed by
* or @ , the offset is relative to the indexes of the
array elements. For example:
$ my_array=(one two three)
$ echo "${my_array[@]:0:2}"
one two
$ echo "${my_array[@]: -2}"
two three
By Alvin Alexander. Last updated: June 22 2017 Unix/Linux bash shell script FAQ: How do I
prompt a user for input from a shell script (Bash shell script), and then read the input the
user provides?
Answer: I usually use the shell script read function to read input from a shell
script. Here are two slightly different versions of the same shell script. This first version
prompts the user for input only once, and then dies if the user doesn't give a correct Y/N
answer:
# (1) prompt user, and read command line argument
read -p "Run the cron script now? " answer
# (2) handle the command line argument we were given
while true
do
case $answer in
[yY]* ) /usr/bin/wget -O - -q -t 1 http://www.example.com/cron.php
echo "Okay, just ran the cron script."
break;;
[nN]* ) exit;;
* ) echo "Dude, just enter Y or N, please."; break ;;
esac
done
This second version stays in a loop until the user supplies a Y/N answer:
while true
do
# (1) prompt user, and read command line argument
read -p "Run the cron script now? " answer
# (2) handle the input we were given
case $answer in
[yY]* ) /usr/bin/wget -O - -q -t 1 http://www.example.com/cron.php
echo "Okay, just ran the cron script."
break;;
[nN]* ) exit;;
* ) echo "Dude, just enter Y or N, please.";;
esac
done
I prefer the second approach, but I thought I'd share both of them here. They are subtly
different, so not the extra break in the first script.
This Linux Bash 'read' function is nice, because it does both things, prompting the user for
input, and then reading the input. The other nice thing it does is leave the cursor at the end
of your prompt, as shown here:
Run the cron script now? _
(This is so much nicer than what I had to do years ago.)
Bash uses Emacs style keyboard shortcuts by default. There is also Vi mode. Find out how to bind HSTR to a keyboard
shortcut based on the style you prefer below.
Check your active Bash keymap with:
bind -v | grep editing-mode
bind -v | grep keymap
To determine character sequence emitted by a pressed key in terminal, type Ctrl-v and then press the key. Check your
current bindings using:
bind -S
Bash Emacs Keymap (default)
Bind HSTR to a Bash key e.g. to Ctrl-r :
bind '"\C-r": "\C-ahstr -- \C-j"'
or Ctrl-Altr :
bind '"\e\C-r":"\C-ahstr -- \C-j"'
or Ctrl-F12 :
bind '"\e[24;5~":"\C-ahstr -- \C-j"'
Bind HSTR to Ctrl-r only if it is interactive shell:
if [[ $- =~ .*i.* ]]; then bind '"\C-r": "\C-a hstr -- \C-j"'; fi
You can bind also other HSTR commands like --kill-last-command :
if [[ $- =~ .*i.* ]]; then bind '"\C-xk": "\C-a hstr -k \C-j"'; fi
Bash Vim Keymap
Bind HSTR to a Bash key e.g. to Ctrlr :
bind '"\C-r": "\e0ihstr -- \C-j"'
Zsh Emacs Keymap
Bind HSTR to a zsh key e.g. to Ctrlr :
bindkey -s "\C-r" "\eqhstr --\n"
Alias
If you want to make running of hstr from command line even easier, then define alias in your ~/.bashrc
:
alias hh=hstr
Don't forget to source ~/.bashrc to be able to to use hh command.
Colors
Let HSTR to use colors:
export HSTR_CONFIG=hicolor
or ensure black and white mode:
export HSTR_CONFIG=monochromatic
Default History View
To show normal history by default (instead of metrics-based view, which is default) use:
export HSTR_CONFIG=raw-history-view
To show favorite commands as default view use:
export HSTR_CONFIG=favorites-view
Filtering
To use regular expressions based matching:
export HSTR_CONFIG=regexp-matching
To use substring based matching:
export HSTR_CONFIG=substring-matching
To use keywords (substrings whose order doesn't matter) search matching (default):
export HSTR_CONFIG=keywords-matching
Make search case sensitive (insensitive by default):
export HSTR_CONFIG=case-sensitive
Keep duplicates in raw-history-view (duplicate commands are discarded by default):
export HSTR_CONFIG=duplicates
Static favorites
Last selected favorite command is put the head of favorite commands list by default. If you want to disable this behavior and
make favorite commands list static, then use the following configuration:
export HSTR_CONFIG=static-favorites
Skip favorites comments
If you don't want to show lines starting with # (comments) among favorites, then use the following configuration:
export HSTR_CONFIG=skip-favorites-comments
Blacklist
Skip commands when processing history i.e. make sure that these commands will not be shown in any view:
export HSTR_CONFIG=blacklist
Commands to be stored in ~/.hstr_blacklist file with trailing empty line. For instance:
cd
my-private-command
ls
ll
Confirm on Delete
Do not prompt for confirmation when deleting history items:
export HSTR_CONFIG=no-confirm
Verbosity
Show a message when deleting the last command from history:
export HSTR_CONFIG=verbose-kill
Show warnings:
export HSTR_CONFIG=warning
Show debug messages:
export HSTR_CONFIG=debug
Bash History Settings
Use the following Bash settings to get most out of HSTR.
Increase the size of history maintained by BASH - variables defined below increase the number of history items and history file
size (default value is 500):
This is #1 Google hit but there's controversy in the answer because the question unfortunately asks about delimiting on
, (comma-space) and not a single character such as comma. If you're only interested in the latter, answers here
are easier to follow:
stackoverflow.com/questions/918886/
� antak
Jun 18 '18 at 9:22
Note that the characters in $IFS are treated individually as separators so that in this case fields may be separated
by either a comma or a space rather than the sequence of the two characters. Interestingly though, empty fields aren't
created when comma-space appears in the input because the space is treated specially.
To access an individual element:
echo "${array[0]}"
To iterate over the elements:
for element in "${array[@]}"
do
echo "$element"
done
To get both the index and the value:
for index in "${!array[@]}"
do
echo "$index ${array[index]}"
done
The last example is useful because Bash arrays are sparse. In other words, you can delete an element or add an element and
then the indices are not contiguous.
unset "array[1]"
array[42]=Earth
To get the number of elements in an array:
echo "${#array[@]}"
As mentioned above, arrays can be sparse so you shouldn't use the length to get the last element. Here's how you can in Bash
4.2 and later:
echo "${array[-1]}"
in any version of Bash (from somewhere after 2.05b):
echo "${array[@]: -1:1}"
Larger negative offsets select farther from the end of the array. Note the space before the minus sign in the older form. It
is required.
Just use IFS=', ' , then you don't have to remove the spaces separately. Test: IFS=', ' read -a array <<< "Paris,
France, Europe"; echo "${array[@]}" � l0b0
May 14 '12 at 15:24
Warning: the IFS variable means split by one of these characters , so it's not a sequence of chars to split by. IFS=',
' read -a array <<< "a,d r s,w" => ${array[*]} == a d r s w �
caesarsol
Oct 29 '15 at 14:45
string="1:2:3:4:5"
set -f # avoid globbing (expansion of *).
array=(${string//:/ })
for i in "${!array[@]}"
do
echo "$i=>${array[i]}"
done
The idea is using string replacement:
${string//substring/replacement}
to replace all matches of $substring with white space and then using the substituted string to initialize a array:
(element1 element2 ... elementN)
Note: this answer makes use of the split+glob operator
. Thus, to prevent expansion of some characters (such as * ) it is a good idea to pause globbing for this script.
Used this approach... until I came across a long string to split. 100% CPU for more than a minute (then I killed it). It's a pity
because this method allows to split by a string, not some character in IFS. �
Werner Lehmann
May 4 '13 at 22:32
WARNING: Just ran into a problem with this approach. If you have an element named * you will get all the elements of your cwd
as well. thus string="1:2:3:4:*" will give some unexpected and possibly dangerous results depending on your implementation. Did
not get the same error with (IFS=', ' read -a array <<< "$string") and this one seems safe to use. �
Dieter Gribnitz
Sep 2 '14 at 15:46
1: This is a misuse of $IFS . The value of the $IFS variable is not taken as a single variable-length
string separator, rather it is taken as a set of single-character string separators, where each field that
read splits off from the input line can be terminated by any character in the set (comma or space, in this example).
Actually, for the real sticklers out there, the full meaning of $IFS is slightly more involved. From the
bash manual
:
The shell treats each character of IFS as a delimiter, and splits the results of the other expansions into words using these
characters as field terminators. If IFS is unset, or its value is exactly <space><tab><newline> , the default, then sequences
of <space> , <tab> , and <newline> at the beginning and end of the results of the previous expansions are ignored, and any
sequence of IFS characters not at the beginning or end serves to delimit words. If IFS has a value other than the default,
then sequences of the whitespace characters <space> , <tab> , and <newline> are ignored at the beginning and end of the word,
as long as the whitespace character is in the value of IFS (an IFS whitespace character). Any character in IFS that is not
IFS whitespace, along with any adjacent IFS whitespace characters, delimits a field. A sequence of IFS whitespace characters
is also treated as a delimiter. If the value of IFS is null, no word splitting occurs.
Basically, for non-default non-null values of $IFS , fields can be separated with either (1) a sequence of one
or more characters that are all from the set of "IFS whitespace characters" (that is, whichever of <space> , <tab> , and <newline>
("newline" meaning line feed (LF) ) are present anywhere in
$IFS ), or (2) any non-"IFS whitespace character" that's present in $IFS along with whatever "IFS whitespace
characters" surround it in the input line.
For the OP, it's possible that the second separation mode I described in the previous paragraph is exactly what he wants for
his input string, but we can be pretty confident that the first separation mode I described is not correct at all. For example,
what if his input string was 'Los Angeles, United States, North America' ?
IFS=', ' read -ra a <<<'Los Angeles, United States, North America'; declare -p a;
## declare -a a=([0]="Los" [1]="Angeles" [2]="United" [3]="States" [4]="North" [5]="America")
2: Even if you were to use this solution with a single-character separator (such as a comma by itself, that is, with no following
space or other baggage), if the value of the $string variable happens to contain any LFs, then read
will stop processing once it encounters the first LF. The read builtin only processes one line per invocation. This
is true even if you are piping or redirecting input only to the read statement, as we are doing in this example
with the here-string
mechanism, and thus unprocessed input is guaranteed to be lost. The code that powers the read builtin has no knowledge
of the data flow within its containing command structure.
You could argue that this is unlikely to cause a problem, but still, it's a subtle hazard that should be avoided if possible.
It is caused by the fact that the read builtin actually does two levels of input splitting: first into lines, then
into fields. Since the OP only wants one level of splitting, this usage of the read builtin is not appropriate, and
we should avoid it.
3: A non-obvious potential issue with this solution is that read always drops the trailing field if it is empty,
although it preserves empty fields otherwise. Here's a demo:
string=', , a, , b, c, , , '; IFS=', ' read -ra a <<<"$string"; declare -p a;
## declare -a a=([0]="" [1]="" [2]="a" [3]="" [4]="b" [5]="c" [6]="" [7]="")
Maybe the OP wouldn't care about this, but it's still a limitation worth knowing about. It reduces the robustness and generality
of the solution.
This problem can be solved by appending a dummy trailing delimiter to the input string just prior to feeding it to read
, as I will demonstrate later.
string="1,2,3,4"
array=(`echo $string | sed 's/,/\n/g'`)
These solutions leverage word splitting in an array assignment to split the string into fields. Funnily enough, just like
read , general word splitting also uses the $IFS special variable, although in this case it is implied
that it is set to its default value of <space><tab><newline> , and therefore any sequence of one or more IFS characters (which
are all whitespace characters now) is considered to be a field delimiter.
This solves the problem of two levels of splitting committed by read , since word splitting by itself constitutes
only one level of splitting. But just as before, the problem here is that the individual fields in the input string can already
contain $IFS characters, and thus they would be improperly split during the word splitting operation. This happens
to not be the case for any of the sample input strings provided by these answerers (how convenient...), but of course that doesn't
change the fact that any code base that used this idiom would then run the risk of blowing up if this assumption were ever violated
at some point down the line. Once again, consider my counterexample of 'Los Angeles, United States, North America'
(or 'Los Angeles:United States:North America' ).
Also, word splitting is normally followed by
filename
expansion ( aka pathname expansion aka globbing), which, if done, would potentially corrupt words containing
the characters * , ? , or [ followed by ] (and, if extglob is
set, parenthesized fragments preceded by ? , * , + , @ , or !
) by matching them against file system objects and expanding the words ("globs") accordingly. The first of these three answerers
has cleverly undercut this problem by running set -f beforehand to disable globbing. Technically this works (although
you should probably add set +f afterward to reenable globbing for subsequent code which may depend on it), but it's
undesirable to have to mess with global shell settings in order to hack a basic string-to-array parsing operation in local code.
Another issue with this answer is that all empty fields will be lost. This may or may not be a problem, depending on the application.
Note: If you're going to use this solution, it's better to use the ${string//:/ } "pattern substitution" form
of
parameter expansion , rather than going to the trouble of invoking a command substitution (which forks the shell), starting
up a pipeline, and running an external executable ( tr or sed ), since parameter expansion is purely
a shell-internal operation. (Also, for the tr and sed solutions, the input variable should be double-quoted
inside the command substitution; otherwise word splitting would take effect in the echo command and potentially mess
with the field values. Also, the $(...) form of command substitution is preferable to the old `...`
form since it simplifies nesting of command substitutions and allows for better syntax highlighting by text editors.)
str="a, b, c, d" # assuming there is a space after ',' as in Q
arr=(${str//,/}) # delete all occurrences of ','
This answer is almost the same as #2 . The difference is that the answerer has made the assumption that the fields are delimited
by two characters, one of which being represented in the default $IFS , and the other not. He has solved this rather
specific case by removing the non-IFS-represented character using a pattern substitution expansion and then using word splitting
to split the fields on the surviving IFS-represented delimiter character.
This is not a very generic solution. Furthermore, it can be argued that the comma is really the "primary" delimiter character
here, and that stripping it and then depending on the space character for field splitting is simply wrong. Once again, consider
my counterexample: 'Los Angeles, United States, North America' .
Also, again, filename expansion could corrupt the expanded words, but this can be prevented by temporarily disabling globbing
for the assignment with set -f and then set +f .
Also, again, all empty fields will be lost, which may or may not be a problem depending on the application.
string='first line
second line
third line'
oldIFS="$IFS"
IFS='
'
IFS=${IFS:0:1} # this is useful to format your code with tabs
lines=( $string )
IFS="$oldIFS"
This is similar to #2 and #3 in that it uses word splitting to get the job done, only now the code explicitly sets $IFS
to contain only the single-character field delimiter present in the input string. It should be repeated that this cannot work
for multicharacter field delimiters such as the OP's comma-space delimiter. But for a single-character delimiter like the LF used
in this example, it actually comes close to being perfect. The fields cannot be unintentionally split in the middle as we saw
with previous wrong answers, and there is only one level of splitting, as required.
One problem is that filename expansion will corrupt affected words as described earlier, although once again this can be solved
by wrapping the critical statement in set -f and set +f .
Another potential problem is that, since LF qualifies as an "IFS whitespace character" as defined earlier, all empty fields
will be lost, just as in #2 and #3 . This would of course not be a problem if the delimiter happens to be a non-"IFS whitespace
character", and depending on the application it may not matter anyway, but it does vitiate the generality of the solution.
So, to sum up, assuming you have a one-character delimiter, and it is either a non-"IFS whitespace character" or you don't
care about empty fields, and you wrap the critical statement in set -f and set +f , then this solution
works, but otherwise not.
(Also, for information's sake, assigning a LF to a variable in bash can be done more easily with the $'...' syntax,
e.g. IFS=$'\n'; .)
This solution is effectively a cross between #1 (in that it sets $IFS to comma-space) and #2-4 (in that it uses
word splitting to split the string into fields). Because of this, it suffers from most of the problems that afflict all of the
above wrong answers, sort of like the worst of all worlds.
Also, regarding the second variant, it may seem like the eval call is completely unnecessary, since its argument
is a single-quoted string literal, and therefore is statically known. But there's actually a very non-obvious benefit to using
eval in this way. Normally, when you run a simple command which consists of a variable assignment only , meaning
without an actual command word following it, the assignment takes effect in the shell environment:
IFS=', '; ## changes $IFS in the shell environment
This is true even if the simple command involves multiple variable assignments; again, as long as there's no command
word, all variable assignments affect the shell environment:
IFS=', ' array=($countries); ## changes both $IFS and $array in the shell environment
But, if the variable assignment is attached to a command name (I like to call this a "prefix assignment") then it does not
affect the shell environment, and instead only affects the environment of the executed command, regardless whether it is a builtin
or external:
IFS=', ' :; ## : is a builtin command, the $IFS assignment does not outlive it
IFS=', ' env; ## env is an external command, the $IFS assignment does not outlive it
If no command name results, the variable assignments affect the current shell environment. Otherwise, the variables are
added to the environment of the executed command and do not affect the current shell environment.
It is possible to exploit this feature of variable assignment to change $IFS only temporarily, which allows us
to avoid the whole save-and-restore gambit like that which is being done with the $OIFS variable in the first variant.
But the challenge we face here is that the command we need to run is itself a mere variable assignment, and hence it would not
involve a command word to make the $IFS assignment temporary. You might think to yourself, well why not just add
a no-op command word to the statement like the
: builtin to make the $IFS assignment temporary? This does not work because it would then make the
$array assignment temporary as well:
IFS=', ' array=($countries) :; ## fails; new $array value never escapes the : command
So, we're effectively at an impasse, a bit of a catch-22. But, when eval runs its code, it runs it in the shell
environment, as if it was normal, static source code, and therefore we can run the $array assignment inside the
eval argument to have it take effect in the shell environment, while the $IFS prefix assignment that
is prefixed to the eval command will not outlive the eval command. This is exactly the trick that is
being used in the second variant of this solution:
IFS=', ' eval 'array=($string)'; ## $IFS does not outlive the eval command, but $array does
So, as you can see, it's actually quite a clever trick, and accomplishes exactly what is required (at least with respect to
assignment effectation) in a rather non-obvious way. I'm actually not against this trick in general, despite the involvement of
eval ; just be careful to single-quote the argument string to guard against security threats.
But again, because of the "worst of all worlds" agglomeration of problems, this is still a wrong answer to the OP's requirement.
IFS=', '; array=(Paris, France, Europe)
IFS=' ';declare -a array=(Paris France Europe)
Um... what? The OP has a string variable that needs to be parsed into an array. This "answer" starts with the verbatim contents
of the input string pasted into an array literal. I guess that's one way to do it.
It looks like the answerer may have assumed that the $IFS variable affects all bash parsing in all contexts, which
is not true. From the bash manual:
IFS The Internal Field Separator that is used for word splitting after expansion and to split lines into words with the
read builtin command. The default value is <space><tab><newline> .
So the $IFS special variable is actually only used in two contexts: (1) word splitting that is performed after
expansion (meaning not when parsing bash source code) and (2) for splitting input lines into words by the read
builtin.
Let me try to make this clearer. I think it might be good to draw a distinction between parsing and execution
. Bash must first parse the source code, which obviously is a parsing event, and then later it executes the
code, which is when expansion comes into the picture. Expansion is really an execution event. Furthermore, I take issue
with the description of the $IFS variable that I just quoted above; rather than saying that word splitting is performed
after expansion , I would say that word splitting is performed during expansion, or, perhaps even more precisely,
word splitting is part of the expansion process. The phrase "word splitting" refers only to this step of expansion; it
should never be used to refer to the parsing of bash source code, although unfortunately the docs do seem to throw around the
words "split" and "words" a lot. Here's a relevant excerpt from the
linux.die.net version of the bash manual:
Expansion is performed on the command line after it has been split into words. There are seven kinds of expansion performed:
brace expansion , tilde expansion , parameter and variable expansion , command substitution ,
arithmetic expansion , word splitting , and pathname expansion .
The order of expansions is: brace expansion; tilde expansion, parameter and variable expansion, arithmetic expansion, and
command substitution (done in a left-to-right fashion); word splitting; and pathname expansion.
You could argue the
GNU version
of the manual does slightly better, since it opts for the word "tokens" instead of "words" in the first sentence of the Expansion
section:
Expansion is performed on the command line after it has been split into tokens.
The important point is, $IFS does not change the way bash parses source code. Parsing of bash source code is actually
a very complex process that involves recognition of the various elements of shell grammar, such as command sequences, command
lists, pipelines, parameter expansions, arithmetic substitutions, and command substitutions. For the most part, the bash parsing
process cannot be altered by user-level actions like variable assignments (actually, there are some minor exceptions to this rule;
for example, see the various
compatxx
shell settings , which can change certain aspects of parsing behavior on-the-fly). The upstream "words"/"tokens" that result
from this complex parsing process are then expanded according to the general process of "expansion" as broken down in the above
documentation excerpts, where word splitting of the expanded (expanding?) text into downstream words is simply one step of that
process. Word splitting only touches text that has been spit out of a preceding expansion step; it does not affect literal text
that was parsed right off the source bytestream.
string='first line
second line
third line'
while read -r line; do lines+=("$line"); done <<<"$string"
This is one of the best solutions. Notice that we're back to using read . Didn't I say earlier that read
is inappropriate because it performs two levels of splitting, when we only need one? The trick here is that you can call
read in such a way that it effectively only does one level of splitting, specifically by splitting off only one field per
invocation, which necessitates the cost of having to call it repeatedly in a loop. It's a bit of a sleight of hand, but it works.
But there are problems. First: When you provide at least one NAME argument to read , it automatically ignores
leading and trailing whitespace in each field that is split off from the input string. This occurs whether $IFS is
set to its default value or not, as described earlier in this post. Now, the OP may not care about this for his specific use-case,
and in fact, it may be a desirable feature of the parsing behavior. But not everyone who wants to parse a string into fields will
want this. There is a solution, however: A somewhat non-obvious usage of read is to pass zero NAME arguments.
In this case, read will store the entire input line that it gets from the input stream in a variable named
$REPLY , and, as a bonus, it does not strip leading and trailing whitespace from the value. This is a very robust
usage of read which I've exploited frequently in my shell programming career. Here's a demonstration of the difference
in behavior:
string=$' a b \n c d \n e f '; ## input string
a=(); while read -r line; do a+=("$line"); done <<<"$string"; declare -p a;
## declare -a a=([0]="a b" [1]="c d" [2]="e f") ## read trimmed surrounding whitespace
a=(); while read -r; do a+=("$REPLY"); done <<<"$string"; declare -p a;
## declare -a a=([0]=" a b " [1]=" c d " [2]=" e f ") ## no trimming
The second issue with this solution is that it does not actually address the case of a custom field separator, such as the
OP's comma-space. As before, multicharacter separators are not supported, which is an unfortunate limitation of this solution.
We could try to at least split on comma by specifying the separator to the -d option, but look what happens:
string='Paris, France, Europe';
a=(); while read -rd,; do a+=("$REPLY"); done <<<"$string"; declare -p a;
## declare -a a=([0]="Paris" [1]=" France")
Predictably, the unaccounted surrounding whitespace got pulled into the field values, and hence this would have to be corrected
subsequently through trimming operations (this could also be done directly in the while-loop). But there's another obvious error:
Europe is missing! What happened to it? The answer is that read returns a failing return code if it hits end-of-file
(in this case we can call it end-of-string) without encountering a final field terminator on the final field. This causes the
while-loop to break prematurely and we lose the final field.
Technically this same error afflicted the previous examples as well; the difference there is that the field separator was taken
to be LF, which is the default when you don't specify the -d option, and the <<< ("here-string") mechanism
automatically appends a LF to the string just before it feeds it as input to the command. Hence, in those cases, we sort of
accidentally solved the problem of a dropped final field by unwittingly appending an additional dummy terminator to the input.
Let's call this solution the "dummy-terminator" solution. We can apply the dummy-terminator solution manually for any custom delimiter
by concatenating it against the input string ourselves when instantiating it in the here-string:
a=(); while read -rd,; do a+=("$REPLY"); done <<<"$string,"; declare -p a;
declare -a a=([0]="Paris" [1]=" France" [2]=" Europe")
There, problem solved. Another solution is to only break the while-loop if both (1) read returned failure and
(2) $REPLY is empty, meaning read was not able to read any characters prior to hitting end-of-file.
Demo:
a=(); while read -rd,|| [[ -n "$REPLY" ]]; do a+=("$REPLY"); done <<<"$string"; declare -p a;
## declare -a a=([0]="Paris" [1]=" France" [2]=$' Europe\n')
This approach also reveals the secretive LF that automatically gets appended to the here-string by the <<< redirection
operator. It could of course be stripped off separately through an explicit trimming operation as described a moment ago, but
obviously the manual dummy-terminator approach solves it directly, so we could just go with that. The manual dummy-terminator
solution is actually quite convenient in that it solves both of these two problems (the dropped-final-field problem and the appended-LF
problem) in one go.
So, overall, this is quite a powerful solution. It's only remaining weakness is a lack of support for multicharacter delimiters,
which I will address later.
string='first line
second line
third line'
readarray -t lines <<<"$string"
(This is actually from the same post as #7 ; the answerer provided two solutions in the same post.)
The readarray builtin, which is a synonym for mapfile , is ideal. It's a builtin command which parses
a bytestream into an array variable in one shot; no messing with loops, conditionals, substitutions, or anything else. And it
doesn't surreptitiously strip any whitespace from the input string. And (if -O is not given) it conveniently clears
the target array before assigning to it. But it's still not perfect, hence my criticism of it as a "wrong answer".
First, just to get this out of the way, note that, just like the behavior of read when doing field-parsing,
readarray drops the trailing field if it is empty. Again, this is probably not a concern for the OP, but it could
be for some use-cases. I'll come back to this in a moment.
Second, as before, it does not support multicharacter delimiters. I'll give a fix for this in a moment as well.
Third, the solution as written does not parse the OP's input string, and in fact, it cannot be used as-is to parse it. I'll
expand on this momentarily as well.
For the above reasons, I still consider this to be a "wrong answer" to the OP's question. Below I'll give what I consider to
be the right answer.
Right answer
Here's a na�ve attempt to make #8 work by just specifying the -d option:
string='Paris, France, Europe';
readarray -td, a <<<"$string"; declare -p a;
## declare -a a=([0]="Paris" [1]=" France" [2]=$' Europe\n')
We see the result is identical to the result we got from the double-conditional approach of the looping read solution
discussed in #7 . We can almost solve this with the manual dummy-terminator trick:
readarray -td, a <<<"$string,"; declare -p a;
## declare -a a=([0]="Paris" [1]=" France" [2]=" Europe" [3]=$'\n')
The problem here is that readarray preserved the trailing field, since the <<< redirection operator
appended the LF to the input string, and therefore the trailing field was not empty (otherwise it would've been dropped).
We can take care of this by explicitly unsetting the final array element after-the-fact:
readarray -td, a <<<"$string,"; unset 'a[-1]'; declare -p a;
## declare -a a=([0]="Paris" [1]=" France" [2]=" Europe")
The only two problems that remain, which are actually related, are (1) the extraneous whitespace that needs to be trimmed,
and (2) the lack of support for multicharacter delimiters.
The whitespace could of course be trimmed afterward (for example, see
How to trim whitespace
from a Bash variable? ). But if we can hack a multicharacter delimiter, then that would solve both problems in one shot.
Unfortunately, there's no direct way to get a multicharacter delimiter to work. The best solution I've thought of is
to preprocess the input string to replace the multicharacter delimiter with a single-character delimiter that will be guaranteed
not to collide with the contents of the input string. The only character that has this guarantee is the
NUL byte . This is because, in bash (though not in
zsh, incidentally), variables cannot contain the NUL byte. This preprocessing step can be done inline in a process substitution.
Here's how to do it using awk :
There, finally! This solution will not erroneously split fields in the middle, will not cut out prematurely, will not drop
empty fields, will not corrupt itself on filename expansions, will not automatically strip leading and trailing whitespace, will
not leave a stowaway LF on the end, does not require loops, and does not settle for a single-character delimiter.
Trimming solution
Lastly, I wanted to demonstrate my own fairly intricate trimming solution using the obscure -C callback option
of readarray . Unfortunately, I've run out of room against Stack Overflow's draconian 30,000 character post limit,
so I won't be able to explain it. I'll leave that as an exercise for the reader.
function mfcb { local val="$4"; "$1"; eval "$2[$3]=\$val;"; };
function val_ltrim { if [[ "$val" =~ ^[[:space:]]+ ]]; then val="${val:${#BASH_REMATCH[0]}}"; fi; };
function val_rtrim { if [[ "$val" =~ [[:space:]]+$ ]]; then val="${val:0:${#val}-${#BASH_REMATCH[0]}}"; fi; };
function val_trim { val_ltrim; val_rtrim; };
readarray -c1 -C 'mfcb val_trim a' -td, <<<"$string,"; unset 'a[-1]'; declare -p a;
## declare -a a=([0]="Paris" [1]="France" [2]="Europe")
It may also be helpful to note (though understandably you had no room to do so) that the -d option to readarray
first appears in Bash 4.4. � fbicknel
Aug 18 '17 at 15:57
Great answer (+1). If you change your awk to awk '{ gsub(/,[ ]+|$/,"\0"); print }' and eliminate that concatenation
of the final ", " then you don't have to go through the gymnastics on eliminating the final record. So: readarray
-td '' a < <(awk '{ gsub(/,[ ]+/,"\0"); print; }' <<<"$string") on Bash that supports readarray . Note your
method is Bash 4.4+ I think because of the -d in readarray �
dawg
Nov 26 '17 at 22:28
@datUser That's unfortunate. Your version of bash must be too old for readarray . In this case, you can use the second-best
solution built on read . I'm referring to this: a=(); while read -rd,; do a+=("$REPLY"); done <<<"$string,";
(with the awk substitution if you need multicharacter delimiter support). Let me know if you run into any problems;
I'm pretty sure this solution should work on fairly old versions of bash, back to version 2-something, released like two decades
ago. � bgoldst
Feb 23 '18 at 3:37
This does not work as stated. @Jmoney38 or shrimpwagon if you can paste this in a terminal and get the desired output, please
paste the result here. � abalter
Aug 30 '16 at 5:13
Sometimes it happened to me that the method described in the accepted answer didn't work, especially if the separator is a carriage
return.
In those cases I solved in this way:
string='first line
second line
third line'
oldIFS="$IFS"
IFS='
'
IFS=${IFS:0:1} # this is useful to format your code with tabs
lines=( $string )
IFS="$oldIFS"
for line in "${lines[@]}"
do
echo "--> $line"
done
+1 This completely worked for me. I needed to put multiple strings, divided by a newline, into an array, and read -a arr
<<< "$strings" did not work with IFS=$'\n' . �
Stefan van den Akker
Feb 9 '15 at 16:52
While not every solution works for every situation, your mention of readarray... replaced my last two hours with 5 minutes...
you got my vote � Mayhem
Dec 31 '15 at 3:13
The key to splitting your string into an array is the multi character delimiter of ", " . Any solution using
IFS for multi character delimiters is inherently wrong since IFS is a set of those characters, not a string.
If you assign IFS=", " then the string will break on EITHER "," OR " " or any combination
of them which is not an accurate representation of the two character delimiter of ", " .
You can use awk or sed to split the string, with process substitution:
#!/bin/bash
str="Paris, France, Europe"
array=()
while read -r -d $'\0' each; do # use a NUL terminated field separator
array+=("$each")
done < <(printf "%s" "$str" | awk '{ gsub(/,[ ]+|$/,"\0"); print }')
declare -p array
# declare -a array=([0]="Paris" [1]="France" [2]="Europe") output
It is more efficient to use a regex you directly in Bash:
#!/bin/bash
str="Paris, France, Europe"
array=()
while [[ $str =~ ([^,]+)(,[ ]+|$) ]]; do
array+=("${BASH_REMATCH[1]}") # capture the field
i=${#BASH_REMATCH} # length of field + delimiter
str=${str:i} # advance the string by that length
done # the loop deletes $str, so make a copy if needed
declare -p array
# declare -a array=([0]="Paris" [1]="France" [2]="Europe") output...
With the second form, there is no sub shell and it will be inherently faster.
Edit by bgoldst: Here are some benchmarks comparing my readarray solution to dawg's regex solution, and I also
included the read solution for the heck of it (note: I slightly modified the regex solution for greater harmony with
my solution) (also see my comments below the post):
## competitors
function c_readarray { readarray -td '' a < <(awk '{ gsub(/, /,"\0"); print; };' <<<"$1, "); unset 'a[-1]'; };
function c_read { a=(); local REPLY=''; while read -r -d ''; do a+=("$REPLY"); done < <(awk '{ gsub(/, /,"\0"); print; };' <<<"$1, "); };
function c_regex { a=(); local s="$1, "; while [[ $s =~ ([^,]+),\ ]]; do a+=("${BASH_REMATCH[1]}"); s=${s:${#BASH_REMATCH}}; done; };
## helper functions
function rep {
local -i i=-1;
for ((i = 0; i<$1; ++i)); do
printf %s "$2";
done;
}; ## end rep()
function testAll {
local funcs=();
local args=();
local func='';
local -i rc=-1;
while [[ "$1" != ':' ]]; do
func="$1";
if [[ ! "$func" =~ ^[_a-zA-Z][_a-zA-Z0-9]*$ ]]; then
echo "bad function name: $func" >&2;
return 2;
fi;
funcs+=("$func");
shift;
done;
shift;
args=("$@");
for func in "${funcs[@]}"; do
echo -n "$func ";
{ time $func "${args[@]}" >/dev/null 2>&1; } 2>&1| tr '\n' '/';
rc=${PIPESTATUS[0]}; if [[ $rc -ne 0 ]]; then echo "[$rc]"; else echo; fi;
done| column -ts/;
}; ## end testAll()
function makeStringToSplit {
local -i n=$1; ## number of fields
if [[ $n -lt 0 ]]; then echo "bad field count: $n" >&2; return 2; fi;
if [[ $n -eq 0 ]]; then
echo;
elif [[ $n -eq 1 ]]; then
echo 'first field';
elif [[ "$n" -eq 2 ]]; then
echo 'first field, last field';
else
echo "first field, $(rep $[$1-2] 'mid field, ')last field";
fi;
}; ## end makeStringToSplit()
function testAll_splitIntoArray {
local -i n=$1; ## number of fields in input string
local s='';
echo "===== $n field$(if [[ $n -ne 1 ]]; then echo 's'; fi;) =====";
s="$(makeStringToSplit "$n")";
testAll c_readarray c_read c_regex : "$s";
}; ## end testAll_splitIntoArray()
## results
testAll_splitIntoArray 1;
## ===== 1 field =====
## c_readarray real 0m0.067s user 0m0.000s sys 0m0.000s
## c_read real 0m0.064s user 0m0.000s sys 0m0.000s
## c_regex real 0m0.000s user 0m0.000s sys 0m0.000s
##
testAll_splitIntoArray 10;
## ===== 10 fields =====
## c_readarray real 0m0.067s user 0m0.000s sys 0m0.000s
## c_read real 0m0.064s user 0m0.000s sys 0m0.000s
## c_regex real 0m0.001s user 0m0.000s sys 0m0.000s
##
testAll_splitIntoArray 100;
## ===== 100 fields =====
## c_readarray real 0m0.069s user 0m0.000s sys 0m0.062s
## c_read real 0m0.065s user 0m0.000s sys 0m0.046s
## c_regex real 0m0.005s user 0m0.000s sys 0m0.000s
##
testAll_splitIntoArray 1000;
## ===== 1000 fields =====
## c_readarray real 0m0.084s user 0m0.031s sys 0m0.077s
## c_read real 0m0.092s user 0m0.031s sys 0m0.046s
## c_regex real 0m0.125s user 0m0.125s sys 0m0.000s
##
testAll_splitIntoArray 10000;
## ===== 10000 fields =====
## c_readarray real 0m0.209s user 0m0.093s sys 0m0.108s
## c_read real 0m0.333s user 0m0.234s sys 0m0.109s
## c_regex real 0m9.095s user 0m9.078s sys 0m0.000s
##
testAll_splitIntoArray 100000;
## ===== 100000 fields =====
## c_readarray real 0m1.460s user 0m0.326s sys 0m1.124s
## c_read real 0m2.780s user 0m1.686s sys 0m1.092s
## c_regex real 17m38.208s user 15m16.359s sys 2m19.375s
##
Very cool solution! I never thought of using a loop on a regex match, nifty use of $BASH_REMATCH . It works, and
does indeed avoid spawning subshells. +1 from me. However, by way of criticism, the regex itself is a little non-ideal, in that
it appears you were forced to duplicate part of the delimiter token (specifically the comma) so as to work around the lack of
support for non-greedy multipliers (also lookarounds) in ERE ("extended" regex flavor built into bash). This makes it a little
less generic and robust. � bgoldst
Nov 27 '17 at 4:28
Secondly, I did some benchmarking, and although the performance is better than the other solutions for smallish strings, it worsens
exponentially due to the repeated string-rebuilding, becoming catastrophic for very large strings. See my edit to your answer.
� bgoldst
Nov 27 '17 at 4:28
@bgoldst: What a cool benchmark! In defense of the regex, for 10's or 100's of thousands of fields (what the regex is splitting)
there would probably be some form of record (like \n delimited text lines) comprising those fields so the catastrophic
slow-down would likely not occur. If you have a string with 100,000 fields -- maybe Bash is not ideal ;-) Thanks for the benchmark.
I learned a thing or two. � dawg
Nov 27 '17 at 4:46
As others have pointed out in this thread, the OP's question gave an example of a comma delimited string to be parsed into
an array, but did not indicate if he/she was only interested in comma delimiters, single character delimiters, or multi-character
delimiters.
Since Google tends to rank this answer at or near the top of search results, I wanted to provide readers with a strong answer
to the question of multiple character delimiters, since that is also mentioned in at least one response.
If you're in search of a solution to a multi-character delimiter problem, I suggest reviewing
Mallikarjun M 's post, in particular the response
from gniourf_gniourf who provides this elegant
pure BASH solution using parameter expansion:
#!/bin/bash
str="LearnABCtoABCSplitABCaABCString"
delimiter=ABC
s=$str$delimiter
array=();
while [[ $s ]]; do
array+=( "${s%%"$delimiter"*}" );
s=${s#*"$delimiter"};
done;
declare -p array
countries='Paris, France, Europe'
OIFS="$IFS"
IFS=', ' array=($countries)
IFS="$OIFS"
#${array[1]} == Paris
#${array[2]} == France
#${array[3]} == Europe
Bad: subject to word splitting and pathname expansion. Please don't revive old questions with good answers to give bad answers.
� gniourf_gniourf
Dec 19 '16 at 17:22
@GeorgeSovetov: As I said, it's subject to word splitting and pathname expansion. More generally, splitting a string into an
array as array=( $string ) is a (sadly very common) antipattern: word splitting occurs: string='Prague,
Czech Republic, Europe' ; Pathname expansion occurs: string='foo[abcd],bar[efgh]' will fail if you have a
file named, e.g., food or barf in your directory. The only valid usage of such a construct is when
string is a glob. � gniourf_gniourf
Dec 26 '16 at 18:07
Pfft. No. If you're writing scripts large enough for this to matter, you're doing it wrong. In application code, eval is evil.
In shell scripting, it's common, necessary, and inconsequential. �
user1009908
Oct 30 '15 at 4:05
Splitting strings by strings is a pretty boring thing to do using bash. What happens is that we have limited approaches that
only work in a few cases (split by ";", "/", "." and so on) or we have a variety of side effects in the outputs.
The approach below has required a number of maneuvers, but I believe it will work for most of our needs!
#!/bin/bash
# --------------------------------------
# SPLIT FUNCTION
# ----------------
F_SPLIT_R=()
f_split() {
: 'It does a "split" into a given string and returns an array.
Args:
TARGET_P (str): Target string to "split".
DELIMITER_P (Optional[str]): Delimiter used to "split". If not
informed the split will be done by spaces.
Returns:
F_SPLIT_R (array): Array with the provided string separated by the
informed delimiter.
'
F_SPLIT_R=()
TARGET_P=$1
DELIMITER_P=$2
if [ -z "$DELIMITER_P" ] ; then
DELIMITER_P=" "
fi
REMOVE_N=1
if [ "$DELIMITER_P" == "\n" ] ; then
REMOVE_N=0
fi
# NOTE: This was the only parameter that has been a problem so far!
# By Questor
# [Ref.: https://unix.stackexchange.com/a/390732/61742]
if [ "$DELIMITER_P" == "./" ] ; then
DELIMITER_P="[.]/"
fi
if [ ${REMOVE_N} -eq 1 ] ; then
# NOTE: Due to bash limitations we have some problems getting the
# output of a split by awk inside an array and so we need to use
# "line break" (\n) to succeed. Seen this, we remove the line breaks
# momentarily afterwards we reintegrate them. The problem is that if
# there is a line break in the "string" informed, this line break will
# be lost, that is, it is erroneously removed in the output!
# By Questor
TARGET_P=$(awk 'BEGIN {RS="dn"} {gsub("\n", "3F2C417D448C46918289218B7337FCAF"); printf $0}' <<< "${TARGET_P}")
fi
# NOTE: The replace of "\n" by "3F2C417D448C46918289218B7337FCAF" results
# in more occurrences of "3F2C417D448C46918289218B7337FCAF" than the
# amount of "\n" that there was originally in the string (one more
# occurrence at the end of the string)! We can not explain the reason for
# this side effect. The line below corrects this problem! By Questor
TARGET_P=${TARGET_P%????????????????????????????????}
SPLIT_NOW=$(awk -F"$DELIMITER_P" '{for(i=1; i<=NF; i++){printf "%s\n", $i}}' <<< "${TARGET_P}")
while IFS= read -r LINE_NOW ; do
if [ ${REMOVE_N} -eq 1 ] ; then
# NOTE: We use "'" to prevent blank lines with no other characters
# in the sequence being erroneously removed! We do not know the
# reason for this side effect! By Questor
LN_NOW_WITH_N=$(awk 'BEGIN {RS="dn"} {gsub("3F2C417D448C46918289218B7337FCAF", "\n"); printf $0}' <<< "'${LINE_NOW}'")
# NOTE: We use the commands below to revert the intervention made
# immediately above! By Questor
LN_NOW_WITH_N=${LN_NOW_WITH_N%?}
LN_NOW_WITH_N=${LN_NOW_WITH_N#?}
F_SPLIT_R+=("$LN_NOW_WITH_N")
else
F_SPLIT_R+=("$LINE_NOW")
fi
done <<< "$SPLIT_NOW"
}
# --------------------------------------
# HOW TO USE
# ----------------
STRING_TO_SPLIT="
* How do I list all databases and tables using psql?
\"
sudo -u postgres /usr/pgsql-9.4/bin/psql -c \"\l\"
sudo -u postgres /usr/pgsql-9.4/bin/psql <DB_NAME> -c \"\dt\"
\"
\"
\list or \l: list all databases
\dt: list all tables in the current database
\"
[Ref.: https://dba.stackexchange.com/questions/1285/how-do-i-list-all-databases-and-tables-using-psql]
"
f_split "$STRING_TO_SPLIT" "bin/psql -c"
# --------------------------------------
# OUTPUT AND TEST
# ----------------
ARR_LENGTH=${#F_SPLIT_R[*]}
for (( i=0; i<=$(( $ARR_LENGTH -1 )); i++ )) ; do
echo " > -----------------------------------------"
echo "${F_SPLIT_R[$i]}"
echo " < -----------------------------------------"
done
if [ "$STRING_TO_SPLIT" == "${F_SPLIT_R[0]}bin/psql -c${F_SPLIT_R[1]}" ] ; then
echo " > -----------------------------------------"
echo "The strings are the same!"
echo " < -----------------------------------------"
fi
Rather than changing IFS to match our desired delimiter, we can replace all occurrences of our desired delimiter ", "
with contents of $IFS via "${string//, /$IFS}" .
Maybe this will be slow for very large strings though?
I cover this idea in
my
answer ; see Wrong answer #5 (you might be especially interested in my discussion of the eval trick).
Your solution leaves $IFS set to the comma-space value after-the-fact. �
bgoldst
Aug 13 '17 at 22:38
that diagram shows what happens according to the man page, and not what happens when you actually try it out in real life. This second
diagram more accurately captures the insanity of bash:
See how remote interactive login shells read /etc/bash.bashrc, but normal interactive login shells don't? Sigh.
Finally, here's a repository containing my implementation
and the graphviz files for the above diagram. If your POSIX-compliant shell isn't listed here, or if I've made a horrible mistake
(or just a tiny one), please send me a pull request or make a comment below, and I'll update this post accordingly.
In my experience, if your bash sources /etc/bash.bashrc, odds are good it also sources /etc/bash.bash_logout
or something similar on logout (after ~/.bash_logout, of course).
Recently I wanted to deepen my understanding of bash by researching as much of it as
possible. Because I felt bash is an often-used (and under-understood) technology, I ended up
writing a book on it
.
You don't have to look hard on the internet to find plenty of useful one-liners in bash, or
scripts. And there are guides to bash that seem somewhat intimidating through either their
thoroughness or their focus on esoteric detail.
Here I've focussed on the things that either confused me or increased my power and
productivity in bash significantly, and tried to communicate them (as in my book) in a way that
emphasises getting the understanding right.
Enjoy!
1)
`` vs $()
These two operators do the same thing. Compare these two lines:
$ echo `ls`
$ echo $(ls)
Why these two forms existed confused me for a long time.
If you don't know, both forms substitute the output of the command contained within it into
the command.
The principal difference is that nesting is simpler.
Which of these is easier to read (and write)?
$ echo `echo \`echo \\\`echo inside\\\`\``
or:
$ echo $(echo $(echo $(echo inside)))
If you're interested in going deeper, see here or
here .
2) globbing vs regexps
Another one that can confuse if never thought about or researched.
While globs and regexps can look similar, they are not the same.
Consider this command:
$ rename -n 's/(.*)/new$1/' *
The two asterisks are interpreted in different ways.
The first is ignored by the shell (because it is in quotes), and is interpreted as '0 or
more characters' by the rename application. So it's interpreted as a regular expression.
The second is interpreted by the shell (because it is not in quotes), and gets replaced by a
list of all the files in the current working folder. It is interpreted as a glob.
So by looking at man bash can you figure out why these two commands produce
different output?
$ ls *
$ ls .*
The second looks even more like a regular expression. But it isn't!
3) Exit Codes
Not everyone knows that every time you run a shell command in bash, an 'exit code' is
returned to bash.
Generally, if a command 'succeeds' you get an error code of 0 . If it doesn't
succeed, you get a non-zero code. 1 is a 'general error', and others can give you
more information (eg which signal killed it, for example).
But these rules don't always hold:
$ grep not_there /dev/null
$ echo $?
$? is a special bash variable that's set to the exit code of each command after
it runs.
Grep uses exit codes to indicate whether it matched or not. I have to look up every time
which way round it goes: does finding a match or not return 0 ?
Grok this and a lot will click into place in what follows.
4) if
statements, [ and [[
Here's another 'spot the difference' similar to the backticks one above.
What will this output?
if grep not_there /dev/null
then
echo hi
else
echo lo
fi
grep's return code makes code like this work more intuitively as a side effect of its use of
exit codes.
Now what will this output?
a) hihi
b) lolo
c) something else
if [ $(grep not_there /dev/null) = '' ]
then
echo -n hi
else
echo -n lo
fi
if [[ $(grep not_there /dev/null) = '' ]]
then
echo -n hi
else
echo -n lo
fi
The difference between [ and [[ was another thing I never really
understood. [ is the original form for tests, and then [[ was
introduced, which is more flexible and intuitive. In the first if block above, the
if statement barfs because the $(grep not_there /dev/null) is evaluated to
nothing, resulting in this comparison:
[ = '' ]
which makes no sense. The double bracket form handles this for you.
This is why you occasionally see comparisons like this in bash scripts:
if [ x$(grep not_there /dev/null) = 'x' ]
so that if the command returns nothing it still runs. There's no need for it, but that's why
it exists.
5) set s
Bash has configurable options which can be set on the fly. I use two of these all the
time:
set -e
exits from a script if any command returned a non-zero exit code (see above).
This outputs the commands that get run as they run:
set -x
So a script might start like this:
#!/bin/bash
set -e
set -x
grep not_there /dev/null
echo $?
What would that script output?
6) <()
This is my favourite. It's so under-used, perhaps because it can be initially baffling, but
I use it all the time.
It's similar to $() in that the output of the command inside is re-used.
In this case, though, the output is treated as a file. This file can be used as an argument
to commands that take files as an argument.
Quoting's a knotty subject in bash, as it is in many software contexts.
Firstly, variables in quotes:
A='123'
echo "$A"
echo '$A'
Pretty simple – double quotes dereference variables, while single quotes go
literal.
So what will this output?
mkdir -p tmp
cd tmp
touch a
echo "*"
echo '*'
Surprised? I was.
8) Top three shortcuts
There are plenty of shortcuts listed in man bash , and it's not hard to find
comprehensive lists. This list consists of the ones I use most often, in order of how often I
use them.
Rather than trying to memorize them all, I recommend picking one, and trying to remember to
use it until it becomes unconscious. Then take the next one. I'll skip over the most obvious
ones (eg !! – repeat last command, and ~ – your home
directory).
!$
I use this dozens of times a day. It repeats the last argument of the last command. If
you're working on a file, and can't be bothered to re-type it command after command it can save
a lot of work:
grep somestring /long/path/to/some/file/or/other.txt
vi !$
!:1-$
This bit of magic takes this further. It takes all the arguments to the previous command and
drops them in. So:
The ! means 'look at the previous command', the : is a separator,
and the 1 means 'take the first word', the - means 'until' and the
$ means 'the last word'.
Note: you can achieve the same thing with !* . Knowing the above gives you the
control to limit to a specific contiguous subset of arguments, eg with !:2-3 .
:h
I use this one a lot too. If you put it after a filename, it will change that filename to
remove everything up to the folder. Like this:
grep isthere /long/path/to/some/file/or/other.txt
cd !$:h
which can save a lot of work in the course of the day.
9) startup order
The order in which bash runs startup scripts can cause a lot of head-scratching. I keep this
diagram handy (from this great page):
It shows which scripts bash decides to run from the top, based on decisions made about the
context bash is running in (which decides the colour to follow).
So if you are in a local (non-remote), non-login, interactive shell (eg when you run bash
itself from the command line), you are on the 'green' line, and these are the order of files
read:
/etc/bash.bashrc
~/.bashrc
[bash runs, then terminates]
~/.bash_logout
This can save you a hell of a lot of time debugging.
10) getopts (cheapci)
If you go deep with bash, you might end up writing chunky utilities in it. If you do, then
getting to grips with getopts can pay large dividends.
For fun, I once wrote a script called
cheapci which I used to work like a Jenkins job.
The code here implements the
reading of the two required, and 14
non-required arguments . Better to learn this than to build up a bunch of bespoke code that
can get very messy pretty quickly as your utility grows.
# aliases
alias la="ls -la --group-directories-first --color"
# clear terminal
alias cls="clear"
#
alias sup="sudo apt update && sudo apt upgrade"
# search for package
alias apts='apt-cache search'
# start x session
alias x="startx"
# download mp3 in best quality from YouTube
# usage: ytmp3 https://www.youtube.com/watch?v=LINK
alias ytmp3="youtube-dl -f bestaudio --extract-audio --audio-format mp3 --audio-quality 0"
# perform 'la' after 'cd'
alias cd="listDir"
listDir() {
builtin cd "$*"
RESULT=$?
if [ "$RESULT" -eq 0 ]; then
la
fi
}
# type "extract filename" to extract the file
extract () {
if [ -f $1 ] ; then
case $1 in
*.tar.bz2) tar xvjf $1 ;;
*.tar.gz) tar xvzf $1 ;;
*.bz2) bunzip2 $1 ;;
*.rar) unrar x $1 ;;
*.gz) gunzip $1 ;;
*.tar) tar xvf $1 ;;
*.tbz2) tar xvjf $1 ;;
*.tgz) tar xvzf $1 ;;
*.zip) unzip $1 ;;
*.Z) uncompress $1 ;;
*.7z) 7z x $1 ;;
*) echo "don't know how to extract '$1'..." ;;
esac
else
echo "'$1' is not a valid file!"
fi
}
# obvious one
alias ..="cd .."
alias ...="cd ../.."
alias ....="cd ../../.."
alias .....="cd ../../../.."
# tail all logs in /var/log
alias logs="find /var/log -type f -exec file {} \; | grep 'text' | cut -d' ' -f1 | sed -e's/:$//g' | grep -v '[0-9]$' | xargs
tail -f"
extract () {
if [ -f $1 ] ; then
case $1 in
*.tar.bz2) tar xvjf $1 ;;
*.tar.gz) tar xvzf $1 ;;
*.bz2) bunzip2 $1 ;;
*.rar) unrar x $1 ;;
*.gz) gunzip $1 ;;
*.tar) tar xvf $1 ;;
*.tbz2) tar xvjf $1 ;;
*.tgz) tar xvzf $1 ;;
*.zip) unzip $1 ;;
*.Z) uncompress $1 ;;
*.7z) 7z x $1 ;;
*) echo "don't know how to extract '$1'..." ;;
esac
else
echo "'$1' is not a valid file!"
fi
}
Erm, did you know that `tar` autoextracts these days? This will work for pretty much anything:
The mnt function acts like a poor person's arch-chroot and will bind mount /proc /sys & /dev before chrooting then tear it down afterwards.
The mkiso function builds a UEFI-capable Debian live system (with the name of the image given as the first argument).
The only other stuff I have are aliases, not really worth posting.
dbruce wrote: Ubuntu forums try to be like a coffee shop in Seattle. Debian forums strive for the charm and ambience
of a skinhead bar in Bacau. We intend to keep it that way.
i have a LOT of stuff in my /etc/bash.bashrc, because i want it to be available for the root user too.
i won't post everything, but here's a "best of" from both /etc/bash.bashrc and ~/.bashrc:
# Bash won't get SIGWINCH if another process is in the foreground.
# Enable checkwinsize so that bash will check the terminal size when
# it regains control.
# http://cnswww.cns.cwru.edu/~chet/bash/FAQ (E11)
shopt -s checkwinsize
# forums.bunsenlabs.org/viewtopic.php?pid=27494#p27494
# also see aliases '...' and '....'
shopt -s autocd
# opensource.com/article/18/5/bash-tricks
shopt -s cdspell
# as big as possible!!!
HISTSIZE=500000
HISTFILESIZE=2000000
man() {
env LESS_TERMCAP_mb=$(printf "\e[1;31m") \
LESS_TERMCAP_md=$(printf "\e[1;31m") \
LESS_TERMCAP_me=$(printf "\e[0m") \
LESS_TERMCAP_se=$(printf "\e[0m") \
LESS_TERMCAP_so=$(printf "\e[7m") \
LESS_TERMCAP_ue=$(printf "\e[0m") \
LESS_TERMCAP_us=$(printf "\e[1;32m") \
man "$@"
}
#LESS_TERMCAP_so=$(printf "\e[1;44;33m")
# that used to be in the man function for less's annoyingly over-colorful status line.
# changed it to simple reverse video (tput rev)
alias ls='ls --group-directories-first -hF --color=auto'
alias ll='ls --group-directories-first -hF --color=auto -la'
alias mpf='/usr/bin/ls -1 | mpv --playlist=-'
alias ruler='slop -o -c 1,0.3,0'
alias xmeasure='slop -o -c 1,0.3,0'
alias obxprop='obxprop | grep -v _NET_WM_ICON'
alias sx='exec startx > ~/.local/share/xorg/xlog 2>&1'
alias pngq='pngquant --nofs --speed 1 --skip-if-larger --strip '
alias screencap='ffmpeg -r 15 -s 1680x1050 -f x11grab -i :0.0 -vcodec msmpeg4v2 -qscale 2'
alias su='su -'
alias fblc='fluxbox -list-commands | column'
alias torrench='torrench -t -k -s -x -r -l -i -b --sorted'
alias F5='while sleep 60; do notify-send -u low "Pressed F5 on:" "$(xdotool getwindowname $(xdotool getwindowfocus))"; xdotool
key F5; done'
alias aurs='aurman --sort_by_name -Ss'
alias cal3='cal -3 -m -w --color'
alias mkdir='mkdir -p -v'
alias ping='ping -c 5'
alias cd..='cd ..'
alias off='systemctl poweroff'
alias xg='xgamma -gamma'
alias find='find 2>/dev/null'
alias stressme='stress --cpu 8 --io 4 --vm 2 --vm-bytes 128M --timeout'
alias hf='history|grep'
alias du1='du -m --max-depth=1|sort -g|sed "s/\t./M\t/g ; s/\///g"'
alias zipcat='gunzip -c'
hh uses shell history to provide suggest box like functionality for commands used in the
past. By default it parses .bash-history file that is filtered as you type a command substring. Commands are not just filtered, but also ordered by a ranking algorithm that considers number
of occurrences, length and timestamp. Favorite and frequently used commands can be
bookmarked . In addition hh allows removal of commands from history - for instance with a
typo or with a sensitive content.
export HH_CONFIG=hicolor # get more colors
shopt -s histappend # append new history items to .bash_history
export HISTCONTROL=ignorespace # leading space hides commands from history
export HISTFILESIZE=10000 # increase history file size (default is 500)
export HISTSIZE=${HISTFILESIZE} # increase history size (default is 500)
export PROMPT_COMMAND="history -a; history -n; ${PROMPT_COMMAND}"
# if this is interactive shell, then bind hh to Ctrl-r (for Vi mode check doc)
if [[ $- =~ .*i.* ]]; then bind '"\C-r": "\C-a hh -- \C-j"'; fi
The prompt command ensures synchronization of the history between BASH memory and history
file.
export HISTFILE=~/.zsh_history # ensure history file visibility
export HH_CONFIG=hicolor # get more colors
bindkey -s "\C-r" "\eqhh\n" # bind hh to Ctrl-r (for Vi mode check doc, experiment with --)
Although this is very simple to read and write, is a very slow solution because forces you to
read twice the same data ($STR) ... if you care of your script performace, the @anubhava
solution is much better – FSp
Nov 27 '12 at 10:26
Apart from being an ugly last-resort solution, this has a bug: You should absolutely use
double quotes in echo "$STR" unless you specifically want the shell to expand
any wildcards in the string as a side effect. See also stackoverflow.com/questions/10067266/
– tripleee
Jan 25 '16 at 6:47
You're right about double quotes of course, though I did point out this solution wasn't
general. However I think your assessment is a bit unfair - for some people this solution may
be more readable (and hence extensible etc) than some others, and doesn't completely rely on
arcane bash feature that wouldn't translate to other shells. I suspect that's why my
solution, though less elegant, continues to get votes periodically... – Rob I
Feb 10 '16 at 13:57
If you know it's going to be just two fields, you can skip the extra subprocesses like this:
var1=${STR%-*}
var2=${STR#*-}
What does this do? ${STR%-*} deletes the shortest substring of
$STR that matches the pattern -* starting from the end of the
string. ${STR#*-} does the same, but with the *- pattern and
starting from the beginning of the string. They each have counterparts %% and
## which find the longest anchored pattern match. If anyone has a
helpful mnemonic to remember which does which, let me know! I always have to try both to
remember.
Dunno about "absence of bashisms" considering that this is already moderately cryptic .... if
your delimiter is a newline instead of a hyphen, then it becomes even more cryptic. On the
other hand, it works with newlines , so there's that. – Steven Lu
May 1 '15 at 20:19
Mnemonic: "#" is to the left of "%" on a standard keyboard, so "#" removes a prefix (on the
left), and "%" removes a suffix (on the right). – DS.
Jan 13 '17 at 19:56
I used triplee's example and it worked exactly as advertised! Just change last two lines to
<pre> myvar1= echo $1 && myvar2= echo $2 </pre>
if you need to store them throughout a script with several "thrown" variables. –
Sigg3.net
Jun 19 '13 at 8:08
This is a really sweet solution if we need to write something that is not Bash specific. To
handle IFS troubles, one can add OLDIFS=$IFS at the beginning
before overwriting it, and then add IFS=$OLDIFS just after the set
line. – Daniel Andersson
Mar 27 '15 at 6:46
Suppose I have the string 1:2:3:4:5 and I want to get its last field (
5 in this case). How do I do that using Bash? I tried cut , but I
don't know how to specify the last field with -f .
While this is working for the given problem, the answer of William below ( stackoverflow.com/a/3163857/520162 )
also returns 5 if the string is 1:2:3:4:5: (while using the string
operators yields an empty result). This is especially handy when parsing paths that could
contain (or not) a finishing / character. – eckes
Jan 23 '13 at 15:23
And how does one keep the part before the last separator? Apparently by using
${foo%:*} . # - from beginning; % - from end.
# , % - shortest match; ## , %% - longest
match. – Mihai Danila
Jul 9 '14 at 14:07
This answer is nice because it uses 'cut', which the author is (presumably) already familiar.
Plus, I like this answer because I am using 'cut' and had this exact question, hence
finding this thread via search. – Dannid
Jan 14 '13 at 20:50
great advantage of this solution over the accepted answer: it also matches paths that contain
or do not contain a finishing / character: /a/b/c/d and
/a/b/c/d/ yield the same result ( d ) when processing pwd |
awk -F/ '{print $NF}' . The accepted answer results in an empty result in the case of
/a/b/c/d/ – eckes
Jan 23 '13 at 15:20
@eckes In case of AWK solution, on GNU bash, version 4.3.48(1)-release that's not true, as it
matters whenever you have trailing slash or not. Simply put AWK will use / as
delimiter, and if your path is /my/path/dir/ it will use value after last
delimiter, which is simply an empty string. So it's best to avoid trailing slash if you need
to do such a thing like I do. – stamster
May 21 at 11:52
This runs into problems if there is whitespace in any of the fields. Also, it does not
directly address the question of retrieving the last field. – chepner
Jun 22 '12 at 12:58
There was a solution involving setting Internal_field_separator (IFS) to
; . I am not sure what happened with that answer, how do you reset
IFS back to default?
RE: IFS solution, I tried this and it works, I keep the old IFS
and then restore it:
With regards to your "Edit2": You can simply "unset IFS" and it will return to the default
state. There's no need to save and restore it explicitly unless you have some reason to
expect that it's already been set to a non-default value. Moreover, if you're doing this
inside a function (and, if you aren't, why not?), you can set IFS as a local variable and it
will return to its previous value once you exit the function. – Brooks Moses
May 1 '12 at 1:26
@BrooksMoses: (a) +1 for using local IFS=... where possible; (b) -1 for
unset IFS , this doesn't exactly reset IFS to its default value, though I
believe an unset IFS behaves the same as the default value of IFS ($' \t\n'), however it
seems bad practice to be assuming blindly that your code will never be invoked with IFS set
to a custom value; (c) another idea is to invoke a subshell: (IFS=$custom; ...)
when the subshell exits IFS will return to whatever it was originally. – dubiousjim
May 31 '12 at 5:21
I just want to have a quick look at the paths to decide where to throw an executable, so I
resorted to run ruby -e "puts ENV.fetch('PATH').split(':')" . If you want to
stay pure bash won't help but using any scripting language that has a built-in split
is easier. – nicooga
Mar 7 '16 at 15:32
This is kind of a drive-by comment, but since the OP used email addresses as the example, has
anyone bothered to answer it in a way that is fully RFC 5322 compliant, namely that any
quoted string can appear before the @ which means you're going to need regular expressions or
some other kind of parser instead of naive use of IFS or other simplistic splitter functions.
– Jeff
Apr 22 at 17:51
You can set the internal field separator (IFS)
variable, and then let it parse into an array. When this happens in a command, then the
assignment to IFS only takes place to that single command's environment (to
read ). It then parses the input according to the IFS variable
value into an array, which we can then iterate over.
IFS=';' read -ra ADDR <<< "$IN"
for i in "${ADDR[@]}"; do
# process "$i"
done
It will parse one line of items separated by ; , pushing it into an array.
Stuff for processing whole of $IN , each time one line of input separated by
; :
while IFS=';' read -ra ADDR; do
for i in "${ADDR[@]}"; do
# process "$i"
done
done <<< "$IN"
This is probably the best way. How long will IFS persist in it's current value, can it mess
up my code by being set when it shouldn't be, and how can I reset it when I'm done with it?
– Chris
Lutz
May 28 '09 at 2:25
You can read everything at once without using a while loop: read -r -d '' -a addr
<<< "$in" # The -d '' is key here, it tells read not to stop at the first newline
(which is the default -d) but to continue until EOF or a NULL byte (which only occur in
binary data). – lhunath
May 28 '09 at 6:14
@LucaBorrione Setting IFS on the same line as the read with no
semicolon or other separator, as opposed to in a separate command, scopes it to that command
-- so it's always "restored"; you don't need to do anything manually. – Charles Duffy
Jul 6 '13 at 14:39
@imagineerThis There is a bug involving herestrings and local changes to IFS that requires
$IN to be quoted. The bug is fixed in bash 4.3. – chepner
Oct 2 '14 at 3:50
This construction replaces all occurrences of ';' (the initial
// means global replace) in the string IN with ' ' (a
single space), then interprets the space-delimited string as an array (that's what the
surrounding parentheses do).
The syntax used inside of the curly braces to replace each ';' character with
a ' ' character is called Parameter
Expansion .
There are some common gotchas:
If the original string has spaces, you will need to use
IFS :
IFS=':'; arrIN=($IN); unset IFS;
If the original string has spaces and the delimiter is a new line, you can set
IFS with:
I just want to add: this is the simplest of all, you can access array elements with
${arrIN[1]} (starting from zeros of course) – Oz123
Mar 21 '11 at 18:50
No, I don't think this works when there are also spaces present... it's converting the ',' to
' ' and then building a space-separated array. – Ethan
Apr 12 '13 at 22:47
This is a bad approach for other reasons: For instance, if your string contains
;*; , then the * will be expanded to a list of filenames in the
current directory. -1 – Charles Duffy
Jul 6 '13 at 14:39
You should have kept the IFS answer. It taught me something I didn't know, and it definitely
made an array, whereas this just makes a cheap substitute. – Chris Lutz
May 28 '09 at 2:42
I see. Yeah i find doing these silly experiments, i'm going to learn new things each time i'm
trying to answer things. I've edited stuff based on #bash IRC feedback and undeleted :)
– Johannes Schaub - litb
May 28 '09 at 2:59
-1, you're obviously not aware of wordsplitting, because it's introducing two bugs in your
code. one is when you don't quote $IN and the other is when you pretend a newline is the only
delimiter used in wordsplitting. You are iterating over every WORD in IN, not every line, and
DEFINATELY not every element delimited by a semicolon, though it may appear to have the
side-effect of looking like it works. – lhunath
May 28 '09 at 6:12
You could change it to echo "$IN" | tr ';' '\n' | while read -r ADDY; do # process "$ADDY";
done to make him lucky, i think :) Note that this will fork, and you can't change outer
variables from within the loop (that's why i used the <<< "$IN" syntax) then –
Johannes
Schaub - litb
May 28 '09 at 17:00
To summarize the debate in the comments: Caveats for general use : the shell applies
word splitting and expansions to the string, which may be undesired; just try
it with. IN="[email protected];[email protected];*;broken apart" . In short: this
approach will break, if your tokens contain embedded spaces and/or chars. such as
* that happen to make a token match filenames in the current folder. –
mklement0
Apr 24 '13 at 14:13
To this SO question, there is already a lot of different way to do this in bash . But bash has many
special features, so called bashism that work well, but that won't work in
any other shell .
In particular, arrays , associative array , and pattern
substitution are pure bashisms and may not work under other shells
.
On my Debian GNU/Linux , there is a standard shell called dash , but I know many
people who like to use ksh .
Finally, in very small situation, there is a special tool called busybox with his own shell
interpreter ( ash ).
But if you would write something usable under many shells, you have to not use
bashisms .
There is a syntax, used in many shells, for splitting a string across first or
last occurrence of a substring:
${var#*SubStr} # will drop begin of string up to first occur of `SubStr`
${var##*SubStr} # will drop begin of string up to last occur of `SubStr`
${var%SubStr*} # will drop part of string from last occur of `SubStr` to the end
${var%%SubStr*} # will drop part of string from first occur of `SubStr` to the end
(The missing of this is the main reason of my answer publication ;)
The # , ## , % , and %% substitutions
have what is IMO an easier explanation to remember (for how much they delete): #
and % delete the shortest possible matching string, and ## and
%% delete the longest possible. – Score_Under
Apr 28 '15 at 16:58
The IFS=\; read -a fields <<<"$var" fails on newlines and add a
trailing newline. The other solution removes a trailing empty field. – sorontar
Oct 26 '16 at 4:36
Could the last alternative be used with a list of field separators set somewhere else? For
instance, I mean to use this as a shell script, and pass a list of field separators as a
positional parameter. – sancho.s
Oct 4 at 3:42
I've seen a couple of answers referencing the cut command, but they've all been
deleted. It's a little odd that nobody has elaborated on that, because I think it's one of
the more useful commands for doing this type of thing, especially for parsing delimited log
files.
In the case of splitting this specific example into a bash script array, tr
is probably more efficient, but cut can be used, and is more effective if you
want to pull specific fields from the middle.
This approach will only work if you know the number of elements in advance; you'd need to
program some more logic around it. It also runs an external tool for every element. –
uli42
Sep 14 '17 at 8:30
Excatly waht i was looking for trying to avoid empty string in a csv. Now i can point the
exact 'column' value as well. Work with IFS already used in a loop. Better than expected for
my situation. – Louis Loudog Trottier
May 10 at 4:20
, May 28, 2009 at 10:31
How about this approach:
IN="[email protected];[email protected]"
set -- "$IN"
IFS=";"; declare -a Array=($*)
echo "${Array[@]}"
echo "${Array[0]}"
echo "${Array[1]}"
+1 Only a side note: shouldn't it be recommendable to keep the old IFS and then restore it?
(as shown by stefanB in his edit3) people landing here (sometimes just copying and pasting a
solution) might not think about this – Luca Borrione
Sep 3 '12 at 9:26
-1: First, @ata is right that most of the commands in this do nothing. Second, it uses
word-splitting to form the array, and doesn't do anything to inhibit glob-expansion when
doing so (so if you have glob characters in any of the array elements, those elements are
replaced with matching filenames). – Charles Duffy
Jul 6 '13 at 14:44
Suggest to use $'...' : IN=$'[email protected];[email protected];bet <d@\ns*
kl.com>' . Then echo "${Array[2]}" will print a string with newline.
set -- "$IN" is also neccessary in this case. Yes, to prevent glob expansion,
the solution should include set -f . – John_West
Jan 8 '16 at 12:29
-1 what if the string contains spaces? for example IN="this is first line; this
is second line" arrIN=( $( echo "$IN" | sed -e 's/;/\n/g' ) ) will produce an array of
8 elements in this case (an element for each word space separated), rather than 2 (an element
for each line semi colon separated) – Luca Borrione
Sep 3 '12 at 10:08
@Luca No the sed script creates exactly two lines. What creates the multiple entries for you
is when you put it into a bash array (which splits on white space by default) –
lothar
Sep 3 '12 at 17:33
That's exactly the point: the OP needs to store entries into an array to loop over it, as you
can see in his edits. I think your (good) answer missed to mention to use arrIN=( $(
echo "$IN" | sed -e 's/;/\n/g' ) ) to achieve that, and to advice to change IFS to
IFS=$'\n' for those who land here in the future and needs to split a string
containing spaces. (and to restore it back afterwards). :) – Luca Borrione
Sep 4 '12 at 7:09
You can use -s to avoid the mentioned problem: superuser.com/questions/896800/
"-f, --fields=LIST select only these fields; also print any line that contains no delimiter
character, unless the -s option is specified" – fersarr
Mar 3 '16 at 17:17
It worked in this scenario -> "echo "$SPLIT_0" | awk -F' inode=' '{print $1}'"! I had
problems when trying to use atrings (" inode=") instead of characters (";"). $ 1, $ 2, $ 3, $
4 are set as positions in an array! If there is a way of setting an array... better! Thanks!
– Eduardo Lucio
Aug 5 '15 at 12:59
@EduardoLucio, what I'm thinking about is maybe you can first replace your delimiter
inode= into ; for example by sed -i 's/inode\=/\;/g'
your_file_to_process , then define -F';' when apply awk ,
hope that can help you. – Tony
Aug 6 '15 at 2:42
This worked REALLY well for me... I used it to itterate over an array of strings which
contained comma separated DB,SERVER,PORT data to use mysqldump. – Nick
Oct 28 '11 at 14:36
Diagnosis: the IFS=";" assignment exists only in the $(...; echo
$IN) subshell; this is why some readers (including me) initially think it won't work.
I assumed that all of $IN was getting slurped up by ADDR1. But nickjb is correct; it does
work. The reason is that echo $IN command parses its arguments using the current
value of $IFS, but then echoes them to stdout using a space delimiter, regardless of the
setting of $IFS. So the net effect is as though one had called read ADDR1 ADDR2
<<< "[email protected][email protected]" (note the input is space-separated not
;-separated). – dubiousjim
May 31 '12 at 5:28
$ in=$'one;two three;*;there is\na newline\nin this field'
$ IFS=';' read -d '' -ra array < <(printf '%s;\0' "$in")
$ declare -p array
declare -a array='([0]="one" [1]="two three" [2]="*" [3]="there is
a newline
in this field")'
The trick for this to work is to use the -d option of read
(delimiter) with an empty delimiter, so that read is forced to read everything
it's fed. And we feed read with exactly the content of the variable
in , with no trailing newline thanks to printf . Note that's we're
also putting the delimiter in printf to ensure that the string passed to
read has a trailing delimiter. Without it, read would trim
potential trailing empty fields:
$ in='one;two;three;' # there's an empty field
$ IFS=';' read -d '' -ra array < <(printf '%s;\0' "$in")
$ declare -p array
declare -a array='([0]="one" [1]="two" [2]="three" [3]="")'
the trailing empty field is preserved.
Update for Bash≥4.4
Since Bash 4.4, the builtin mapfile (aka readarray ) supports
the -d option to specify a delimiter. Hence another canonical way is:
I found it as the rare solution on that list that works correctly with \n ,
spaces and * simultaneously. Also, no loops; array variable is accessible in the
shell after execution (contrary to the highest upvoted answer). Note, in=$'...'
, it does not work with double quotes. I think, it needs more upvotes. – John_West
Jan 8 '16 at 12:10
Consider using read -r ... to ensure that, for example, the two characters "\t"
in the input end up as the same two characters in your variables (instead of a single tab
char). – dubiousjim
May 31 '12 at 5:36
This is probably due to a bug involving IFS and here strings that was fixed in
bash 4.3. Quoting $IN should fix it. (In theory, $IN
is not subject to word splitting or globbing after it expands, meaning the quotes should be
unnecessary. Even in 4.3, though, there's at least one bug remaining--reported and scheduled
to be fixed--so quoting remains a good idea.) – chepner
Sep 19 '15 at 13:59
The following Bash/zsh function splits its first argument on the delimiter given by the
second argument:
split() {
local string="$1"
local delimiter="$2"
if [ -n "$string" ]; then
local part
while read -d "$delimiter" part; do
echo $part
done <<< "$string"
echo $part
fi
}
For instance, the command
$ split 'a;b;c' ';'
yields
a
b
c
This output may, for instance, be piped to other commands. Example:
$ split 'a;b;c' ';' | cat -n
1 a
2 b
3 c
Compared to the other solutions given, this one has the following advantages:
IFS is not overriden: Due to dynamic scoping of even local variables,
overriding IFS over a loop causes the new value to leak into function calls
performed from within the loop.
Arrays are not used: Reading a string into an array using read requires
the flag -a in Bash and -A in zsh.
If desired, the function may be put into a script as follows:
There are some cool answers here (errator esp.), but for something analogous to split in
other languages -- which is what I took the original question to mean -- I settled on this:
Now ${a[0]} , ${a[1]} , etc, are as you would expect. Use
${#a[*]} for number of terms. Or to iterate, of course:
for i in ${a[*]}; do echo $i; done
IMPORTANT NOTE:
This works in cases where there are no spaces to worry about, which solved my problem, but
may not solve yours. Go with the $IFS solution(s) in that case.
Better use ${IN//;/ } (double slash) to make it also work with more than two
values. Beware that any wildcard ( *?[ ) will be expanded. And a trailing empty
field will be discarded. – sorontar
Oct 26 '16 at 5:14
Better use set -- $IN to avoid some issues with "$IN" starting with dash. Still,
the unquoted expansion of $IN will expand wildcards ( *?[ ).
– sorontar
Oct 26 '16 at 5:17
In both cases a sub-list can be composed within the loop is persistent after the loop has
completed. This is useful when manipulating lists in memory, instead storing lists in files.
{p.s. keep calm and carry on B-) }
Fails if any part of $PATH contains spaces (or newlines). Also expands wildcards (asterisk *,
question mark ? and braces [ ]). – sorontar
Oct 26 '16 at 5:08
FYI, /etc/os-release and /etc/lsb-release are meant to be sourced,
and not parsed. So your method is really wrong. Moreover, you're not quite answering the
question about spiltting a string on a delimiter. – gniourf_gniourf
Jan 30 '17 at 8:26
-1 this doesn't work here (ubuntu 12.04). it prints only the first echo with all $IN value in
it, while the second is empty. you can see it if you put echo "0: "${ADDRS[0]}\n echo "1:
"${ADDRS[1]} the output is 0: [email protected];[email protected]\n 1: (\n is new line)
– Luca
Borrione
Sep 3 '12 at 10:04
-1, 1. IFS isn't being set in that subshell (it's being passed to the environment of "echo",
which is a builtin, so nothing is happening anyway). 2. $IN is quoted so it
isn't subject to IFS splitting. 3. The process substitution is split by whitespace, but this
may corrupt the original data. – Score_Under
Apr 28 '15 at 17:09
IN='[email protected];[email protected];Charlie Brown <[email protected];!"#$%&/()[]{}*? are no problem;simple is beautiful :-)'
set -f
oldifs="$IFS"
IFS=';'; arrayIN=($IN)
IFS="$oldifs"
for i in "${arrayIN[@]}"; do
echo "$i"
done
set +f
Explanation: Simple assignment using parenthesis () converts semicolon separated list into
an array provided you have correct IFS while doing that. Standard FOR loop handles individual
items in that array as usual. Notice that the list given for IN variable must be "hard"
quoted, that is, with single ticks.
IFS must be saved and restored since Bash does not treat an assignment the same way as a
command. An alternate workaround is to wrap the assignment inside a function and call that
function with a modified IFS. In that case separate saving/restoring of IFS is not needed.
Thanks for "Bize" for pointing that out.
!"#$%&/()[]{}*? are no problem well... not quite: []*? are glob
characters. So what about creating this directory and file: `mkdir '!"#$%&'; touch
'!"#$%&/()[]{} got you hahahaha - are no problem' and running your command? simple may be
beautiful, but when it's broken, it's broken. – gniourf_gniourf
Feb 20 '15 at 16:45
@ajaaskel you didn't fully understand my comment. Go in a scratch directory and issue these
commands: mkdir '!"#$%&'; touch '!"#$%&/()[]{} got you hahahaha - are no
problem' . They will only create a directory and a file, with weird looking names, I
must admit. Then run your commands with the exact IN you gave:
IN='[email protected];[email protected];Charlie Brown <[email protected];!"#$%&/()[]{}*?
are no problem;simple is beautiful :-)' . You'll see that you won't get the output you
expect. Because you're using a method subject to pathname expansions to split your string.
– gniourf_gniourf
Feb 25 '15 at 7:26
This is to demonstrate that the characters * , ? ,
[...] and even, if extglob is set, !(...) ,
@(...) , ?(...) , +(...)are problems with this
method! – gniourf_gniourf
Feb 25 '15 at 7:29
@gniourf_gniourf Thanks for detailed comments on globbing. I adjusted the code to have
globbing off. My point was however just to show that rather simple assignment can do the
splitting job. – ajaaskel
Feb 26 '15 at 15:26
> , Dec 19, 2013 at 21:39
Maybe not the most elegant solution, but works with * and spaces:
IN="bla@so me.com;*;[email protected]"
for i in `delims=${IN//[^;]}; seq 1 $((${#delims} + 1))`
do
echo "> [`echo $IN | cut -d';' -f$i`]"
done
Basically it removes every character other than ; making delims
eg. ;;; . Then it does for loop from 1 to
number-of-delimiters as counted by ${#delims} . The final step is
to safely get the $i th part using cut .
Create indexed arrays on the fly We can create indexed arrays with a more concise
syntax, by simply assign them some values:
$ my_array=(foo bar)
In this case we assigned multiple items at once to the array, but we can also insert one
value at a time, specifying its index:
$ my_array[0]=foo
Array operations Once an array is created, we can perform some useful operations on
it, like displaying its keys and values or modifying it by appending or removing elements: Print
the values of an array To display all the values of an array we can use the following shell
expansion syntax:
${my_array[@]}
Or even:
${my_array[*]}
Both syntax let us access all the values of the array and produce the same results, unless
the expansion it's quoted. In this case a difference arises: in the first case, when using
@ , the expansion will result in a word for each element of the array. This becomes
immediately clear when performing a for loop . As an example, imagine we have an
array with two elements, "foo" and "bar":
$ my_array=(foo bar)
Performing a for loop on it will produce the following result:
$ for i in "${my_array[@]}"; do echo "$i"; done
foo
bar
When using * , and the variable is quoted, instead, a single "result" will be
produced, containing all the elements of the array:
$ for i in "${my_array[*]}"; do echo "$i"; done
foo bar
Print the keys of an array It's even possible to retrieve and print the keys used in an
indexed or associative array, instead of their respective values. The syntax is almost
identical, but relies on the use of the ! operator:
$ my_array=(foo bar baz)
$ for index in "${!my_array[@]}"; do echo "$index"; done
0
1
2
The same is valid for associative arrays:
$ declare -A my_array
$ my_array=([foo]=bar [baz]=foobar)
$ for key in "${!my_array[@]}"; do echo "$key"; done
baz
foo
As you can see, being the latter an associative array, we can't count on the fact that
retrieved values are returned in the same order in which they were declared. Getting the size of
an array We can retrieve the size of an array (the number of elements contained in it), by
using a specific shell expansion:
$ my_array=(foo bar baz)
$ echo "the array contains ${#my_array[@]} elements"
the array contains 3 elements
We have created an array which contains three elements, "foo", "bar" and "baz", then by using
the syntax above, which differs from the one we saw before to retrieve the array values only for
the # character before the array name, we retrieved the number of the elements in the
array instead of its content. Adding elements to an array As we saw, we can add elements to
an indexed or associative array by specifying respectively their index or associative key. In the
case of indexed arrays, we can also simply add an element, by appending to the end of the array,
using the += operator:
$ my_array=(foo bar)
$ my_array+=(baz)
If we now print the content of the array we see that the element has been added successfully:
Deleting an element from the array To delete an element from the array we need to know
it's index or its key in the case of an associative array, and use the unset
command. Let's see an example:
We have created a simple array containing three elements, "foo", "bar" and "baz", then we
deleted "bar" from it running unset and referencing the index of "bar" in the array:
in this case we know it was 1 , since bash arrays start at 0. If we check the indexes
of the array, we can now see that 1 is missing:
In the example above, the value referenced by the "foo" key has been deleted, leaving only
"foobar" in the array.
Deleting an entire array, it's even simpler: we just pass the array name as an argument to
the unset command without specifying any index or key:
$ unset my_array
$ echo ${!my_array[@]}
After executing unset against the entire array, when trying to print its content
an empty result is returned: the array doesn't exist anymore. Conclusions In this tutorial
we saw the difference between indexed and associative arrays in bash, how to initialize them and
how to perform fundamental operations, like displaying their keys and values and appending or
removing items. Finally we saw how to unset them completely. Bash syntax can sometimes be pretty
weird, but using arrays in scripts can be really useful. When a script starts to become more
complex than expected, my advice is, however, to switch to a more capable scripting language such
as python.
This comment
has been minimized.
Show comment
Hide comment
Copy link
bobbydavid
Sep 19, 2012
One annoyance with this alias is that simply typing "cd" will twiddle the
directory stack instead of bringing you to your home directory.
Copy link
bobbydavid
commented
Sep 19, 2012
One annoyance with
this alias is that simply typing "cd" will twiddle the directory stack instead of
bringing you to your home directory.
This comment
has been minimized.
Show comment
Hide comment
Copy link
dideler
Mar 9, 2013
@bobbydavid
makes a good point. This would be better as a function.
function cd {
if (("$#" > 0)); then
pushd "$@" > /dev/null
else
cd $HOME
fi
}
By the way, I found this gist by googling "silence pushd".
function cd {
if (("$#" > 0)); then
if [ "$1" == "-" ]; then
popd > /dev/null
else
pushd "$@" > /dev/null
fi
else
cd $HOME
fi
}
You can always mimic the "cd -" functionality by using pushd alone.
Btw, I also found this gist by googling "silent pushd" ;)
This comment
has been minimized.
Show comment
Hide comment
Copy link
cra
Jul 1, 2014
And thanks to your last comment, I found this gist by googling "silent cd -" :)
Copy link
cra
commented
Jul 1, 2014
And thanks to your
last comment, I found this gist by googling "silent cd -" :)
This comment
has been minimized.
Show comment
Hide comment
Copy link
keltroth
Jun 25, 2015
With bash completion activated a can't get rid of this error :
"bash: pushd: cd: No such file or directory"...
With bash completion
activated a can't get rid of this error :
"bash: pushd: cd: No such file or directory"...
Any clue ?
This comment
has been minimized.
Show comment
Hide comment
Copy link
keltroth
Jun 25, 2015
Got it !
One have to add :
complete -d cd
After making the alias !
My complete code here :
function _cd {
if (("$#" > 0)); then
if [ "$1" == "-" ]; then
popd > /dev/null
else
pushd "$@" > /dev/null
fi
else
cd $HOME
fi
}
alias cd=_cd
complete -d cd
function _cd {
if (("$#" > 0)); then
if [ "$1" == "-" ]; then
popd > /dev/null
else
pushd "$@" > /dev/null
fi
else
cd $HOME
fi
}
alias cd=_cd
complete -d cd
This comment
has been minimized.
Show comment
Hide comment
Copy link
jan-warchol
Nov 29, 2015
I wanted to be able to go back by a given number of history items by typing
cd -n
, and I came up with this:
function _cd {
# typing just `_cd` will take you $HOME ;)
if [ "$1" == "" ]; then
pushd "$HOME" > /dev/null
# use `_cd -` to visit previous directory
elif [ "$1" == "-" ]; then
pushd $OLDPWD > /dev/null
# use `_cd -n` to go n directories back in history
elif [[ "$1" =~ ^-[0-9]+$ ]]; then
for i in `seq 1 ${1/-/}`; do
popd > /dev/null
done
# use `_cd -- <path>` if your path begins with a dash
elif [ "$1" == "--" ]; then
shift
pushd -- "$@" > /dev/null
# basic case: move to a dir and add it to history
else
pushd "$@" > /dev/null
fi
}
# replace standard `cd` with enhanced version, ensure tab-completion works
alias cd=_cd
complete -d cd
I wanted to be able
to go back by a given number of history items by typing
cd -n
, and I
came up with this:
function _cd {
# typing just `_cd` will take you $HOME ;)
if [ "$1" == "" ]; then
pushd "$HOME" > /dev/null
# use `_cd -` to visit previous directory
elif [ "$1" == "-" ]; then
pushd $OLDPWD > /dev/null
# use `_cd -n` to go n directories back in history
elif [[ "$1" =~ ^-[0-9]+$ ]]; then
for i in `seq 1 ${1/-/}`; do
popd > /dev/null
done
# use `_cd -- <path>` if your path begins with a dash
elif [ "$1" == "--" ]; then
shift
pushd -- "$@" > /dev/null
# basic case: move to a dir and add it to history
else
pushd "$@" > /dev/null
fi
}
# replace standard `cd` with enhanced version, ensure tab-completion works
alias cd=_cd
complete -d cd
I think you may find this interesting.
This comment
has been minimized.
Show comment
Hide comment
Copy link
3v1n0
Oct 25, 2017
Another improvement over
@jan-warchol
version, to make
cd -
to alternatively use
pushd $OLDPWD
and
popd
depending on what we called before.
This allows to avoid to fill your history with elements when you often do
cd -; cd - # repeated as long you want
. This could be applied when using
this alias also for
$OLDPWD
, but in that case it might be that you
want it repeated there, so I didn't touch it.
Also added
cd -l
as alias for
dir -v
and use
cd -g X
to go to the
X
th directory in your history (without
popping, that's possible too of course, but it' something more an addition in
this case).
# Replace cd with pushd https://gist.github.com/mbadran/130469
function push_cd() {
# typing just `push_cd` will take you $HOME ;)
if [ -z "$1" ]; then
push_cd "$HOME"
# use `push_cd -` to visit previous directory
elif [ "$1" == "-" ]; then
if [ "$(dirs -p | wc -l)" -gt 1 ]; then
current_dir="$PWD"
popd > /dev/null
pushd -n $current_dir > /dev/null
elif [ -n "$OLDPWD" ]; then
push_cd $OLDPWD
fi
# use `push_cd -l` or `push_cd -s` to print current stack of folders
elif [ "$1" == "-l" ] || [ "$1" == "-s" ]; then
dirs -v
# use `push_cd -l N` to go to the Nth directory in history (pushing)
elif [ "$1" == "-g" ] && [[ "$2" =~ ^[0-9]+$ ]]; then
indexed_path=$(dirs -p | sed -n $(($2+1))p)
push_cd $indexed_path
# use `push_cd +N` to go to the Nth directory in history (pushing)
elif [[ "$1" =~ ^+[0-9]+$ ]]; then
push_cd -g ${1/+/}
# use `push_cd -N` to go n directories back in history
elif [[ "$1" =~ ^-[0-9]+$ ]]; then
for i in `seq 1 ${1/-/}`; do
popd > /dev/null
done
# use `push_cd -- <path>` if your path begins with a dash
elif [ "$1" == "--" ]; then
shift
pushd -- "$@" > /dev/null
# basic case: move to a dir and add it to history
else
pushd "$@" > /dev/null
if [ "$1" == "." ] || [ "$1" == "$PWD" ]; then
popd -n > /dev/null
fi
fi
if [ -n "$CD_SHOW_STACK" ]; then
dirs -v
fi
}
# replace standard `cd` with enhanced version, ensure tab-completion works
alias cd=push_cd
complete -d cd```
Another improvement
over
@jan-warchol
version, to make
cd -
to alternatively use
pushd
$OLDPWD
and
popd
depending on what we called before.
This
allows to avoid to fill your history with elements when you often do
cd -; cd
- # repeated as long you want
. This could be applied when using this alias
also for
$OLDPWD
, but in that case it might be that you want it
repeated there, so I didn't touch it.
Also added
cd -l
as alias for
dir -v
and use
cd
-g X
to go to the
X
th directory in your history (without
popping, that's possible too of course, but it' something more an addition in this
case).
# Replace cd with pushd https://gist.github.com/mbadran/130469
function push_cd() {
# typing just `push_cd` will take you $HOME ;)
if [ -z "$1" ]; then
push_cd "$HOME"
# use `push_cd -` to visit previous directory
elif [ "$1" == "-" ]; then
if [ "$(dirs -p | wc -l)" -gt 1 ]; then
current_dir="$PWD"
popd > /dev/null
pushd -n $current_dir > /dev/null
elif [ -n "$OLDPWD" ]; then
push_cd $OLDPWD
fi
# use `push_cd -l` or `push_cd -s` to print current stack of folders
elif [ "$1" == "-l" ] || [ "$1" == "-s" ]; then
dirs -v
# use `push_cd -l N` to go to the Nth directory in history (pushing)
elif [ "$1" == "-g" ] && [[ "$2" =~ ^[0-9]+$ ]]; then
indexed_path=$(dirs -p | sed -n $(($2+1))p)
push_cd $indexed_path
# use `push_cd +N` to go to the Nth directory in history (pushing)
elif [[ "$1" =~ ^+[0-9]+$ ]]; then
push_cd -g ${1/+/}
# use `push_cd -N` to go n directories back in history
elif [[ "$1" =~ ^-[0-9]+$ ]]; then
for i in `seq 1 ${1/-/}`; do
popd > /dev/null
done
# use `push_cd -- <path>` if your path begins with a dash
elif [ "$1" == "--" ]; then
shift
pushd -- "$@" > /dev/null
# basic case: move to a dir and add it to history
else
pushd "$@" > /dev/null
if [ "$1" == "." ] || [ "$1" == "$PWD" ]; then
popd -n > /dev/null
fi
fi
if [ -n "$CD_SHOW_STACK" ]; then
dirs -v
fi
}
# replace standard `cd` with enhanced version, ensure tab-completion works
alias cd=push_cd
complete -d cd```
izaak says:
March 12, 2010
at 11:06 am I would also add $ echo 'export HISTSIZE=10000' >> ~/.bash_profile
It's really useful, I think.
Dariusz says:
March 12, 2010
at 2:31 pm you can add it to /etc/profile so it is available to all users. I also add:
# Make sure all terminals save history
shopt -s histappend histreedit histverify
shopt -s no_empty_cmd_completion # bash>=2.04 only
# Whenever displaying the prompt, write the previous line to disk:
PROMPT_COMMAND='history -a'
#Use GREP color features by default: This will highlight the matched words / regexes
export GREP_OPTIONS='�color=auto'
export GREP_COLOR='1;37;41′
Babar Haq says:
March 15, 2010
at 6:25 am Good tip. We have multiple users connecting as root using ssh and running different commands. Is there a way to
log the IP that command was run from?
Thanks in advance.
Anthony says:
August 21,
2014 at 9:01 pm Just for anyone who might still find this thread (like I did today):
will give you the time format, plus the IP address culled from the ssh_connection environment variable (thanks for pointing
that out, Cadrian, I never knew about that before), all right there in your history output.
You could even add in $(whoami)@ right to get if you like (although if everyone's logging in with the root account that's
not helpful).
set |grep -i hist
HISTCONTROL=ignoreboth
HISTFILE=/home/cadrian/.bash_history
HISTFILESIZE=1000000000
HISTSIZE=10000000
So in profile you can so something like HISTFILE=/root/.bash_history_$(echo $SSH_CONNECTION| cut -d\ -f1)
TSI says:
March 21, 2010
at 10:29 am bash 4 can syslog every command bat afaik, you have to recompile it (check file config-top.h). See the news file
of bash: http://tiswww.case.edu/php/chet/bash/NEWS
If you want to safely export history of your luser, you can ssl-syslog them to a central syslog server.
Sohail says:
January 13, 2012
at 7:05 am Hi
Nice trick but unfortunately, the commands which were executed in the past few days also are carrying the current day's (today's)
timestamp.
Yes indeed that will be the behavior of the system since you have just enabled on that day the HISTTIMEFORMAT feature. In
other words, the system recall or record the commands which were inputted prior enabling of this feature. Hope this answers
your concern.
Yes, that will be the behavior of the system since you have just enabled on that day the HISTTIMEFORMAT feature. In other
words, the system can't recall or record the commands which were inputted prior enabling of this feature, thus it will just
reflect on the printed output (upon execution of "history") the current day and time. Hope this answers your concern.
The command only lists the current date (Today) even for those commands which were executed on earlier days.
Any solutions ?
Regards
nitiratna nikalje says:
August 24, 2012
at 5:24 pm hi vivek.do u know any openings for freshers in linux field? I m doing rhce course from rajiv banergy. My samba,nfs-nis,dhcp,telnet,ftp,http,ssh,squid,cron,quota
and system administration is over.iptables ,sendmail and dns is remaining.
Krishan says:
February 7,
2014 at 6:18 am The command is not working properly. It is displaying the date and time of todays for all the commands where
as I ran the some command three before.
I want to collect the history of particular user everyday and want to send an email.I wrote below script.
for collecting everyday history by time shall i edit .profile file of that user echo 'export HISTTIMEFORMAT="%d/%m/%y %T "' >> ~/.bash_profile
Script:
#!/bin/bash
#This script sends email of particular user
history >/tmp/history
if [ -s /tmp/history ]
then
mailx -s "history 29042014" </tmp/history
fi
rm /tmp/history
#END OF THE SCRIPT
Can any one suggest better way to collect particular user history for everyday
What's the accepted way of parsing this such that in each case (or some combination of the
two) $v , $f , and $d will all be set to
true and $outFile will be equal to /fizz/someOtherFile
?
For zsh-users there's a great builtin called zparseopts which can do: zparseopts -D -E
-M -- d=debug -debug=d And have both -d and --debug in the
$debug array echo $+debug[1] will return 0 or 1 if one of those are
used. Ref: zsh.org/mla/users/2011/msg00350.html
– dezza
Aug 2 '16 at 2:13
Preferred Method: Using straight bash without getopt[s]
I originally answered the question as the OP asked. This Q/A is getting a lot of
attention, so I should also offer the non-magic way to do this. I'm going to expand upon
guneysus's answer
to fix the nasty sed and include
Tobias Kienzler's suggestion .
Two of the most common ways to pass key value pair arguments are:
#!/bin/bash
POSITIONAL=()
while [[ $# -gt 0 ]]
do
key="$1"
case $key in
-e|--extension)
EXTENSION="$2"
shift # past argument
shift # past value
;;
-s|--searchpath)
SEARCHPATH="$2"
shift # past argument
shift # past value
;;
-l|--lib)
LIBPATH="$2"
shift # past argument
shift # past value
;;
--default)
DEFAULT=YES
shift # past argument
;;
*) # unknown option
POSITIONAL+=("$1") # save it in an array for later
shift # past argument
;;
esac
done
set -- "${POSITIONAL[@]}" # restore positional parameters
echo FILE EXTENSION = "${EXTENSION}"
echo SEARCH PATH = "${SEARCHPATH}"
echo LIBRARY PATH = "${LIBPATH}"
echo DEFAULT = "${DEFAULT}"
echo "Number files in SEARCH PATH with EXTENSION:" $(ls -1 "${SEARCHPATH}"/*."${EXTENSION}" | wc -l)
if [[ -n $1 ]]; then
echo "Last line of file specified as non-opt/last argument:"
tail -1 "$1"
fi
#!/bin/bash
for i in "$@"
do
case $i in
-e=*|--extension=*)
EXTENSION="${i#*=}"
shift # past argument=value
;;
-s=*|--searchpath=*)
SEARCHPATH="${i#*=}"
shift # past argument=value
;;
-l=*|--lib=*)
LIBPATH="${i#*=}"
shift # past argument=value
;;
--default)
DEFAULT=YES
shift # past argument with no value
;;
*)
# unknown option
;;
esac
done
echo "FILE EXTENSION = ${EXTENSION}"
echo "SEARCH PATH = ${SEARCHPATH}"
echo "LIBRARY PATH = ${LIBPATH}"
echo "Number files in SEARCH PATH with EXTENSION:" $(ls -1 "${SEARCHPATH}"/*."${EXTENSION}" | wc -l)
if [[ -n $1 ]]; then
echo "Last line of file specified as non-opt/last argument:"
tail -1 $1
fi
To better understand ${i#*=} search for "Substring Removal" in this guide . It is
functionally equivalent to `sed 's/[^=]*=//' <<< "$i"` which calls a
needless subprocess or `echo "$i" | sed 's/[^=]*=//'` which calls two
needless subprocesses.
Never use getopt(1). getopt cannot handle empty arguments strings, or
arguments with embedded whitespace. Please forget that it ever existed.
The POSIX shell (and others) offer getopts which is safe to use instead. Here
is a simplistic getopts example:
#!/bin/sh
# A POSIX variable
OPTIND=1 # Reset in case getopts has been used previously in the shell.
# Initialize our own variables:
output_file=""
verbose=0
while getopts "h?vf:" opt; do
case "$opt" in
h|\?)
show_help
exit 0
;;
v) verbose=1
;;
f) output_file=$OPTARG
;;
esac
done
shift $((OPTIND-1))
[ "${1:-}" = "--" ] && shift
echo "verbose=$verbose, output_file='$output_file', Leftovers: $@"
# End of file
The advantages of getopts are:
It's portable, and will work in e.g. dash.
It can handle things like -vf filename in the expected Unix way,
automatically.
The disadvantage of getopts is that it can only handle short options (
-h , not --help ) without trickery.
There is a getopts tutorial which explains
what all of the syntax and variables mean. In bash, there is also help getopts ,
which might be informative.
Is this really true? According to Wikipedia there's a newer GNU enhanced version of
getopt which includes all the functionality of getopts and then
some. man getopt on Ubuntu 13.04 outputs getopt - parse command options
(enhanced) as the name, so I presume this enhanced version is standard now. –
Livven
Jun 6 '13 at 21:19
You do not echo –default . In the first example, I notice that if
–default is the last argument, it is not processed (considered as
non-opt), unless while [[ $# -gt 1 ]] is set as while [[ $# -gt 0
]] – kolydart
Jul 10 '17 at 8:11
No answer mentions enhanced getopt . And the top-voted answer is misleading: It ignores
-vfd style short options (requested by the OP), options after positional
arguments (also requested by the OP) and it ignores parsing-errors. Instead:
Use enhanced getopt from util-linux or formerly GNU glibc .
1
It works with getopt_long() the C function of GNU glibc.
Has all useful distinguishing features (the others don't have them):
handles spaces, quoting characters and even binary in arguments
2
it can handle options at the end: script.sh -o outFile file1 file2
-v
allows = -style long options: script.sh --outfile=fileOut
--infile fileIn
Is so old already 3 that no GNU system is missing this (e.g. any
Linux has it).
You can test for its existence with: getopt --test → return value
4.
Other getopt or shell-builtin getopts are of limited
use.
verbose: y, force: y, debug: y, in: ./foo/bar/someFile, out: /fizz/someOtherFile
with the following myscript
#!/bin/bash
getopt --test > /dev/null
if [[ $? -ne 4 ]]; then
echo "I'm sorry, `getopt --test` failed in this environment."
exit 1
fi
OPTIONS=dfo:v
LONGOPTIONS=debug,force,output:,verbose
# -temporarily store output to be able to check for errors
# -e.g. use "--options" parameter by name to activate quoting/enhanced mode
# -pass arguments only via -- "$@" to separate them correctly
PARSED=$(getopt --options=$OPTIONS --longoptions=$LONGOPTIONS --name "$0" -- "$@")
if [[ $? -ne 0 ]]; then
# e.g. $? == 1
# then getopt has complained about wrong arguments to stdout
exit 2
fi
# read getopt's output this way to handle the quoting right:
eval set -- "$PARSED"
# now enjoy the options in order and nicely split until we see --
while true; do
case "$1" in
-d|--debug)
d=y
shift
;;
-f|--force)
f=y
shift
;;
-v|--verbose)
v=y
shift
;;
-o|--output)
outFile="$2"
shift 2
;;
--)
shift
break
;;
*)
echo "Programming error"
exit 3
;;
esac
done
# handle non-option arguments
if [[ $# -ne 1 ]]; then
echo "$0: A single input file is required."
exit 4
fi
echo "verbose: $v, force: $f, debug: $d, in: $1, out: $outFile"
1 enhanced getopt is available on most "bash-systems", including
Cygwin; on OS X try brew install gnu-getopt 2 the POSIX exec() conventions have no reliable way to
pass binary NULL in command line arguments; those bytes prematurely end the argument 3 first version released in 1997 or before (I only tracked it back to
1997)
I believe that the only caveat with getopt is that it cannot be used
conveniently in wrapper scripts where one might have few options specific to the
wrapper script, and then pass the non-wrapper-script options to the wrapped executable,
intact. Let's say I have a grep wrapper called mygrep and I have an
option --foo specific to mygrep , then I cannot do mygrep
--foo -A 2 , and have the -A 2 passed automatically to grep
; I need to do mygrep --foo -- -A 2 . Here is my implementation on top of
your solution. – Kaushal Modi
Apr 27 '17 at 14:02
Alex, I agree and there's really no way around that since we need to know the actual return
value of getopt --test . I'm a big fan of "Unofficial Bash Strict mode", (which
includes set -e ), and I just put the check for getopt ABOVE set -euo
pipefail and IFS=$'\n\t' in my script. – bobpaul
Mar 20 at 16:45
@bobpaul Oh, there is a way around that. And I'll edit my answer soon to reflect my
collections regarding this issue ( set -e )... – Robert Siemer
Mar 21 at 9:10
@bobpaul Your statement about util-linux is wrong and misleading as well: the package is
marked "essential" on Ubuntu/Debian. As such, it is always installed. – Which distros
are you talking about (where you say it needs to be installed on purpose)? – Robert Siemer
Mar 21 at 9:16
#!/bin/bash
for i in "$@"
do
case $i in
-p=*|--prefix=*)
PREFIX="${i#*=}"
;;
-s=*|--searchpath=*)
SEARCHPATH="${i#*=}"
;;
-l=*|--lib=*)
DIR="${i#*=}"
;;
--default)
DEFAULT=YES
;;
*)
# unknown option
;;
esac
done
echo PREFIX = ${PREFIX}
echo SEARCH PATH = ${SEARCHPATH}
echo DIRS = ${DIR}
echo DEFAULT = ${DEFAULT}
To better understand ${i#*=} search for "Substring Removal" in this guide . It is
functionally equivalent to `sed 's/[^=]*=//' <<< "$i"` which calls a
needless subprocess or `echo "$i" | sed 's/[^=]*=//'` which calls two
needless subprocesses.
Neat! Though this won't work for space-separated arguments à la mount -t tempfs
... . One can probably fix this via something like while [ $# -ge 1 ]; do
param=$1; shift; case $param in; -p) prefix=$1; shift;; etc – Tobias Kienzler
Nov 12 '13 at 12:48
@Matt J, the first part of the script (for i) would be able to handle arguments with spaces
in them if you use "$i" instead of $i. The getopts does not seem to be able to handle
arguments with spaces. What would be the advantage of using getopt over the for i loop?
– thebunnyrules
Jun 1 at 1:57
Sorry for the delay. In my script, the handle_argument function receives all the non-option
arguments. You can replace that line with whatever you'd like, maybe *) die
"unrecognized argument: $1" or collect the args into a variable *) args+="$1";
shift 1;; . – bronson
Oct 8 '15 at 20:41
Amazing! I've tested a couple of answers, but this is the only one that worked for all cases,
including many positional parameters (both before and after flags) – Guilherme Garnier
Apr 13 at 16:10
I'm about 4 years late to this question, but want to give back. I used the earlier answers as
a starting point to tidy up my old adhoc param parsing. I then refactored out the following
template code. It handles both long and short params, using = or space separated arguments,
as well as multiple short params grouped together. Finally it re-inserts any non-param
arguments back into the $1,$2.. variables. I hope it's useful.
#!/usr/bin/env bash
# NOTICE: Uncomment if your script depends on bashisms.
#if [ -z "$BASH_VERSION" ]; then bash $0 $@ ; exit $? ; fi
echo "Before"
for i ; do echo - $i ; done
# Code template for parsing command line parameters using only portable shell
# code, while handling both long and short params, handling '-f file' and
# '-f=file' style param data and also capturing non-parameters to be inserted
# back into the shell positional parameters.
while [ -n "$1" ]; do
# Copy so we can modify it (can't modify $1)
OPT="$1"
# Detect argument termination
if [ x"$OPT" = x"--" ]; then
shift
for OPT ; do
REMAINS="$REMAINS \"$OPT\""
done
break
fi
# Parse current opt
while [ x"$OPT" != x"-" ] ; do
case "$OPT" in
# Handle --flag=value opts like this
-c=* | --config=* )
CONFIGFILE="${OPT#*=}"
shift
;;
# and --flag value opts like this
-c* | --config )
CONFIGFILE="$2"
shift
;;
-f* | --force )
FORCE=true
;;
-r* | --retry )
RETRY=true
;;
# Anything unknown is recorded for later
* )
REMAINS="$REMAINS \"$OPT\""
break
;;
esac
# Check for multiple short options
# NOTICE: be sure to update this pattern to match valid options
NEXTOPT="${OPT#-[cfr]}" # try removing single short opt
if [ x"$OPT" != x"$NEXTOPT" ] ; then
OPT="-$NEXTOPT" # multiple short opts, keep going
else
break # long form, exit inner loop
fi
done
# Done with that param. move to next
shift
done
# Set the non-parameters back into the positional parameters ($1 $2 ..)
eval set -- $REMAINS
echo -e "After: \n configfile='$CONFIGFILE' \n force='$FORCE' \n retry='$RETRY' \n remains='$REMAINS'"
for i ; do echo - $i ; done
This code can't handle options with arguments like this: -c1 . And the use of
= to separate short options from their arguments is unusual... –
Robert
Siemer
Dec 6 '15 at 13:47
I ran into two problems with this useful chunk of code: 1) the "shift" in the case of
"-c=foo" ends up eating the next parameter; and 2) 'c' should not be included in the "[cfr]"
pattern for combinable short options. – sfnd
Jun 6 '16 at 19:28
My answer is largely based on the answer by Bruno Bronosky , but I sort
of mashed his two pure bash implementations into one that I use pretty frequently.
# As long as there is at least one more argument, keep looping
while [[ $# -gt 0 ]]; do
key="$1"
case "$key" in
# This is a flag type option. Will catch either -f or --foo
-f|--foo)
FOO=1
;;
# Also a flag type option. Will catch either -b or --bar
-b|--bar)
BAR=1
;;
# This is an arg value type option. Will catch -o value or --output-file value
-o|--output-file)
shift # past the key and to the value
OUTPUTFILE="$1"
;;
# This is an arg=value type option. Will catch -o=value or --output-file=value
-o=*|--output-file=*)
# No need to shift here since the value is part of the same string
OUTPUTFILE="${key#*=}"
;;
*)
# Do whatever you want with extra options
echo "Unknown option '$key'"
;;
esac
# Shift after checking all the cases to get the next option
shift
done
This allows you to have both space separated options/values, as well as equal defined
values.
So you could run your script using:
./myscript --foo -b -o /fizz/file.txt
as well as:
./myscript -f --bar -o=/fizz/file.txt
and both should have the same end result.
PROS:
Allows for both -arg=value and -arg value
Works with any arg name that you can use in bash
Meaning -a or -arg or --arg or -a-r-g or whatever
Pure bash. No need to learn/use getopt or getopts
CONS:
Can't combine args
Meaning no -abc. You must do -a -b -c
These are the only pros/cons I can think of off the top of my head
I have found the matter to write portable parsing in scripts so frustrating that I have
written Argbash - a FOSS
code generator that can generate the arguments-parsing code for your script plus it has some
nice features:
Thanks for writing argbash, I just used it and found it works well. I mostly went for argbash
because it's a code generator supporting the older bash 3.x found on OS X 10.11 El Capitan.
The only downside is that the code-generator approach means quite a lot of code in your main
script, compared to calling a module. – RichVel
Aug 18 '16 at 5:34
You can actually use Argbash in a way that it produces tailor-made parsing library just for
you that you can have included in your script or you can have it in a separate file and just
source it. I have added an example to
demonstrate that and I have made it more explicit in the documentation, too. –
bubla
Aug 23 '16 at 20:40
Good to know. That example is interesting but still not really clear - maybe you can change
name of the generated script to 'parse_lib.sh' or similar and show where the main script
calls it (like in the wrapping script section which is more complex use case). –
RichVel
Aug 24 '16 at 5:47
The issues were addressed in recent version of argbash: Documentation has been improved, a
quickstart argbash-init script has been introduced and you can even use argbash online at
argbash.io/generate –
bubla
Dec 2 '16 at 20:12
I read all and this one is my preferred one. I don't like to use -a=1 as argc
style. I prefer to put first the main option -options and later the special ones with single
spacing -o option . Im looking for the simplest-vs-better way to read argvs.
– erm3nda
May 20 '15 at 22:50
It's working really well but if you pass an argument to a non a: option all the following
options would be taken as arguments. You can check this line ./myscript -v -d fail -o
/fizz/someOtherFile -f ./foo/bar/someFile with your own script. -d option is not set
as d: – erm3nda
May 20 '15 at 23:25
Expanding on the excellent answer by @guneysus, here is a tweak that lets user use whichever
syntax they prefer, eg
command -x=myfilename.ext --another_switch
vs
command -x myfilename.ext --another_switch
That is to say the equals can be replaced with whitespace.
This "fuzzy interpretation" might not be to your liking, but if you are making scripts
that are interchangeable with other utilities (as is the case with mine, which must work with
ffmpeg), the flexibility is useful.
STD_IN=0
prefix=""
key=""
value=""
for keyValue in "$@"
do
case "${prefix}${keyValue}" in
-i=*|--input_filename=*) key="-i"; value="${keyValue#*=}";;
-ss=*|--seek_from=*) key="-ss"; value="${keyValue#*=}";;
-t=*|--play_seconds=*) key="-t"; value="${keyValue#*=}";;
-|--stdin) key="-"; value=1;;
*) value=$keyValue;;
esac
case $key in
-i) MOVIE=$(resolveMovie "${value}"); prefix=""; key="";;
-ss) SEEK_FROM="${value}"; prefix=""; key="";;
-t) PLAY_SECONDS="${value}"; prefix=""; key="";;
-) STD_IN=${value}; prefix=""; key="";;
*) prefix="${keyValue}=";;
esac
done
getopts works great if #1 you have it installed and #2 you intend to run it on the same
platform. OSX and Linux (for example) behave differently in this respect.
Here is a (non getopts) solution that supports equals, non-equals, and boolean flags. For
example you could run your script in this way:
./script --arg1=value1 --arg2 value2 --shouldClean
# parse the arguments.
COUNTER=0
ARGS=("$@")
while [ $COUNTER -lt $# ]
do
arg=${ARGS[$COUNTER]}
let COUNTER=COUNTER+1
nextArg=${ARGS[$COUNTER]}
if [[ $skipNext -eq 1 ]]; then
echo "Skipping"
skipNext=0
continue
fi
argKey=""
argVal=""
if [[ "$arg" =~ ^\- ]]; then
# if the format is: -key=value
if [[ "$arg" =~ \= ]]; then
argVal=$(echo "$arg" | cut -d'=' -f2)
argKey=$(echo "$arg" | cut -d'=' -f1)
skipNext=0
# if the format is: -key value
elif [[ ! "$nextArg" =~ ^\- ]]; then
argKey="$arg"
argVal="$nextArg"
skipNext=1
# if the format is: -key (a boolean flag)
elif [[ "$nextArg" =~ ^\- ]] || [[ -z "$nextArg" ]]; then
argKey="$arg"
argVal=""
skipNext=0
fi
# if the format has not flag, just a value.
else
argKey=""
argVal="$arg"
skipNext=0
fi
case "$argKey" in
--source-scmurl)
SOURCE_URL="$argVal"
;;
--dest-scmurl)
DEST_URL="$argVal"
;;
--version-num)
VERSION_NUM="$argVal"
;;
-c|--clean)
CLEAN_BEFORE_START="1"
;;
-h|--help|-help|--h)
showUsage
exit
;;
esac
done
This is how I do in a function to avoid breaking getopts run at the same time somewhere
higher in stack:
function waitForWeb () {
local OPTIND=1 OPTARG OPTION
local host=localhost port=8080 proto=http
while getopts "h:p:r:" OPTION; do
case "$OPTION" in
h)
host="$OPTARG"
;;
p)
port="$OPTARG"
;;
r)
proto="$OPTARG"
;;
esac
done
...
}
I give you The Function parse_params that will parse params:
Without polluting global scope.
Effortlessly returns to you ready to use variables so that you could build further
logic on them
Amount of dashes before params does not matter ( --all equals
-all equals all=all )
The script below is a copy-paste working demonstration. See show_use function
to understand how to use parse_params .
Limitations:
Does not support space delimited params ( -d 1 )
Param names will lose dashes so --any-param and -anyparam are
equivalent
eval $(parse_params "$@") must be used inside bash function (it will not
work in the global scope)
#!/bin/bash
# Universal Bash parameter parsing
# Parse equal sign separated params into named local variables
# Standalone named parameter value will equal its param name (--force creates variable $force=="force")
# Parses multi-valued named params into an array (--path=path1 --path=path2 creates ${path[*]} array)
# Parses un-named params into ${ARGV[*]} array
# Additionally puts all named params into ${ARGN[*]} array
# Additionally puts all standalone "option" params into ${ARGO[*]} array
# @author Oleksii Chekulaiev
# @version v1.3 (May-14-2018)
parse_params ()
{
local existing_named
local ARGV=() # un-named params
local ARGN=() # named params
local ARGO=() # options (--params)
echo "local ARGV=(); local ARGN=(); local ARGO=();"
while [[ "$1" != "" ]]; do
# Escape asterisk to prevent bash asterisk expansion
_escaped=${1/\*/\'\"*\"\'}
# If equals delimited named parameter
if [[ "$1" =~ ^..*=..* ]]; then
# Add to named parameters array
echo "ARGN+=('$_escaped');"
# key is part before first =
local _key=$(echo "$1" | cut -d = -f 1)
# val is everything after key and = (protect from param==value error)
local _val="${1/$_key=}"
# remove dashes from key name
_key=${_key//\-}
# search for existing parameter name
if (echo "$existing_named" | grep "\b$_key\b" >/dev/null); then
# if name already exists then it's a multi-value named parameter
# re-declare it as an array if needed
if ! (declare -p _key 2> /dev/null | grep -q 'declare \-a'); then
echo "$_key=(\"\$$_key\");"
fi
# append new value
echo "$_key+=('$_val');"
else
# single-value named parameter
echo "local $_key=\"$_val\";"
existing_named=" $_key"
fi
# If standalone named parameter
elif [[ "$1" =~ ^\-. ]]; then
# Add to options array
echo "ARGO+=('$_escaped');"
# remove dashes
local _key=${1//\-}
echo "local $_key=\"$_key\";"
# non-named parameter
else
# Escape asterisk to prevent bash asterisk expansion
_escaped=${1/\*/\'\"*\"\'}
echo "ARGV+=('$_escaped');"
fi
shift
done
}
#--------------------------- DEMO OF THE USAGE -------------------------------
show_use ()
{
eval $(parse_params "$@")
# --
echo "${ARGV[0]}" # print first unnamed param
echo "${ARGV[1]}" # print second unnamed param
echo "${ARGN[0]}" # print first named param
echo "${ARG0[0]}" # print first option param (--force)
echo "$anyparam" # print --anyparam value
echo "$k" # print k=5 value
echo "${multivalue[0]}" # print first value of multi-value
echo "${multivalue[1]}" # print second value of multi-value
[[ "$force" == "force" ]] && echo "\$force is set so let the force be with you"
}
show_use "param 1" --anyparam="my value" param2 k=5 --force --multi-value=test1 --multi-value=test2
You have to decide before use if = is to be used on an option or not. This is to keep the
code clean(ish).
while [[ $# > 0 ]]
do
key="$1"
while [[ ${key+x} ]]
do
case $key in
-s*|--stage)
STAGE="$2"
shift # option has parameter
;;
-w*|--workfolder)
workfolder="$2"
shift # option has parameter
;;
-e=*)
EXAMPLE="${key#*=}"
break # option has been fully handled
;;
*)
# unknown option
echo Unknown option: $key #1>&2
exit 10 # either this: my preferred way to handle unknown options
break # or this: do this to signal the option has been handled (if exit isn't used)
;;
esac
# prepare for next option in this key, if any
[[ "$key" = -? || "$key" == --* ]] && unset key || key="${key/#-?/-}"
done
shift # option(s) fully processed, proceed to next input argument
done
can be accomplished with a fairly concise approach:
# process flags
pointer=1
while [[ $pointer -le $# ]]; do
param=${!pointer}
if [[ $param != "-"* ]]; then ((pointer++)) # not a parameter flag so advance pointer
else
case $param in
# paramter-flags with arguments
-e=*|--environment=*) environment="${param#*=}";;
--another=*) another="${param#*=}";;
# binary flags
-q|--quiet) quiet=true;;
-d) debug=true;;
esac
# splice out pointer frame from positional list
[[ $pointer -gt 1 ]] \
&& set -- ${@:1:((pointer - 1))} ${@:((pointer + 1)):$#} \
|| set -- ${@:((pointer + 1)):$#};
fi
done
# positional remain
node_name=$1
ip_address=$2
--param arg (space delimited)
It's usualy clearer to not mix --flag=value and --flag value
styles.
./script.sh dumbo 127.0.0.1 --environment production -q -d
This is a little dicey to read, but is still valid
./script.sh dumbo --environment production 127.0.0.1 --quiet -d
Source
# process flags
pointer=1
while [[ $pointer -le $# ]]; do
if [[ ${!pointer} != "-"* ]]; then ((pointer++)) # not a parameter flag so advance pointer
else
param=${!pointer}
((pointer_plus = pointer + 1))
slice_len=1
case $param in
# paramter-flags with arguments
-e|--environment) environment=${!pointer_plus}; ((slice_len++));;
--another) another=${!pointer_plus}; ((slice_len++));;
# binary flags
-q|--quiet) quiet=true;;
-d) debug=true;;
esac
# splice out pointer frame from positional list
[[ $pointer -gt 1 ]] \
&& set -- ${@:1:((pointer - 1))} ${@:((pointer + $slice_len)):$#} \
|| set -- ${@:((pointer + $slice_len)):$#};
fi
done
# positional remain
node_name=$1
ip_address=$2
Note that getopt(1) was a short living mistake from AT&T.
getopt was created in 1984 but already buried in 1986 because it was not really
usable.
A proof for the fact that getopt is very outdated is that the
getopt(1) man page still mentions "$*" instead of "$@"
, that was added to the Bourne Shell in 1986 together with the getopts(1) shell
builtin in order to deal with arguments with spaces inside.
BTW: if you are interested in parsing long options in shell scripts, it may be of interest
to know that the getopt(3) implementation from libc (Solaris) and
ksh93 both added a uniform long option implementation that supports long options
as aliases for short options. This causes ksh93 and the Bourne
Shell to implement a uniform interface for long options via getopts .
An example for long options taken from the Bourne Shell man page:
This also might be useful to know, you can set a value and if someone provides input,
override the default with that value..
myscript.sh -f ./serverlist.txt or just ./myscript.sh (and it takes defaults)
#!/bin/bash
# --- set the value, if there is inputs, override the defaults.
HOME_FOLDER="${HOME}/owned_id_checker"
SERVER_FILE_LIST="${HOME_FOLDER}/server_list.txt"
while [[ $# > 1 ]]
do
key="$1"
shift
case $key in
-i|--inputlist)
SERVER_FILE_LIST="$1"
shift
;;
esac
done
echo "SERVER LIST = ${SERVER_FILE_LIST}"
Main differentiating feature of my solution is that it allows to have options concatenated
together just like tar -xzf foo.tar.gz is equal to tar -x -z -f
foo.tar.gz . And just like in tar , ps etc. the leading
hyphen is optional for a block of short options (but this can be changed easily). Long
options are supported as well (but when a block starts with one then two leading hyphens are
required).
Code with example options
#!/bin/sh
echo
echo "POSIX-compliant getopt(s)-free old-style-supporting option parser from phk@[se.unix]"
echo
print_usage() {
echo "Usage:
$0 {a|b|c} [ARG...]
Options:
--aaa-0-args
-a
Option without arguments.
--bbb-1-args ARG
-b ARG
Option with one argument.
--ccc-2-args ARG1 ARG2
-c ARG1 ARG2
Option with two arguments.
" >&2
}
if [ $# -le 0 ]; then
print_usage
exit 1
fi
opt=
while :; do
if [ $# -le 0 ]; then
# no parameters remaining -> end option parsing
break
elif [ ! "$opt" ]; then
# we are at the beginning of a fresh block
# remove optional leading hyphen and strip trailing whitespaces
opt=$(echo "$1" | sed 's/^-\?\([a-zA-Z0-9\?-]*\)/\1/')
fi
# get the first character -> check whether long option
first_chr=$(echo "$opt" | awk '{print substr($1, 1, 1)}')
[ "$first_chr" = - ] && long_option=T || long_option=F
# note to write the options here with a leading hyphen less
# also do not forget to end short options with a star
case $opt in
-)
# end of options
shift
break
;;
a*|-aaa-0-args)
echo "Option AAA activated!"
;;
b*|-bbb-1-args)
if [ "$2" ]; then
echo "Option BBB with argument '$2' activated!"
shift
else
echo "BBB parameters incomplete!" >&2
print_usage
exit 1
fi
;;
c*|-ccc-2-args)
if [ "$2" ] && [ "$3" ]; then
echo "Option CCC with arguments '$2' and '$3' activated!"
shift 2
else
echo "CCC parameters incomplete!" >&2
print_usage
exit 1
fi
;;
h*|\?*|-help)
print_usage
exit 0
;;
*)
if [ "$long_option" = T ]; then
opt=$(echo "$opt" | awk '{print substr($1, 2)}')
else
opt=$first_chr
fi
printf 'Error: Unknown option: "%s"\n' "$opt" >&2
print_usage
exit 1
;;
esac
if [ "$long_option" = T ]; then
# if we had a long option then we are going to get a new block next
shift
opt=
else
# if we had a short option then just move to the next character
opt=$(echo "$opt" | awk '{print substr($1, 2)}')
# if block is now empty then shift to the next one
[ "$opt" ] || shift
fi
done
echo "Doing something..."
exit 0
For the example usage please see the examples further below.
Position of options
with arguments
For what its worth there the options with arguments don't be the last (only long options
need to be). So while e.g. in tar (at least in some implementations) the
f options needs to be last because the file name follows ( tar xzf
bar.tar.gz works but tar xfz bar.tar.gz does not) this is not the case
here (see the later examples).
Multiple options with arguments
As another bonus the option parameters are consumed in the order of the options by the
parameters with required options. Just look at the output of my script here with the command
line abc X Y Z (or -abc X Y Z ):
Option AAA activated!
Option BBB with argument 'X' activated!
Option CCC with arguments 'Y' and 'Z' activated!
Long options concatenated as well
Also you can also have long options in option block given that they occur last in the
block. So the following command lines are all equivalent (including the order in which the
options and its arguments are being processed):
-cba Z Y X
cba Z Y X
-cb-aaa-0-args Z Y X
-c-bbb-1-args Z Y X -a
--ccc-2-args Z Y -ba X
c Z Y b X a
-c Z Y -b X -a
--ccc-2-args Z Y --bbb-1-args X --aaa-0-args
All of these lead to:
Option CCC with arguments 'Z' and 'Y' activated!
Option BBB with argument 'X' activated!
Option AAA activated!
Doing something...
Not in this solutionOptional arguments
Options with optional arguments should be possible with a bit of work, e.g. by looking
forward whether there is a block without a hyphen; the user would then need to put a hyphen
in front of every block following a block with a parameter having an optional parameter.
Maybe this is too complicated to communicate to the user so better just require a leading
hyphen altogether in this case.
Things get even more complicated with multiple possible parameters. I would advise against
making the options trying to be smart by determining whether the an argument might be for it
or not (e.g. with an option just takes a number as an optional argument) because this might
break in the future.
I personally favor additional options instead of optional arguments.
Option
arguments introduced with an equal sign
Just like with optional arguments I am not a fan of this (BTW, is there a thread for
discussing the pros/cons of different parameter styles?) but if you want this you could
probably implement it yourself just like done at http://mywiki.wooledge.org/BashFAQ/035#Manual_loop
with a --long-with-arg=?* case statement and then stripping the equal sign (this
is BTW the site that says that making parameter concatenation is possible with some effort
but "left [it] as an exercise for the reader" which made me take them at their word but I
started from scratch).
Other notes
POSIX-compliant, works even on ancient Busybox setups I had to deal with (with e.g.
cut , head and getopts missing).
Solution that preserves unhandled arguments. Demos Included.
Here is my solution. It is VERY flexible and unlike others, shouldn't require external
packages and handles leftover arguments cleanly.
Usage is: ./myscript -flag flagvariable -otherflag flagvar2
All you have to do is edit the validflags line. It prepends a hyphen and searches all
arguments. It then defines the next argument as the flag name e.g.
The main code (short version, verbose with examples further down, also a version with
erroring out):
#!/usr/bin/env bash
#shebang.io
validflags="rate time number"
count=1
for arg in $@
do
match=0
argval=$1
for flag in $validflags
do
sflag="-"$flag
if [ "$argval" == "$sflag" ]
then
declare $flag=$2
match=1
fi
done
if [ "$match" == "1" ]
then
shift 2
else
leftovers=$(echo $leftovers $argval)
shift
fi
count=$(($count+1))
done
#Cleanup then restore the leftovers
shift $#
set -- $leftovers
The verbose version with built in echo demos:
#!/usr/bin/env bash
#shebang.io
rate=30
time=30
number=30
echo "all args
$@"
validflags="rate time number"
count=1
for arg in $@
do
match=0
argval=$1
# argval=$(echo $@ | cut -d ' ' -f$count)
for flag in $validflags
do
sflag="-"$flag
if [ "$argval" == "$sflag" ]
then
declare $flag=$2
match=1
fi
done
if [ "$match" == "1" ]
then
shift 2
else
leftovers=$(echo $leftovers $argval)
shift
fi
count=$(($count+1))
done
#Cleanup then restore the leftovers
echo "pre final clear args:
$@"
shift $#
echo "post final clear args:
$@"
set -- $leftovers
echo "all post set args:
$@"
echo arg1: $1 arg2: $2
echo leftovers: $leftovers
echo rate $rate time $time number $number
Final one, this one errors out if an invalid -argument is passed through.
#!/usr/bin/env bash
#shebang.io
rate=30
time=30
number=30
validflags="rate time number"
count=1
for arg in $@
do
argval=$1
match=0
if [ "${argval:0:1}" == "-" ]
then
for flag in $validflags
do
sflag="-"$flag
if [ "$argval" == "$sflag" ]
then
declare $flag=$2
match=1
fi
done
if [ "$match" == "0" ]
then
echo "Bad argument: $argval"
exit 1
fi
shift 2
else
leftovers=$(echo $leftovers $argval)
shift
fi
count=$(($count+1))
done
#Cleanup then restore the leftovers
shift $#
set -- $leftovers
echo rate $rate time $time number $number
echo leftovers: $leftovers
Pros: What it does, it handles very well. It preserves unused arguments which a lot of the
other solutions here don't. It also allows for variables to be called without being defined
by hand in the script. It also allows prepopulation of variables if no corresponding argument
is given. (See verbose example).
Cons: Can't parse a single complex arg string e.g. -xcvf would process as a single
argument. You could somewhat easily write additional code into mine that adds this
functionality though.
The top answer to this question seemed a bit buggy when I tried it -- here's my solution
which I've found to be more robust:
boolean_arg=""
arg_with_value=""
while [[ $# -gt 0 ]]
do
key="$1"
case $key in
-b|--boolean-arg)
boolean_arg=true
shift
;;
-a|--arg-with-value)
arg_with_value="$2"
shift
shift
;;
-*)
echo "Unknown option: $1"
exit 1
;;
*)
arg_num=$(( $arg_num + 1 ))
case $arg_num in
1)
first_normal_arg="$1"
shift
;;
2)
second_normal_arg="$1"
shift
;;
*)
bad_args=TRUE
esac
;;
esac
done
# Handy to have this here when adding arguments to
# see if they're working. Just edit the '0' to be '1'.
if [[ 0 == 1 ]]; then
echo "first_normal_arg: $first_normal_arg"
echo "second_normal_arg: $second_normal_arg"
echo "boolean_arg: $boolean_arg"
echo "arg_with_value: $arg_with_value"
exit 0
fi
if [[ $bad_args == TRUE || $arg_num < 2 ]]; then
echo "Usage: $(basename "$0") <first-normal-arg> <second-normal-arg> [--boolean-arg] [--arg-with-value VALUE]"
exit 1
fi
This example shows how to use getopt and eval and
HEREDOC and shift to handle short and long parameters with and
without a required value that follows. Also the switch/case statement is concise and easy to
follow.
#!/usr/bin/env bash
# usage function
function usage()
{
cat << HEREDOC
Usage: $progname [--num NUM] [--time TIME_STR] [--verbose] [--dry-run]
optional arguments:
-h, --help show this help message and exit
-n, --num NUM pass in a number
-t, --time TIME_STR pass in a time string
-v, --verbose increase the verbosity of the bash script
--dry-run do a dry run, don't change any files
HEREDOC
}
# initialize variables
progname=$(basename $0)
verbose=0
dryrun=0
num_str=
time_str=
# use getopt and store the output into $OPTS
# note the use of -o for the short options, --long for the long name options
# and a : for any option that takes a parameter
OPTS=$(getopt -o "hn:t:v" --long "help,num:,time:,verbose,dry-run" -n "$progname" -- "$@")
if [ $? != 0 ] ; then echo "Error in command line arguments." >&2 ; usage; exit 1 ; fi
eval set -- "$OPTS"
while true; do
# uncomment the next line to see how shift is working
# echo "\$1:\"$1\" \$2:\"$2\""
case "$1" in
-h | --help ) usage; exit; ;;
-n | --num ) num_str="$2"; shift 2 ;;
-t | --time ) time_str="$2"; shift 2 ;;
--dry-run ) dryrun=1; shift ;;
-v | --verbose ) verbose=$((verbose + 1)); shift ;;
-- ) shift; break ;;
* ) break ;;
esac
done
if (( $verbose > 0 )); then
# print out all the parameters we read in
cat <<-EOM
num=$num_str
time=$time_str
verbose=$verbose
dryrun=$dryrun
EOM
fi
# The rest of your script below
The most significant lines of the script above are these:
OPTS=$(getopt -o "hn:t:v" --long "help,num:,time:,verbose,dry-run" -n "$progname" -- "$@")
if [ $? != 0 ] ; then echo "Error in command line arguments." >&2 ; exit 1 ; fi
eval set -- "$OPTS"
while true; do
case "$1" in
-h | --help ) usage; exit; ;;
-n | --num ) num_str="$2"; shift 2 ;;
-t | --time ) time_str="$2"; shift 2 ;;
--dry-run ) dryrun=1; shift ;;
-v | --verbose ) verbose=$((verbose + 1)); shift ;;
-- ) shift; break ;;
* ) break ;;
esac
done
Short, to the point, readable, and handles just about everything (IMHO).
I get this on Mac OS X: ``` lib/bashopts.sh: line 138: declare: -A: invalid option declare:
usage: declare [-afFirtx] [-p] [name[=value] ...] Error in lib/bashopts.sh:138. 'declare -x
-A bashopts_optprop_name' exited with status 2 Call tree: 1: lib/controller.sh:4 source(...)
Exiting with status 1 ``` – Josh Wulf
Jun 24 '17 at 18:07
you can pass attribute to short or long option (if you are using block of short
options, attribute is attached to the last option)
you can use spaces or = to provide attributes, but attribute matches until
encountering hyphen+space "delimiter", so in --q=qwe tyqwe ty is
one attribute
it handles mix of all above so -o a -op attr ibute --option=att ribu te --op-tion
attribute --option att-ribute is valid
script:
#!/usr/bin/env sh
help_menu() {
echo "Usage:
${0##*/} [-h][-l FILENAME][-d]
Options:
-h, --help
display this help and exit
-l, --logfile=FILENAME
filename
-d, --debug
enable debug
"
}
parse_options() {
case $opt in
h|help)
help_menu
exit
;;
l|logfile)
logfile=${attr}
;;
d|debug)
debug=true
;;
*)
echo "Unknown option: ${opt}\nRun ${0##*/} -h for help.">&2
exit 1
esac
}
options=$@
until [ "$options" = "" ]; do
if [[ $options =~ (^ *(--([a-zA-Z0-9-]+)|-([a-zA-Z0-9-]+))(( |=)(([\_\.\?\/\\a-zA-Z0-9]?[ -]?[\_\.\?a-zA-Z0-9]+)+))?(.*)|(.+)) ]]; then
if [[ ${BASH_REMATCH[3]} ]]; then # for --option[=][attribute] or --option[=][attribute]
opt=${BASH_REMATCH[3]}
attr=${BASH_REMATCH[7]}
options=${BASH_REMATCH[9]}
elif [[ ${BASH_REMATCH[4]} ]]; then # for block options -qwert[=][attribute] or single short option -a[=][attribute]
pile=${BASH_REMATCH[4]}
while (( ${#pile} > 1 )); do
opt=${pile:0:1}
attr=""
pile=${pile/${pile:0:1}/}
parse_options
done
opt=$pile
attr=${BASH_REMATCH[7]}
options=${BASH_REMATCH[9]}
else # leftovers that don't match
opt=${BASH_REMATCH[10]}
options=""
fi
parse_options
fi
done
This takes the same approach as Noah's answer , but has less safety checks
/ safeguards. This allows us to write arbitrary arguments into the script's environment and
I'm pretty sure your use of eval here may allow command injection. – Will Barnwell
Oct 10 '17 at 23:57
You use shift on the known arguments and not on the unknown ones so your remaining
$@ will be all but the first two arguments (in the order they are passed in),
which could lead to some mistakes if you try to use $@ later. You don't need the
shift for the = parameters, since you're not handling spaces and you're getting the value
with the substring removal #*= – Jason S
Dec 3 '17 at 1:01
history also allows you to rerun a command with different syntax. For example,
if I wanted to change my previous command history | grep dnf to history |
grep ssh , I can execute the following at the prompt:
$ ^dnf^ssh^
history will rerun the command, but replace dnf with
ssh , and execute it.
Removing history
There may come a time that you want to remove some or all the commands in your history file.
If you want to delete a particular command, enter history -d <line number> .
To clear the entire contents of the history file, execute history -c .
The history file is stored in a file that you can modify, as well. Bash shell users will
find it in their Home directory as .bash_history .
Next steps
There are a number of other things that you can do with history :
Set the size of your history buffer to a certain number of commands
Record the date and time for each line in history
Prevent certain commands from being recorded in history
For more information about the history command and other interesting things you
can do with it, take a look at the GNU Bash Manual .
Although in the examples above we used integer indices in our arrays, let's consider two
occasions when that won't be the case: First, if we wanted the $i -th element of
the array, where $i is a variable containing the index of interest, we can
retrieve that element using: echo ${allThreads[$i]} . Second, to output all the
elements of an array, we replace the numeric index with the @ symbol (you can
think of @ as standing for all ): echo ${allThreads[@]}
.
Looping through array elements
With that in mind, let's loop through $allThreads and launch the pipeline for
each value of --threads :
for t in ${allThreads[@]} ; do
. / pipeline --threads $t
done
Looping through array indices
Next, let's consider a slightly different approach. Rather than looping over array
elements , we can loop over array indices :
for i in ${!allThreads[@]} ;
do
. / pipeline --threads ${allThreads[$i]}
done
Let's break that down: As we saw above, ${allThreads[@]} represents all the
elements in our array. Adding an exclamation mark to make it ${!allThreads[@]}
will return the list of all array indices (in our case 0 to 7). In other words, the
for loop is looping through all indices $i and reading the
$i -th element from $allThreads to set the value of the
--threads parameter.
This is much harsher on the eyes, so you may be wondering why I bother introducing it in the
first place. That's because there are times where you need to know both the index and the value
within a loop, e.g., if you want to ignore the first element of an array, using indices saves
you from creating an additional variable that you then increment inside the
loop.
Populating arrays
So far, we've been able to launch the pipeline for each --threads of interest.
Now, let's assume the output to our pipeline is the runtime in seconds. We would like to
capture that output at each iteration and save it in another array so we can do various
manipulations with it at the end.
Some useful syntax
But before diving into the code, we need to introduce some more syntax. First, we need to be
able to retrieve the output of a Bash command. To do so, use the following syntax:
output=$( ./my_script.sh ) , which will store the output of our commands into the
variable $output .
The second bit of syntax we need is how to append the value we just retrieved to an array.
The syntax to do that will look familiar:
myArray+=( "newElement1" "newElement2" )
The parameter sweep
Putting everything together, here is our script for launching our parameter
sweep:
allThreads = ( 1 2 4 8 16 32 64 128 )
allRuntimes = ()
for t in ${allThreads[@]} ; do
runtime =$ ( . / pipeline --threads $t )
allRuntimes+= ( $runtime )
done
And voilà!
What else you got?
In this article, we covered the scenario of using arrays for parameter sweeps. But I promise
there are more reasons to use Bash arrays -- here are two more examples.
Log alerting
In this scenario, your app is divided into modules, each with its own log file. We can write
a cron job script to email the right person when there are signs of trouble in certain
modules:
# List of logs and who should be notified of issues
logPaths = ( "api.log" "auth.log" "jenkins.log" "data.log" )
logEmails = ( "jay@email" "emma@email" "jon@email" "sophia@email" )
# Look for signs of trouble in each log
for i in ${!logPaths[@]} ;
do
log = ${logPaths[$i]}
stakeholder = ${logEmails[$i]}
numErrors =$ ( tail -n 100 " $log " | grep "ERROR" | wc -l )
# Warn stakeholders if recently saw > 5 errors
if [[ " $numErrors " -gt 5 ]] ;
then
emailRecipient = " $stakeholder "
emailSubject = "WARNING: ${log} showing unusual levels of errors"
emailBody = " ${numErrors} errors found in log ${log} "
echo " $emailBody " | mailx -s " $emailSubject " " $emailRecipient "
fi
done
API queries
Say you want to generate some analytics about which users comment the most on your Medium
posts. Since we don't have direct database access, SQL is out of the question, but we can use
APIs!
To avoid getting into a long discussion about API authentication and tokens, we'll instead
use JSONPlaceholder ,
a public-facing API testing service, as our endpoint. Once we query each post and retrieve the
emails of everyone who commented, we can append those emails to our results array:
# Query first 10 posts
for postId in { 1 .. 10 } ;
do
# Make API call to fetch emails of this posts's commenters
response =$ ( curl " ${endpoint} ?postId= ${postId} " )
# Use jq to parse the JSON response into an array
allEmails+= ( $ ( jq '.[].email' <<< " $response " ) )
done
Note here that I'm using the jq tool to parse JSON from the command line.
The syntax of jq is beyond the scope of this article, but I highly recommend you
look into it.
As you might imagine, there are countless other scenarios in which using Bash arrays can
help, and I hope the examples outlined in this article have given you some food for thought. If
you have other examples to share from your own work, please leave a comment below.
But
wait, there's more!
Since we covered quite a bit of array syntax in this article, here's a summary of what we
covered, along with some more advanced tricks we did not cover:
Syntax
Result
arr=()
Create an empty array
arr=(1 2 3)
Initialize array
${arr[2]}
Retrieve third element
${arr[@]}
Retrieve all elements
${!arr[@]}
Retrieve array indices
${#arr[@]}
Calculate array size
arr[0]=3
Overwrite 1st element
arr+=(4)
Append value(s)
str=$(ls)
Save ls output as a string
arr=( $(ls) )
Save ls output as an array of files
${arr[@]:s:n}
Retrieve elements at indices n to s+n
One last thought
As we've discovered, Bash arrays sure have strange syntax, but I hope this article convinced
you that they are extremely powerful. Once you get the hang of the syntax, you'll find yourself
using Bash arrays quite often.
... ... ...
Robert Aboukhalil is a Bioinformatics Software Engineer. In his work, he develops
cloud applications for the analysis and interactive visualization of genomics data. Robert
holds a Ph.D. in Bioinformatics from Cold Spring Harbor Laboratory and a B.Eng. in Computer
Engineering from McGill.
In this article, we will share a number of Bash command-line shortcuts useful for any Linux
user. These shortcuts allow you to easily and in a fast manner, perform certain activities such
as accessing and running previously executed commands, opening an editor,
editing/deleting/changing text on the command line, moving the cursor, controlling processes
etc. on the command line.
Although this article will mostly benefit Linux beginners getting their way around with
command line basics, those with intermediate skills and advanced users might also find it
practically helpful. We will group the bash keyboard shortcuts according to categories as
follows.
Launch an Editor
Open a terminal and press Ctrl+X and Ctrl+E to open an editor (
nano editor ) with an empty buffer. Bash will try to launch the editor defined by the $EDITOR
environment variable.
Nano Editor Controlling The Screen
These shortcuts are used to control terminal screen output:
Ctrl+L – clears the screen (same effect as the " clear "
command).
Ctrl+S – pause all command output to the screen. If you have executed
a command that produces verbose, long output, use this to pause the output scrolling down the
screen.
Ctrl+Q – resume output to the screen after pausing it with Ctrl+S
.
Move Cursor on The Command Line
The next shortcuts are used for moving the cursor within the command-line:
Ctrl+A or Home – moves the cursor to the start of a
line.
Ctrl+E or End – moves the cursor to the end of the
line.
Ctrl+B or Left Arrow – moves the cursor back one
character at a time.
Ctrl+F or Right Arrow – moves the cursor forward one
character at a time.
Ctrl + Left Arrow or Alt+B or Esc and
then B – moves the cursor back one word at a time.
Ctrl + Right Arrow or Alt+C or Esc
and then F – moves the cursor forward one word at a time.
Search Through Bash History
The following shortcuts are used for searching for commands in the bash history:
Up arrow key – retrieves the previous command. If you press it
constantly, it takes you through multiple commands in history, so you can find the one you
want. Use the Down arrow to move in the reverse direction through the history.
Ctrl+P and Ctrl+N – alternatives for the Up and Down
arrow keys, respectively.
Ctrl+R – starts a reverse search, through the bash history, simply
type characters that should be unique to the command you want to find in the history.
Ctrl+S – launches a forward search, through the bash history.
Ctrl+G – quits reverse or forward search, through the bash
history.
Delete Text on the Command Line
The following shortcuts are used for deleting text on the command line:
Ctrl+D or Delete – remove or deletes the character under
the cursor.
Ctrl+K – removes all text from the cursor to the end of the line.
Ctrl+X and then Backspace – removes all the text from the
cursor to the beginning of the line.
Transpose Text or Change Case on the Command Line
These shortcuts will transpose or change the case of letters or words on the command
line:
Ctrl+T – transposes the character before the cursor with the character
under the cursor.
Esc and then T – transposes the two words immediately
before (or under) the cursor.
Esc and then U – transforms the text from the cursor to
the end of the word to uppercase.
Esc and then L – transforms the text from the cursor to
the end of the word to lowercase.
Esc and then C – changes the letter under the cursor (or
the first letter of the next word) to uppercase, leaving the rest of the word unchanged.
Working With Processes in Linux
The following shortcuts help you to control running Linux processes.
Ctrl+Z – suspend the current foreground process. This sends the
SIGTSTP signal to the process. You can get the process back to the foreground later using the
fg process_name (or %bgprocess_number like %1 , %2 and so on) command.
Ctrl+C – interrupt the current foreground process, by sending the
SIGINT signal to it. The default behavior is to terminate a process gracefully, but the
process can either honor or ignore it.
Ctrl+D – exit the bash shell (same as running the exit command).
In the final part of this article, we will explain some useful ! (bang)
operations:
!! – execute last command.
!top – execute the most recent command that starts with 'top' (e.g. !
).
!top:p – displays the command that !top would run (also adds it as the
latest command in the command history).
!$ – execute the last word of the previous command (same as Alt + .,
e.g. if last command is ' cat tecmint.txt ', then !$ would try to run ' tecmint.txt ').
!$:p – displays the word that !$ would execute.
!* – displays the last word of the previous command.
!*:p – displays the last word that !* would substitute.
For more information, see the bash man page:
$ man bash
That's all for now! In this article, we shared some common and useful Bash command-line
shortcuts and operations. Use the comment form below to make any additions or ask
questions.
"... Live Work Work Work Die: A Journey into the Savage Heart of Silicon Valley ..."
"... Older generations called this kind of fraud "fake it 'til you make it." ..."
"... Nowadays I work 9:30-4:30 for a very good, consistent paycheck and let some other "smart person" put in 75 hours a week dealing with hiring ..."
"... It's not a "kids these days" sort of issue, it's *always* been the case that shameless, baseless self-promotion wins out over sincere skill without the self-promotion, because the people who control the money generally understand boasting more than they understand the technology. ..."
"... In the bad old days we had a hell of a lot of ridiculous restriction We must somehow made our programs to run successfully inside a RAM that was 48KB in size (yes, 48KB, not 48MB or 48GB), on a CPU with a clock speed of 1.023 MHz ..."
"... So what are the uses for that? I am curious what things people have put these to use for. ..."
"... Also, Oracle, SAP, IBM... I would never buy from them, nor use their products. I have used plenty of IBM products and they suck big time. They make software development 100 times harder than it could be. ..."
"... I have a theory that 10% of people are good at what they do. It doesn't really matter what they do, they will still be good at it, because of their nature. These are the people who invent new things, who fix things that others didn't even see as broken and who automate routine tasks or simply question and erase tasks that are not necessary. ..."
"... 10% are just causing damage. I'm not talking about terrorists and criminals. ..."
"... Programming is statistically a dead-end job. Why should anyone hone a dead-end skill that you won't be able to use for long? For whatever reason, the industry doesn't want old programmers. ..."
The author shares what he realized at a job recruitment fair seeking Java Legends, Python Badasses, Hadoop Heroes, "and other
gratingly childish classifications describing various programming specialities.
" I wasn't the only one bluffing my way through the tech scene. Everyone was doing it, even the much-sought-after engineering
talent.
I
was struck by how many developers were, like myself, not really programmers , but rather this, that and the other. A great
number of tech ninjas were not exactly black belts when it came to the actual onerous work of computer programming. So many of
the complex, discrete tasks involved in the creation of a website or an app had been automated that it was no longer necessary
to possess knowledge of software mechanics. The coder's work was rarely a craft. The apps ran on an assembly line, built with
"open-source", off-the-shelf components. The most important computer commands for the ninja to master were copy and paste...
[M]any programmers who had "made it" in Silicon Valley were scrambling to promote themselves from coder to "founder". There
wasn't necessarily more money to be had running a startup, and the increase in status was marginal unless one's startup attracted
major investment and the right kind of press coverage. It's because the programmers knew that their own ladder to prosperity was
on fire and disintegrating fast. They knew that well-paid programming jobs would also soon turn to smoke and ash, as the proliferation
of learn-to-code courses around the world lowered the market value of their skills, and as advances in artificial intelligence
allowed for computers to take over more of the mundane work of producing software. The programmers also knew that the fastest
way to win that promotion to founder was to find some new domain that hadn't yet been automated. Every tech industry campaign
designed to spur investment in the Next Big Thing -- at that time, it was the "sharing economy" -- concealed a larger programme
for the transformation of society, always in a direction that favoured the investor and executive classes.
"I wasn't just changing careers and jumping on the 'learn to code' bandwagon," he writes at one point. "I was being steadily
indoctrinated in a specious ideology."
> The people can do both are smart enough to build their own company and compete with you.
Been there, done that. Learned a few lessons. Nowadays I work 9:30-4:30 for a very good, consistent paycheck and let some other
"smart person" put in 75 hours a week dealing with hiring, managing people, corporate strategy, staying up on the competition,
figuring out tax changes each year and getting taxes filed six times each year, the various state and local requirements, legal
changes, contract hassles, etc, while hoping the company makes money this month so they can take a paycheck and lay their rent.
I learned that I'm good at creating software systems and I enjoy it. I don't enjoy all-nighters, partners being dickheads trying
to pull out of a contract, or any of a thousand other things related to running a start-up business. I really enjoy a consistent,
six-figure compensation package too.
I pay monthly gross receipts tax (12), quarterly withholdings (4) and a corporate (1) and individual (1) returns. The gross
receipts can vary based on the state, so I can see how six times a year would be the minimum.
Nowadays I work 9:30-4:30 for a very good, consistent paycheck and let some other "smart person" put in 75 hours a week
dealing with hiring
There's nothing wrong with not wnting to run your own business, it's not for most people, and even if it was, the numbers don't
add up. But putting the scare qoutes in like that makes it sound like you have huge chip on your shoulder. Those things re just
as essential to the business as your work and without them you wouldn't have the steady 9:30-4:30 with good paycheck.
Of course they are important. I wouldn't have done those things if they weren't important!
I frequently have friends say things like "I love baking. I can't get enough of baking. I'm going to open a bakery.". I ask
them "do you love dealing with taxes, every month? Do you love contract law? Employment law? Marketing? Accounting?" If you LOVE
baking, the smart thing to do is to spend your time baking. Running a start-up business, you're not going to do much baking.
I can tell you a few things that have worked for me. I'll go in chronological order rather than priority order.
Make friends in the industry you want to be in. Referrals are a major way people get jobs.
Look at the job listings for jobs you'd like to have and see which skills a lot of companies want, but you're missing. For
me that's Java. A lot companies list Java skills and I'm not particularly good with Java. Then consider learning the skills you
lack, the ones a lot of job postings are looking for.
You don't understand the point of an ORM do you? I'd suggest reading why they exist
They exist because programmers value code design more than data design. ORMs are the poster-child for square-peg-round-hole
solutions, which is why all ORMs choose one of three different ways of squashing hierarchical data into a relational form, all
of which are crappy.
If the devs of the system (the ones choosing to use an ORM) had any competence at all they'd design their database first because
in any application that uses a database the database is the most important bit, not the OO-ness or Functional-ness of the design.
Over the last few decades I've seen programs in a system come and go; a component here gets rewritten, a component there gets
rewritten, but you know what? They all have to work with the same damn data.
You can more easily switch out your code for new code with new design in a new language, than you can switch change the database
structure. So explain to me why it is that you think the database should be mangled to fit your OO code rather than mangling your
OO code to fit the database?
Stick to the one thing for 10-15years. Often all this new shit doesn't do jack different to the old shit, its not faster, its
not better. Every dick wants to be famous so make another damn library/tool with his own fancy name and feature, instead
of enhancing an existing product.
Or kids who can't hack the main stuff, suddenly discover the cool new, and then they can pretend they're "learning" it, and
when the going gets tough (as it always does) they can declare the tech to be pants and move to another.
hence we had so many people on the bandwagon for functional programming, then dumped it for ruby on rails, then dumped that
for Node.js, not sure what they're on at currently, probably back to asp.net.
How much code do you have to reuse before you're not really programming anymore? When I started in this business, it was reasonably
possible that you could end up on a project that didn't particularly have much (or any) of an operating system. They taught you
assembly language and the process by which the system boots up, but I think if I were to ask most of the programmers where I work,
they wouldn't be able to explain how all that works...
It really feels like if you know what you're doing it should be possible to build a team of actually good programmers and
put everyone else out of business by actually meeting your deliverables, but no one has yet. I wonder why that is.
You mean Amazon, Google, Facebook and the like? People may not always like what they do, but they manage to get things done
and make plenty of money in the process. The problem for a lot of other businesses is not having a way to identify and promote
actually good programmers. In your example, you could've spent 10 minutes fixing their query and saved them days of headache,
but how much recognition will you actually get? Where is your motivation to help them?
It's not a "kids these days" sort of issue, it's *always* been the case that shameless, baseless self-promotion wins out
over sincere skill without the self-promotion, because the people who control the money generally understand boasting more than
they understand the technology. Yes it can happen that baseless boasts can be called out over time by a large enough mass
of feedback from competent peers, but it takes a *lot* to overcome the tendency for them to have faith in the boasts.
And all these modern coders forget old lessons, and make shit stuff, just look at instagram windows app, what a load of garbage
shit, that us old fuckers could code in 2-3 weeks.
Instagram - your app sucks, cookie cutter coders suck, no refinement, coolness. Just cheap ass shit, with limited usefulness.
Just like most of commercial software that's new - quick shit.
Oh and its obvious if your an Indian faking it, you haven't worked in 100 companies at the age of 29.
Here's another problem, if faced with a skilled team that says "this will take 6 months to do right" and a more naive team
that says "oh, we can slap that together in a month", management goes with the latter. Then the security compromises occur, then
the application fails due to pulling in an unvetted dependency update live into production. When the project grows to handling
thousands instead of dozens of users and it starts mysteriously folding over and the dev team is at a loss, well the choice has
be
These restrictions is a large part of what makes Arduino programming "fun". If you don't plan out your memory usage, you're
gonna run out of it. I cringe when I see 8MB web pages of bloated "throw in everything including the kitchen sink and the neighbor's
car". Unfortunately, the careful and cautious way is a dying in favor of the throw 3rd party code at it until it does something.
Of course, I don't have time to review it but I'm sure everybody else has peer reviewed it for flaws and exploits line by line.
Unfortunately, the careful and cautious way is a dying in favor of the throw 3rd party code at it until it does something.
Of course. What is the business case for making it efficient? Those massive frameworks are cached by the browser and run on
the client's system, so cost you nothing and save you time to market. Efficient costs money with no real benefit to the business.
If we want to fix this, we need to make bloat have an associated cost somehow.
My company is dealing with the result of this mentality right now. We released the web app to the customer without performance
testing and doing several majorly inefficient things to meet deadlines. Once real load was put on the application by users with
non-ideal hardware and browsers, the app was infuriatingly slow. Suddenly our standard sub-40 hour workweek became a 50+ hour
workweek for months while we fixed all the inefficient code and design issues.
So, while you're right that getting to market and opt
In the bad old days we had a hell of a lot of ridiculous restriction We must somehow made our programs to run successfully
inside a RAM that was 48KB in size (yes, 48KB, not 48MB or 48GB), on a CPU with a clock speed of 1.023 MHz
We still have them. In fact some of the systems I've programmed have been more resource limited than the gloriously spacious
32KiB memory of the BBC model B. Take the PIC12F or 10F series. A glorious 64 bytes of RAM, max clock speed of 16MHz, but not
unusual to run it 32kHz.
So what are the uses for that? I am curious what things people have put these to use for.
It's hard to determine because people don't advertise use of them at all. However, I know that my electric toothbrush uses
an Epson 4 bit MCU of some description. It's got a status LED, basic NiMH batteryb charger and a PWM controller for an H Bridge.
Braun sell a *lot* of electric toothbrushes. Any gadget that's smarter than a simple switch will probably have some sort of basic
MCU in it. Alarm system components, sensor
b) No computer ever ran at 1.023 MHz. It was either a nice multiple of 1Mhz or maybe a multiple of 3.579545Mhz (ie. using the
TV output circuit's color clock crystal to drive the CPU).
Well, it could be used to drive the TV output circuit, OR, it was used because it's a stupidly cheap high speed crystal. You
have to remember except for a few frequencies, most crystals would have to be specially cut for the desired frequency. This occurs
even today, where most oscillators are either 32.768kHz (real time clock
Yeah, nice talk. You could have stopped after the first sentence. The other AC is referring to the
Commodore C64 [wikipedia.org]. The frequency has nothing
to do with crystal availability but with the simple fact that everything in the C64 is synced to the TV. One clock cycle equals
8 pixels. The graphics chip and the CPU take turns accessing the RAM. The different frequencies dictated by the TV standards are
the reason why the CPU in the NTSC version of the C64 runs at 1.023MHz and the PAL version at 0.985MHz.
Commodore 64 for the win. I worked for a company that made detection devices for the railroad, things like monitoring axle
temperatures, reading the rail car ID tags. The original devices were made using Commodore 64 boards using software written by
an employee at the one rail road company working with them.
The company then hired some electrical engineers to design custom boards using the 68000 chips and I was hired as the only
programmer. Had to rewrite all of the code which was fine...
Many of these languages have an interactive interpreter. I know for a fact that Python does.
So, since job-fairs are an all day thing, and setup is already a thing for them -- set up a booth with like 4 computers at
it, and an admin station. The 4 terminals have an interactive session with the interpreter of choice. Every 20min or so, have
a challenge for "Solve this problem" (needs to be easy and already solved in general. Programmers hate being pimped without pay.
They don't mind tests of skill, but hate being pimped. Something like "sort this array, while picking out all the prime numbers"
or something.) and see who steps up. The ones that step up have confidence they can solve the problem, and you can quickly see
who can do the work and who can't.
The ones that solve it, and solve it to your satisfaction, you offer a nice gig to.
Then you get someone good at sorting arrays while picking out prime numbers, but potentially not much else.
The point of the test is not to identify the perfect candidate, but to filter out the clearly incompetent. If you can't sort
an array and write a function to identify a prime number, I certainly would not hire you. Passing the test doesn't get you a job,
but it may get you an interview ... where there will be other tests.
(I am not even a professional programmer, but I can totally perform such a trivially easy task. The example tests basic understanding
of loop construction, function construction, variable use, efficient sorting, and error correction-- especially with mixed type
arrays. All of these are things any programmer SHOULD now how to do, without being overly complicated, or clearly a disguised
occupational problem trying to get a free solution. Like I said, programmers hate being pimped, and will be turned off
Again, the quality applicant and the code monkey both have something the fakers do not-- Actual comprehension of what a program
is, and how to create one.
As Bill points out, this is not the final exam. This is the "Oh, I see you do actually know how to program-- show me more"
portion of the process. This is the part that HR drones are not capable of performing, due to Dunning-Krueger. Those that are
actually, REALLY competent will do more than just satisfy the requirements of the challenge, they will provide actually working
solutions to the challenge that properly validate their input, and return proper error states if the input is invalid, etc-- You
can learn a LOT about a potential hire by observing their work. *THAT* is what this is really about. The triviality of the problem
is a necessity, because you ***DON'T*** try to get free solutions out of people.
I realize that may be difficult for you to comprehend, but you *DON'T* do that. The job fair is to let people know that you
have a position available, and try to curry interest in people to apply. A successful pre-screening is confidence building, and
helps the potential hire to feel that your company is actually interested in actually hiring somebody, and not just fucking off
in the booth, to cover for "failing to find somebody" and then "Getting yet another H1B". It gives them a chance to show you what
they can do. That is what it is for, and what it does. It also excludes the fakers that this article is about-- The ones that
can talk a good talk, but could not program a simple boolean check condition if their life depended on it.
If it were not for the time constraints of a job fair (usually only 2 days, and in that time you need to try and pre-screen
as many as possible), I would suggest a tiered challenge, with progressively harder challenges, where you hand out resumes to
the ones that make it to the top 3 brackets, but that is not the way the world works.
This in my opinion is really a waste of time. Challenges like this have to be so simple they can be done walking up to a
booth are not likely to filter the "all talks" any better than a few interview questions could (imperson so the candidate can't
just google it).
Tougher more involved stuff isn't good either it gives a huge advantage to the full time job hunter, the guy or gal that
already has a 9-5 and a family that wants to seem them has not got time for games. We have been struggling with hiring where
I work ( I do a lot of the interviews ) and these are the conclusions we have reached
You would be surprised at the number of people with impeccable-looking resumes failing at something as simple as the
FizzBuzz test [codinghorror.com]
The only thing fuzzbuzz tests is "have you done fizzbuzz before"? It's a short question filled with every petty trick the author
could think ti throw in there. If you haven't seen the tricks they trip you up for no reason related to your actual coding skills.
Once you have seen them they're trivial and again unrelated to real work. Fizzbuzz is best passed by someone aiming to game the
interview system. It passes people gaming it and trips up people who spent their time doing on the job real work.
A good programmer first and foremost has a clean mind. Experience suggests puzzle geeks, who excel at contrived tests, are
usually sloppy thinkers.
No. Good programmers can trivially knock out any of these so-called lame monkey tests. It's lame code monkeys who can't do
it. And I've seen their work. Many night shifts and weekends I've burned trying to fix their shit because they couldn't actually
do any of the things behind what you call "lame monkey tests", like:
pulling expensive invariant calculations out of loops using for loops to scan a fucking table to pull rows or calculate an
aggregate when they could let the database do what it does best with a simple SQL statement systems crashing under actual load
because their shitty code was never stress tested ( but it worked on my dev box! .) again with databases, having to
redo their schemas because they were fattened up so much with columns like VALUE1, VALUE2, ... VALUE20 (normalize you assholes!) chatting remote APIs - because these code monkeys cannot think about the need
for bulk operations in increasingly distributed systems. storing dates in unsortable strings because the idiots do not know
most modern programming languages have a date data type.
Oh and the most important, off-by-one looping errors. I see this all the time, the type of thing a good programmer can spot
on quickly because he or she can do the so-called "lame monkey tests" that involve arrays and sorting.
I've seen the type: "I don't need to do this shit because I have business knowledge and I code for business and IT not google",
and then they go and code and fuck it up... and then the rest of us have to go clean up their shit at 1AM or on weekends.
If you work as an hourly paid contractor cleaning that crap, it can be quite lucrative. But sooner or later it truly sucks
the energy out of your soul.
So yeah, we need more lame monkey tests ... to filter the lame code monkeys.
Someone could Google the problem with the phone then step up and solve the challenge.
If given a spec, someone can consistently cobble together working code by Googling, then I would love to hire them. That is
the most productive way to get things done.
There is nothing wrong with using external references. When I am coding, I have three windows open: an editor, a testing window,
and a browser with a Stackoverflow tab open.
Yeah, when we do tech interviews, we ask questions that we are certain they won't be able to answer, but want to see how they
would think about the problem and what questions they ask to get more data and that they don't just fold up and say "well that's
not the sort of problem I'd be thinking of" The examples aren't made up or anything, they are generally selection of real problems
that were incredibly difficult that our company had faced before, that one may not think at first glance such a position would
than spending weeks interviewing "good" candidates for an opening, selecting a couple and hiring them as contractors, then
finding out they are less than unqualified to do the job they were hired for.
I've seen it a few times, Java "experts", Microsoft "experts" with years of experience on their resumes, but completely useless
in coding, deployment or anything other than buying stuff from the break room vending machines.
That being said, I've also seen projects costing hundreds of thousands of dollars, with y
I agree with this. I consider myself to be a good programmer and I would never go into contractor game. I also wonder, how
does it take you weeks to interview someone and you still can't figure out if the person can't code? I could probably see that
in 15 minutes in a pair coding session.
Also, Oracle, SAP, IBM... I would never buy from them, nor use their products. I have used plenty of IBM products and they
suck big time. They make software development 100 times harder than it could be. Their technical supp
That being said, I've also seen projects costing hundreds of thousands of dollars, with years of delays from companies like
Oracle, Sun, SAP, and many other "vendors"
Software development is a hard thing to do well, despite the general thinking of technology becoming cheaper over time, and
like health care the quality of the goods and services received can sometimes be difficult to ascertain. However, people who don't
respect developers and the problems we solve are very often the same ones who continually frustrate themselves by trying to cheap
out, hiring outsourced contractors, and then tearing their hair out when sub par results are delivered, if anything is even del
As part of your interview process, don't you have candidates code a solution to a problem on a whiteboard? I've interviewed
lots of "good" candidates (on paper) too, but they crashed and burned when challenged with a coding exercise. As a result, we
didn't make them job offers.
I'm not a great coder but good enough to get done what clients want done. If I'm not sure or don't think I can do it, I tell
them. I think they appreciate the honesty. I don't work in a tech-hub, startups or anything like that so I'm not under the same
expectations and pressures that others may be.
OK, so yes, I know plenty of programmers who do fake it. But stitching together components isn't "fake" programming.
Back in the day, we had to write our own code to loop through an XML file, looking for nuggets. Now, we just use an XML serializer.
Back then, we had to write our own routines to send TCP/IP messages back and forth. Now we just use a library.
I love it! I hated having to make my own bricks before I could build a house. Now, I can get down to the business of writing
the functionality I want, ins
But, I suspect you could write the component if you had to. That makes you a very different user of that component than someone
who just knows it as a magic black box.
Because of this, you understand the component better and have real knowledge of its strengths and limitations. People blindly
using components with only a cursory idea of their internal operation often cause major performance problems. They rarely recognize
when it is time to write their own to overcome a limitation (or even that it is possibl
You're right on all counts. A person who knows how the innards work, is better than someone who doesn't, all else being equal.
Still, today's world is so specialized that no one can possibly learn it all. I've never built a processor, as you have, but I
still have been able to build a DNA matching algorithm for a major DNA lab.
I would argue that anyone who can skillfully use off-the-shelf components can also learn how to build components, if they are
required to.
1, 'Back in the Day' there was no XML, XMl was not very long ago.
2, its a parser, a serialiser is pretty much the opposite (unless this weeks fashion has redefined that.. anything is possible).
3, 'Back then' we didnt have TCP stacks...
But, actually I agree with you. I can only assume the author thinks there are lots of fake plumbers because they dont cast
their own toilet bowels from raw clay, and use pre-build fittings and pipes! That car mechanics start from raw steel scrap and
a file.. And that you need
Yes, I agree with you on the "middle ground." My reaction was to the author's point that "not knowing how to build the components"
was the same as being a "fake programmer."
If I'm a plumber, and I don't know anything about the engineering behind the construction of PVC pipe, I can still be a good
plumber. If I'm an electrician, and I don't understand the role of a blast furnace in the making of the metal components, I can
still be a good electrician.
The analogy fits. If I'm a programmer, and I don't know how to make an LZW compression library, I can still be a good programmer.
It's a matter of layers. These days, we specialize. You've got your low-level programmers that make the components, the high level
programmers that put together the components, the graphics guys who do HTML/CSS, and the SQL programmers that just know about
databases. Every person has their specialty. It's no longer necessary to be a low-level programmer, or jack-of-all-trades, to
be "good."
If I don't know the layout of the IP header, I can still write quality networking software, and if I know XSLT, I can still
do cool stuff with XML, even if I don't know how to write a good parser.
LOL yeah I know it's all JSON now. I've been around long enough to see these fads come and go. Frankly, I don't see a whole
lot of advantage of JSON over XML. It's not even that much more compact, about 10% or so. But the point is that the author laments
the "bad old days" when you had to create all your own building blocks, and you didn't have a team of specialists. I for one don't
want to go back to those days!
The main advantage is that JSON is that it is consistent. XML has attributes, embedded optional stuff within tags. That was
derived from the original SGML ancestor where is was thought to be a convenience for the human authors who were supposed to be
making the mark-up manually. Programmatically it is a PITA.
I got shit for decrying XML back when it was the trendy thing. I've had people apologise to me months later because they've
realized I was right, even though at the time they did their best to fuck over my career because XML was the new big thing and
I wasn't fully on board.
XML has its strengths and its place, but fuck me it taught me how little some people really fucking understand shit.
And a rather small part at that, albeit a very visible and vocal one full of the proverbial prima donas. However, much of the
rest of the tech business, or at least the people working in it, are not like that. It's small groups of developers working in
other industries that would not typically be considered technology. There are software developers working for insurance companies,
banks, hedge funds, oil and gas exploration or extraction firms, national defense and many hundreds and thousands of other small
They knew that well-paid programming jobs would also soon turn to smoke and ash, as the proliferation of learn-to-code courses
around the world lowered the market value of their skills, and as advances in artificial intelligence allowed for computers
to take over more of the mundane work of producing software.
Kind of hard to take this article serious after saying gibberish like this. I would say most good programmers know that neither
learn-to-code courses nor AI are going to make a dent in their income any time soon.
There is a huge shortage of decent programmers. I have personally witnessed more than one phone "interview" that went like
"have you done this? what about this? do you know what this is? um, can you start Monday?" (120K-ish salary range)
Partly because there are way more people who got their stupid ideas funded than good coders willing to stain their resume with
that. partly because if you are funded, and cannot do all the required coding solo, here's your conundrum:
top level hackers can afford to be really picky, so on one hand it's hard to get them interested, and if you could get
that, they often want some ownership of the project. the plus side is that they are happy to work for lots of equity if they
have faith in the idea, but that can be a huge "if".
"good but not exceptional" senior engineers aren't usually going to be super happy, as they often have spouses and children
and mortgages, so they'd favor job security over exciting ideas and startup lottery.
that leaves you with fresh-out-of-college folks, which are really really a mixed bunch. some are actually already senior
level of understanding without the experience, some are absolutely useless, with varying degrees in between, and there's no
easy way to tell which is which early.
so the not-so-scrupulous folks realized what's going on, and launched multiple coding boot camps programmes, to essentially
trick both the students into believing they can become a coder in a month or two, and also the prospective employers that said
students are useful. so far it's been working, to a degree, in part because in such companies coding skill evaluation process
is broken. but one can only hide their lack of value add for so long, even if they do manage to bluff their way into a job.
All one had to do was look at the lousy state of software and web sites today to see this is true. It's quite obvious little
to no thought is given on how to make something work such that one doesn't have to jump through hoops.
I have many times said the most perfect word processing program ever developed was WordPefect 5.1 for DOS. Ones productivity
was astonishing. It just worked.
Now we have the bloated behemoth Word which does its utmost to get in the way of you doing your work. The only way to get it
to function is to turn large portions of its "features" off, and even then it still insists on doing something other than what
you told it to do.
Then we have the abomination of Windows 10, which is nothing but Clippy on 10X steroids. It is patently obvious the people
who program this steaming pile have never heard of simplicity. Who in their right mind would think having to "search" for something
is more efficient than going directly to it? I would ask the question if these people wander around stores "searching" for what
they're looking for, but then I realize that's how their entire life is run. They search for everything online rather than going
directly to the source. It's no wonder they complain about not having time to things. They're always searching.
Web sites are another area where these people have no clue what they're doing. Anything that might be useful is hidden behind
dropdown menus, flyouts, popup bubbles and intriately designed mazes of clicks needed to get to where you want to go. When someone
clicks on a line of products, they shouldn't be harassed about what part of the product line they want to look at. Give them the
information and let the user go where they want.
This rant could go on, but this article explains clearly why we have regressed when it comes to software and web design. Instead
of making things simple and easy to use, using the one or two brain cells they have, programmers and web designers let the software
do what it wants without considering, should it be done like this?
The tech industry has a ton of churn -- there's some technological advancement, but there's an awful lot of new products turned
out simply to keep customers buying new licenses and paying for upgrades.
This relentless and mostly phony newness means a lot of people have little experience with current products. People fake because
they have no choice. The good ones understand the general technologies and problems they're meant to solve and can generally get
up to speed quickly, while the bad ones are good at faking it but don't really know what they're doing. Telling the difference
from the outside is impossible.
Sales people make it worse, promoting people as "experts" in specific products or implementations because the people have experience
with a related product and "they're all the same". This burns out the people with good adaption skills.
From the summary, it sounds like a lot of programmers and software engineers are trying to develop the next big thing so that
they can literally beg for money from the elite class and one day, hopefully, become a member of the aforementioned. It's sad
how the middle class has been utterly decimated in the United States that some of us are willing to beg for scraps from the wealthy.
I used to work in IT but I've aged out and am now back in school to learn automotive technology so that I can do something other
than being a security guard. Currently, the only work I have been able to find has been in the unglamorous security field.
I am learning some really good new skills in the automotive program that I am in but I hate this one class called "Professionalism
in the Shop." I can summarize the entire class in one succinct phrase, "Learn how to appeal to, and communicate with, Mr. Doctor,
Mr. Lawyer, or Mr. Wealthy-man." Basically, the class says that we are supposed to kiss their ass so they keep coming back to
the Audi, BMW, Mercedes, Volvo, or Cadillac dealership. It feels a lot like begging for money on behalf of my employer (of which
very little of it I will see) and nothing like professionalism. Professionalism is doing the job right the first time, not jerking
the customer off. Professionalism is not begging for a 5 star review for a few measly extra bucks but doing absolute top quality
work. I guess the upshot is that this class will be the easiest 4.0 that I've ever seen.
There is something fundamentally wrong when the wealthy elite have basically demanded that we beg them for every little scrap.
I can understand the importance of polite and professional interaction but this prevalent expectation that we bend over backwards
for them crosses a line with me. I still suck it up because I have to but it chafes my ass to basically validate the wealthy man.
In 70's I worked with two people who had a natural talent for computer science algorithms .vs. coding syntax. In the 90's while at COLUMBIA I worked with only a couple of true computer scientists out of 30 students.
I've met 1 genius who programmed, spoke 13 languages, ex-CIA, wrote SWIFT and spoke fluent assembly complete with animated characters.
According to the Bluff Book, everyone else without natural talent fakes it. In the undiluted definition of computer science,
genetics roulette and intellectual d
Ah yes, the good old 80:20 rule, except it's recursive for programmers.
80% are shit, so you fire them. Soon you realize that 80% of the remaining 20% are also shit, so you fire them too. Eventually
you realize that 80% of the 4% remaining after sacking the 80% of the 20% are also shit, so you fire them!
...
The cycle repeats until there's just one programmer left: the person telling the joke.
---
tl;dr: All programmers suck. Just ask them to review their own code from more than 3 years ago: they'll tell you that
Who gives a fuck about lines? If someone gave me JavaScript, and someone gave me minified JavaScript, which one would I
want to maintain?
I don�(TM)t care about your line savings, less isn�(TM)t always better.
Because the world of programming is not centered about JavasScript and reduction of lines is not the same as minification.
If the first thing that came to your mind was about minified JavaScript when you saw this conversation, you are certainly not
the type of programmer I would want to inherit code from.
See, there's a lot of shit out there that is overtly redundant and unnecessarily complex. This is specially true when copy-n-paste
code monkeys are left to their own devices for whom code formatting seems
I have a theory that 10% of people are good at what they do. It doesn't really matter what they do, they will still be
good at it, because of their nature. These are the people who invent new things, who fix things that others didn't even see as
broken and who automate routine tasks or simply question and erase tasks that are not necessary. If you have a software team
that contain 5 of these, you can easily beat a team of 100 average people, not only in cost but also in schedule, quality and
features. In theory they are worth 20 times more than average employees, but in practise they are usually paid the same amount
of money with few exceptions.
80% of people are the average. They can follow instructions and they can get the work done, but they don't see that something
is broken and needs fixing if it works the way it has always worked. While it might seem so, these people are not worthless. There
are a lot of tasks that these people are happily doing which the 10% don't want to do. E.g. simple maintenance work, implementing
simple features, automating test cases etc. But if you let the top 10% lead the project, you most likely won't be needed that
much of these people. Most work done by these people is caused by themselves, by writing bad software due to lack of good leader.
10% are just causing damage. I'm not talking about terrorists and criminals. I have seen software developers who have tried
(their best?), but still end up causing just damage to the code that someone else needs to fix, costing much more than their own
wasted time. You really must use code reviews if you don't know your team members, to find these people early.
I have a lot of weaknesses. My people skills suck, I'm scrawny, I'm arrogant. I'm also generally known as a really good programmer
and people ask me how/why I'm so much better at my job than everyone else in the room. (There are a lot of things I'm not good
at, but I'm good at my job, so say everyone I've worked with.)
I think one major difference is that I'm always studying, intentionally working to improve, every day. I've been doing that
for twenty years.
I've worked with people who have "20 years of experience"; they've done the same job, in the same way, for 20 years. Their
first month on the job they read the first half of "Databases for Dummies" and that's what they've been doing for 20 years. They
never read the second half, and use Oracle database 18.0 exactly the same way they used Oracle Database 2.0 - and it was wrong
20 years ago too. So it's not just experience, it's 20 years of learning, getting better, every day. That's 7,305 days of improvement.
I have a lot of weaknesses. My people skills suck, I'm scrawny, I'm arrogant. I'm also generally known as a really good
programmer and people ask me how/why I'm so much better at my job than everyone else in the room. (There are a lot of things
I'm not good at, but I'm good at my job, so say everyone I've worked with.)
I think one major difference is that I'm always studying, intentionally working to improve, every day. I've been doing that
for twenty years.
I've worked with people who have "20 years of experience"; they've done the same job, in the same way, for 20 years. Their
first month on the job they read the first half of "Databases for Dummies" and that's what they've been doing for 20 years.
They never read the second half, and use Oracle database 18.0 exactly the same way they used Oracle Database 2.0 - and it was
wrong 20 years ago too. So it's not just experience, it's 20 years of learning, getting better, every day. That's 7,305 days
of improvement.
If you take this attitude towards other people, people will not ask your for help. At the same time, you'll be also be not
able to ask for their help.
You're not interviewing your peers. They are already in your team. You should be working together.
I've seen superstar programmers suck the life out of project by over-complicating things and not working together with others.
10% are just causing damage. I'm not talking about terrorists and criminals.
Terrorists and criminals have nothing on those guys. I know guy who is one of those. Worse, he's both motivated and enthusiastic.
He also likes to offer help and advice to other people who don't know the systems well.
"I divide my officers into four groups. There are clever, diligent, stupid, and lazy officers. Usually two characteristics
are combined. Some are clever and diligent -- their place is the General Staff. The next lot are stupid and lazy -- they make
up 90 percent of every army and are suited to routine duties. Anyone who is both clever and lazy is qualified for the highest
leadership duties, because he possesses the intellectual clarity and the composure necessary for difficult decisions. One must
beware of anyone who is stupid and diligent -- he must not be entrusted with any responsibility because he will always cause only
mischief."
It's called the Pareto Distribution [wikipedia.org].
The number of competent people (people doing most of the work) in any given organization goes like the square root of the number
of employees.
Matches my observations. 10-15% are smart, can think independently, can verify claims by others and can identify and use rules
in whatever they do. They are not fooled by things "everybody knows" and see standard-approaches as first approximations that,
of course, need to be verified to work. They do not trust anything blindly, but can identify whether something actually work well
and build up a toolbox of such things.
The problem is that in coding, you do not have a "(mass) production step", and that is the
In basic concept I agree with your theory, it fits my own anecdotal experience well, but I find that your numbers are off.
The top bracket is actually closer to 20%. The reason it seems so low is that a large portion of the highly competent people are
running one programmer shows, so they have no co-workers to appreciate their knowledge and skill. The places they work do a very
good job of keeping them well paid and happy (assuming they don't own the company outright), so they rarely if ever switch jobs.
at least 70, probably 80, maybe even 90 percent of professional programmers should just fuck off and do something else as they
are useless at programming.
Programming is statistically a dead-end job. Why should anyone hone a dead-end skill that you won't be able to use for
long? For whatever reason, the industry doesn't want old programmers.
Otherwise, I'd suggest longer training and education before they enter the industry. But that just narrows an already narrow
window of use.
Well, it does rather depend on which industry you work in - i've managed to find interesting programming jobs for 25 years,
and there's no end in sight for interesting projects and new avenues to explore. However, this isn't for everyone, and if you
have good personal skills then moving from programming into some technical management role is a very worthwhile route, and I know
plenty of people who have found very interesting work in that direction.
I think that is a misinterpretation of the facts. Old(er) coders that are incompetent are just much more obvious and usually
are also limited to technologies that have gotten old as well. Hence the 90% old coders that can actually not hack it and never
really could get sacked at some time and cannot find a new job with their limited and outdated skills. The 10% that are good at
it do not need to worry though. Who worries there is their employers when these people approach retirement age.
My experience as an IT Security Consultant (I also do some coding, but only at full rates) confirms that. Most are basically
helpless and many have negative productivity, because people with a clue need to clean up after them. "Learn to code"? We have
far too many coders already.
You can't bluff you way through writing software, but many, many people have bluffed their way into a job and then tried to
learn it from the people who are already there. In a marginally functional organization those incompetents are let go pretty quickly,
but sometimes they stick around for months or years.
Apparently the author of this book is one of those, probably hired and fired several times before deciding to go back to his
liberal arts roots and write a book.
I think you can and this is by far not the first piece describing that. Here is a classic:
https://blog.codinghorror.com/... [codinghorror.com]
Yet these people somehow manage to actually have "experience" because they worked in a role they are completely unqualified to
fill.
Fiddling with JavaScript libraries to get a fancy dancy interface that makes PHB's happy is a sought-after skill, for good
or bad. Now that we rely more on half-ass libraries, much of "programming" is fiddling with dark-grey boxes until they work
good enough.
This drives me crazy, but I'm consoled somewhat by the fact that it will all be thrown out in five years anyway.
Bash Range: How to iterate over sequences generated on the shell 2 days ago You can iterate the sequence of numbers in
bash by two ways. One is by using seq command and another is by specifying range in for loop. In seq command, the sequence starts
from one, the number increments by one in each step and print each number in each line up to the upper limit by default. If the number
starts from upper limit then it decrements by one in each step. Normally, all numbers are interpreted as floating point but if the
sequence starts from integer then the list of decimal integers will print. If seq command can execute successfully then it returns
0, otherwise it returns any non-zero number. You can also iterate the sequence of numbers using for loop with range. Both seq command
and for loop with range are shown in this tutorial by using examples.
The options of seq command:
You can use seq command by using the following options.
-w This option is used to pad the numbers with leading zeros to print all numbers with equal width.
-f format This option is used to print number with particular format. Floating number can be formatted by using %f,
%g and %e as conversion characters. %g is used as default.
-s string This option is used to separate the numbers with string. The default value is newline ('\n').
Examples of seq command:
You can apply seq command by three ways. You can use only upper limit or upper and lower limit or upper and lower limit with increment
or decrement value of each step . Different uses of the seq command with options are shown in the following examples.
Example-1: seq command without option
When only upper limit is used then the number will start from 1 and increment by one in each step. The following command
will print the number from 1 to 4.
$ seq 4
When the two values are used with seq command then first value will be used as starting number and second value will be used as
ending number. The following command will print the number from 7 to 15.
$ seq 7 15
When you will use three values with seq command then the second value will be used as increment or decrement value for each step.
For the following command, the starting number is 10, ending number is 1 and each step will be counted by decrementing 2.
$ seq 10 -2 1
Example-2: seq with �w option
The following command will print the output by adding leading zero for the number from 1 to 9.
$ seq -w 0110
Example-3: seq with �s option
The following command uses "-" as separator for each sequence number. The sequence of numbers will print by adding "-" as separator.
$ seq -s - 8
Example-4: seq with -f option
The following command will print 10 date values starting from 1. Here, "%g" option is used to add sequence number with other string
value.
$ seq -f "%g/04/2018" 10
The following command is used to generate the sequence of floating point number using "%f" . Here, the number will start from
3 and increment by 0.8 in each step and the last number will be less than or equal to 6.
$ seq -f "%f" 3 0.8 6
Example-5: Write the sequence in a file
If you want to save the sequence of number into a file without printing in the console then you can use the following commands.
The first command will print the numbers to a file named " seq.txt ". The number will generate from 5 to 20 and increment by 10 in
each step. The second command is used to view the content of " seq.txt" file.
seq 5 10 20 | cat > seq.txt
cat seq.txt
Example-6: Using seq in for loop
Suppose, you want to create files named fn1 to fn10 using for loop with seq. Create a file named "sq1.bash" and add the following
code. For loop will iterate for 10 times using seq command and create 10 files in the sequence fn1, fn2,fn3 ..fn10.
#!/bin/bash
for i in ` seq 10 ` ; do
touch fn. $i
done
Run the following commands to execute the code of the bash file and check the files are created or not.
bash sq1.bash
ls
Examples of for loop with range:Example-7: For loop with range
The alternative of seq command is range. You can use range in for loop to generate sequence of numbers like seq. Write the following
code in a bash file named " sq2.bash ". The loop will iterate for 5 times and print the square root of each number in each step.
#!/bin/bash
for n in { 1 .. 5 } ; do
(( result =n * n ))
echo $n square = $result
done
Run the command to execute the script of the file.
bash sq2.bash
Example-8: For loop with range and increment value
By default, the number is increment by one in each step in range like seq. You can also change the increment value in range. Write
the following code in a bash file named " sq3.bash ". The for loop in the script will iterate for 5 times, each step is incremented
by 2 and print all odd numbers between 1 to 10.
#!/bin/bash
echo "all odd numbers from 1 to 10 are"
for i in { 1 .. 10 .. 2 }; do
echo $i ;
done
Run the command to execute the script of the file.
bash sq3.bash
If you want to work with the sequence of numbers then you can use any of the options that are shown in this tutorial. After completing
this tutorial, you will be able to use seq command and for loop with range more efficiently in your bash script.
Bash completion is a functionality through which Bash helps users type their commands more
quickly and easily. It does this by presenting possible options when users press the Tab key
while typing a command.
The completion script is code that uses the builtin Bash command complete to
define which completion suggestions can be displayed for a given executable . The nature of the
completion options vary, from simple static to highly sophisticated. Why bother?
This functionality helps users by:
saving them from typing text when it can be auto-completed
helping them know the available continuations to their commands
preventing errors and improving their experience by hiding or showing options based on
what they have already typed
Hands-on
Here's what we will do in this tutorial:
We will first create a dummy executable script called dothis . All it does is
execute the command that resides on the number that was passed as an argument in the user's
history. For example, the following command will simply execute the ls -a command,
given that it exists in history with number 235 :
dothis 235
Then we will create a Bash completion script that will display commands along with their
number from the user's history, and we will "bind" it to the dothis
executable.
$ dothis < tab >< tab >
215 ls
216 ls -la
217 cd ~
218 man history
219 git status
220 history | cut -c 8 - bash_screen.png
Create a file named dothis in your working directory and add the following
code:
if [ -z "$1" ] ; then
echo "No command number passed"
exit 2
fi
exists =$ ( fc -l -1000 | grep ^ $1 -- 2 >/ dev / null )
if [ -n " $exists " ] ; then
fc -s -- "$1"
else
echo "Command with number $1 was not found in recent history"
exit 2
fi
Notes:
We first check if the script was called with an argument
We then check if the specific number is included in the last 1000 commands
if it exists, we execute the command using the fc functionality
otherwise, we display an error message
Make the script executable with:
chmod +x ./dothis
We will execute this script many times in this tutorial, so I suggest you place it in a
folder that is included in your path so that we can access it from anywhere by
typing dothis .
I installed it in my home bin folder using:
install ./dothis ~/bin/dothis
You can do the same given that you have a ~/bin folder and it is included in
your PATH variable.
Check to see if it's working:
dothis
You should see this:
$ dothis
No command number passed
Done.
Creating the completion script
Create a file named dothis-completion.bash . From now on, we will refer to this
file with the term completion script .
Once we add some code to it, we will source it to allow the completion to take
effect. We must source this file every single time we change something in it .
Later in this tutorial, we will discuss our options for registering this script whenever a
Bash shell opens.
Static completion
Suppose that the dothis program supported a list of commands, for example:
now
tomorrow
never
Let's use the complete command to register this list for completion. To use the
proper terminology, we say we use the complete command to define a completion
specification ( compspec ) for our program.
Here's what we specified with the complete command above:
we used the -W ( wordlist ) option to provide a list of words for
completion.
we defined to which "program" these completion words will be used (the
dothis parameter)
Source the file:
source ./dothis-completion.bash
Now try pressing Tab twice in the command line, as shown below:
$ dothis < tab
>< tab >
never now tomorrow
Try again after typing the n :
$ dothis n < tab >< tab >
never now
Magic! The completion options are automatically filtered to match only those starting with
n .
Note: The options are not displayed in the order that we defined them in the word list; they
are automatically sorted.
There are many other options to be used instead of the -W that we used in this
section. Most produce completions in a fixed manner, meaning that we don't intervene
dynamically to filter their output.
For example, if we want to have directory names as completion words for the
dothis program, we would change the complete command to the following:
complete -A directory dothis
Pressing Tab after the dothis program would get us a list of the directories in
the current directory from which we execute the script:
We will be producing the completions of the dothis executable with the
following logic:
If the user presses the Tab key right after the command, we will show the last 50
executed commands along with their numbers in history
If the user presses the Tab key after typing a number that matches more than one command
from history, we will show only those commands along with their numbers in history
If the user presses the Tab key after a number that matches exactly one command in
history, we auto-complete the number without appending the command's literal (if this is
confusing, no worries -- you will understand later)
Let's start by defining a function that will execute each time the user requests completion
on a dothis command. Change the completion script to this:
we used the -F flag in the complete command defining that the
_dothis_completions is the function that will provide the completions of the
dothis executable
COMPREPLY is an array variable used to store the completions -- the
completion mechanism uses this variable to display its contents as completions
Now source the script and go for completion:
$ dothis < tab >< tab >
never now tomorrow
Perfect. We produce the same completions as in the previous section with the word list. Or
not? Try this:
$ dothis nev < tab >< tab >
never now tomorrow
As you can see, even though we type nev and then request for completion, the available
options are always the same and nothing gets completed automatically. Why is this
happening?
The contents of the COMPREPLY variable are always displayed. The function is
now responsible for adding/removing entries from there.
If the COMPREPLY variable had only one element, then that word would be
automatically completed in the command. Since the current implementation always returns the
same three words, this will not happen.
Enter compgen : a builtin command that generates completions supporting most of
the options of the complete command (ex. -W for word list,
-d for directories) and filtering them based on what the user has already
typed.
Don't worry if you feel confused; everything will become clear later.
Type the following in the console to better understand what compgen does:
$
compgen -W "now tomorrow never"
now
tomorrow
never
$ compgen -W "now tomorrow never" n
now
never
$ compgen -W "now tomorrow never" t
tomorrow
So now we can use it, but we need to find a way to know what has been typed after the
dothis command. We already have the way: The Bash completion facilities provide
Bash
variables related to the completion taking place. Here are the more important ones:
COMP_WORDS : an array of all the words typed after the name of the program
the compspec belongs to
COMP_CWORD : an index of the COMP_WORDS array pointing to the
word the current cursor is at -- in other words, the index of the word the cursor was when
the tab key was pressed
COMP_LINE : the current command line
To access the word just after the dothis word, we can use the value of
COMP_WORDS[1]
Now, instead of the words now, tomorrow, never , we would like to see actual
numbers from the command history.
The fc -l command followed by a negative number -n displays the
last n commands. So we will use:
fc -l -50
which lists the last 50 executed commands along with their numbers. The only manipulation we
need to do is replace tabs with spaces to display them properly from the completion mechanism.
sed to the rescue.
We do have a problem, though. Try typing a number as you see it in your completion list and
then press the key again.
$ dothis 623 < tab >
$ dothis 623 ls 623 ls -la
...
$ dothis 623 ls 623 ls 623 ls 623 ls 623 ls -la
This is happening because in our completion script, we used the
${COMP_WORDS[1]} to always check the first typed word after the
dothis command (the number 623 in the above snippet). Hence the
completion continues to suggest the same completion again and again when the Tab key is
pressed.
To fix this, we will not allow any kind of completion to take place if at least one argument
has already been typed. We will add a condition in our function that checks the size of the
aforementioned COMP_WORDS array.
#/usr/bin/env bash
_dothis_completions ()
{
if [ " ${#COMP_WORDS[@]} " ! = "2" ] ; then
return
fi
$ dothis 623 < tab >
$ dothis 623 ls -la < tab > # SUCCESS: nothing happens here
There is another thing we don't like, though. We do want to display the numbers along with
the corresponding commands to help users decide which one is desired, but when there is only
one completion suggestion and it gets automatically picked by the completion mechanism, we
shouldn't append the command literal too .
In other words, our dothis executable accepts only a number, and we haven't
added any functionality to check or expect other arguments. When our completion function gives
only one result, we should trim the command literal and respond only with the command
number.
To accomplish this, we will keep the response of the compgen command in an
array variable, and if its size is 1 , we will trim the one and only element to keep just the
number. Otherwise, we'll let the array as is.
Change the completion script to this:
#/usr/bin/env bash
_dothis_completions ()
{
if [ " ${#COMP_WORDS[@]} " ! = "2" ] ; then
return
fi
# keep the suggestions in a local variable
local suggestions = ( $ ( compgen -W " $(fc -l -50 | sed 's/\t/ /') " -- " ${COMP_WORDS[1]} "
))
if [ " ${#suggestions[@]} " == "1" ] ; then
# if there's only one match, we remove the command literal
# to proceed with the automatic completion of the number
local number =$ ( echo ${suggestions[0]/%\ */} )
COMPREPLY = ( " $number " )
else
# more than one suggestions resolved,
# respond with the suggestions intact
COMPREPLY = ( " ${suggestions[@]} " )
fi
}
complete -F _dothis_completions dothis
Registering the completion script
If you want to enable the completion just for you on your machine, all you have to do is add
a line in your .bashrc file sourcing the script:
If you want to enable the completion for all users, you can just copy the script under
/etc/bash_completion.d/ and it will automatically be loaded by
Bash.
Fine-tuning the completion script
Here are some extra steps for better results:
Displaying each entry in a new line
In the Bash completion script I was working on, I too had to present suggestions consisting
of two parts. I wanted to display the first part in the default color and the second part in
gray to distinguish it as help text. In this tutorial's example, it would be nice to present
the numbers in the default color and the command literal in a less fancy one.
Unfortunately, this is not possible, at least for now, because the completions are displayed
as plain text and color directives are not processed (for example: \e[34mBlue
).
What we can do to improve the user experience (or not) is to display each entry in a new
line. This solution is not that obvious since we can't just append a new line character in each
COMPREPLY entry. We will follow a rather
hackish method and pad suggestion literals to a width that fills the terminal.
Enter printf . If you want to display each suggestion on each own line, change
the completion script to the following:
#/usr/bin/env bash
_dothis_completions ()
{
if [ " ${#COMP_WORDS[@]} " ! = "2" ] ; then
return
fi
local IFS =$ '\n'
local suggestions = ( $ ( compgen -W " $(fc -l -50 | sed 's/\t//') " -- " ${COMP_WORDS[1]} "
))
if [ " ${#suggestions[@]} " == "1" ] ; then
local number = " ${suggestions[0]/%\ */} "
COMPREPLY = ( " $number " )
else
for i in " ${!suggestions[@]} " ; do
suggestions [ $i ] = " $(printf '%*s' "-$COLUMNS" "${suggestions[$i]}") "
done
In our case, we hard-coded to display the last 50 commands for completion. This is not a
good practice. We should first respect what each user might prefer. If he/she hasn't made any
preference, we should default to 50.
To accomplish that, we will check if an environment variable
DOTHIS_COMPLETION_COMMANDS_NUMBER has been set.
Change the completion script one last time:
#/usr/bin/env bash
_dothis_completions ()
{
if [ " ${#COMP_WORDS[@]} " ! = "2" ] ; then
return
fi
local commands_number = ${DOTHIS_COMPLETION_COMMANDS_NUMBER:-50}
local IFS =$ '\n'
local suggestions = ( $ ( compgen -W " $(fc -l -$commands_number | sed 's/\t//') " -- "
${COMP_WORDS[1]} " ))
if [ " ${#suggestions[@]} " == "1" ] ; then
local number = " ${suggestions[0]/%\ */} "
COMPREPLY = ( " $number " )
else
for i in " ${!suggestions[@]} " ; do
suggestions [ $i ] = " $(printf '%*s' "-$COLUMNS" "${suggestions[$i]}") "
done
You can find the code of this tutorial on GitHub .
For feedback, comments, typos, etc., please open an issue in the
repository.
Lazarus Lazaridis - I am an open source enthusiast and I like helping developers with
tutorials and tools . I usually code
in Ruby especially when it's on Rails but I also speak Java, Go, bash & C#. I have studied
CS at Athens University of Economics and Business and I live in Athens, Greece. My nickname is
iridakos and I publish tech related posts on my personal blog iridakos.com .
For example, if you have a directory ~/Documents/Phone-Backup/Linux-Docs/Ubuntu/ , using
gogo , you can create an alias (a shortcut name), for instance Ubuntu to access it
without typing the whole path anymore. No matter your current working directory, you can move
into ~/cd Documents/Phone-Backup/Linux-Docs/Ubuntu/ by simply using the alias
Ubuntu .
In addition, it also allows you to create aliases for connecting directly into directories
on remote Linux servers.
How to Install Gogo in Linux Systems
To install Gogo , first clone the gogo repository from Github and then copy the
gogo.py to any directory in your PATH environmental variable (if you already have
the ~/bin/ directory, you can place it here, otherwise create it).
$ git clone https://github.com/mgoral/gogo.git
$ cd gogo/
$ mkdir -p ~/bin #run this if you do not have ~/bin directory
$ cp gogo.py ~/bin/
... ... ...
To start using gogo , you need to logout and login back to use it. Gogo
stores its configuration in ~/.config/gogo/gogo.conf file (which should be auto
created if it doesn't exist) and has the following syntax.
# Comments are lines that start from '#' character.
default = ~/something
alias = /desired/path
alias2 = /desired/path with space
alias3 = "/this/also/works"
zażółć = "unicode/is/also/supported/zażółć gęślą jaźń"
If you run gogo run without any arguments, it will go to the directory specified in default;
this alias is always available, even if it's not in the configuration file, and points to $HOME
directory.
"... Lukas Jelinek is the author of the incron package that allows users to specify tables of inotify events that are executed by the master incrond process. Despite the reference to "cron", the package does not schedule events at regular intervals -- it is a tool for filesystem events, and the cron reference is slightly misleading. ..."
"... The incron package is available from EPEL ..."
It is, at times, important to know when things change in the Linux OS. The uses to which
systems are placed often include high-priority data that must be processed as soon as it is
seen. The conventional method of finding and processing new file data is to poll for it,
usually with cron. This is inefficient, and it can tax performance unreasonably if too many
polling events are forked too often.
Linux has an efficient method for alerting user-space processes to changes impacting files
of interest. The inotify Linux system calls were first discussed here in Linux Journal
in a 2005 article by Robert
Love who primarily addressed the behavior of the new features from the perspective of
C.
However, there also are stable shell-level utilities and new classes of monitoring
dæmons for registering filesystem watches and reporting events. Linux installations using
systemd also can access basic inotify functionality with path units. The inotify interface does
have limitations -- it can't monitor remote, network-mounted filesystems (that is, NFS); it
does not report the userid involved in the event; it does not work with /proc or other
pseudo-filesystems; and mmap() operations do not trigger it, among other concerns. Even with
these limitations, it is a tremendously useful feature.
This article completes the work begun by Love and gives everyone who can write a Bourne
shell script or set a crontab the ability to react to filesystem changes.
The inotifywait
Utility
Working under Oracle Linux 7 (or similar versions of Red Hat/CentOS/Scientific Linux), the
inotify shell tools are not installed by default, but you can load them with yum:
# yum install inotify-tools
Loaded plugins: langpacks, ulninfo
ol7_UEKR4 | 1.2 kB 00:00
ol7_latest | 1.4 kB 00:00
Resolving Dependencies
--> Running transaction check
---> Package inotify-tools.x86_64 0:3.14-8.el7 will be installed
--> Finished Dependency Resolution
Dependencies Resolved
==============================================================
Package Arch Version Repository Size
==============================================================
Installing:
inotify-tools x86_64 3.14-8.el7 ol7_latest 50 k
Transaction Summary
==============================================================
Install 1 Package
Total download size: 50 k
Installed size: 111 k
Is this ok [y/d/N]: y
Downloading packages:
inotify-tools-3.14-8.el7.x86_64.rpm | 50 kB 00:00
Running transaction check
Running transaction test
Transaction test succeeded
Running transaction
Warning: RPMDB altered outside of yum.
Installing : inotify-tools-3.14-8.el7.x86_64 1/1
Verifying : inotify-tools-3.14-8.el7.x86_64 1/1
Installed:
inotify-tools.x86_64 0:3.14-8.el7
Complete!
The package will include two utilities (inotifywait and inotifywatch), documentation and a
number of libraries. The inotifywait program is of primary interest.
Some derivatives of Red Hat 7 may not include inotify in their base repositories. If you
find it missing, you can obtain it from Fedora's EPEL repository , either by downloading the
inotify RPM for manual installation or adding the EPEL repository to yum.
Any user on the system who can launch a shell may register watches -- no special privileges
are required to use the interface. This example watches the /tmp directory:
$ inotifywait -m /tmp
Setting up watches.
Watches established.
If another session on the system performs a few operations on the files in /tmp:
A few relevant sections of the manual page explain what is happening:
$ man inotifywait | col -b | sed -n '/diagnostic/,/helpful/p'
inotifywait will output diagnostic information on standard error and
event information on standard output. The event output can be config-
ured, but by default it consists of lines of the following form:
watched_filename EVENT_NAMES event_filename
watched_filename
is the name of the file on which the event occurred. If the
file is a directory, a trailing slash is output.
EVENT_NAMES
are the names of the inotify events which occurred, separated by
commas.
event_filename
is output only when the event occurred on a directory, and in
this case the name of the file within the directory which caused
this event is output.
By default, any special characters in filenames are not escaped
in any way. This can make the output of inotifywait difficult
to parse in awk scripts or similar. The --csv and --format
options will be helpful in this case.
It also is possible to filter the output by registering particular events of interest with
the -e option, the list of which is shown here:
access
create
move_self
attrib
delete
moved_to
close_write
delete_self
moved_from
close_nowrite
modify
open
close
move
unmount
A common application is testing for the arrival of new files. Since inotify must be given
the name of an existing filesystem object to watch, the directory containing the new files is
provided. A trigger of interest is also easy to provide -- new files should be complete and
ready for processing when the close_write trigger fires. Below is an example
script to watch for these events:
#!/bin/sh
unset IFS # default of space, tab and nl
# Wait for filesystem events
inotifywait -m -e close_write \
/tmp /var/tmp /home/oracle/arch-orcl/ |
while read dir op file
do [[ "${dir}" == '/tmp/' && "${file}" == *.txt ]] &&
echo "Import job should start on $file ($dir $op)."
[[ "${dir}" == '/var/tmp/' && "${file}" == CLOSE_WEEK*.txt ]] &&
echo Weekly backup is ready.
[[ "${dir}" == '/home/oracle/arch-orcl/' && "${file}" == *.ARC ]]
&&
su - oracle -c 'ORACLE_SID=orcl ~oracle/bin/log_shipper' &
[[ "${dir}" == '/tmp/' && "${file}" == SHUT ]] && break
((step+=1))
done
echo We processed $step events.
There are a few problems with the script as presented -- of all the available shells on
Linux, only ksh93 (that is, the AT&T Korn shell) will report the "step" variable correctly
at the end of the script. All the other shells will report this variable as null.
The reason for this behavior can be found in a brief explanation on the manual page for
Bash: "Each command in a pipeline is executed as a separate process (i.e., in a subshell)." The
MirBSD clone of the Korn shell has a slightly longer explanation:
# man mksh | col -b | sed -n '/The parts/,/do so/p'
The parts of a pipeline, like below, are executed in subshells. Thus,
variable assignments inside them fail. Use co-processes instead.
foo | bar | read baz # will not change $baz
foo | bar |& read -p baz # will, however, do so
And, the pdksh documentation in Oracle Linux 5 (from which MirBSD mksh emerged) has several
more mentions of the subject:
General features of at&t ksh88 that are not (yet) in pdksh:
- the last command of a pipeline is not run in the parent shell
- `echo foo | read bar; echo $bar' prints foo in at&t ksh, nothing
in pdksh (ie, the read is done in a separate process in pdksh).
- in pdksh, if the last command of a pipeline is a shell builtin, it
is not executed in the parent shell, so "echo a b | read foo bar"
does not set foo and bar in the parent shell (at&t ksh will).
This may get fixed in the future, but it may take a while.
$ man pdksh | col -b | sed -n '/BTW, the/,/aware/p'
BTW, the most frequently reported bug is
echo hi | read a; echo $a # Does not print hi
I'm aware of this and there is no need to report it.
This behavior is easy enough to demonstrate -- running the script above with the default
bash shell and providing a sequence of example events:
# ./inotify.sh
Setting up watches.
Watches established.
Import job should start on newdata.txt (/tmp/ CLOSE_WRITE,CLOSE).
Weekly backup is ready.
We processed events.
Examining the process list while the script is running, you'll also see two shells, one
forked for the control structure:
$ function pps { typeset a IFS=\| ; ps ax | while read a
do case $a in *$1*|+([!0-9])) echo $a;; esac; done }
$ pps inot
PID TTY STAT TIME COMMAND
3394 pts/1 S+ 0:00 /bin/sh ./inotify.sh
3395 pts/1 S+ 0:00 inotifywait -m -e close_write /tmp /var/tmp
3396 pts/1 S+ 0:00 /bin/sh ./inotify.sh
As it was manipulated in a subshell, the "step" variable above was null when control flow
reached the echo. Switching this from #/bin/sh to #/bin/ksh93 will correct the problem, and
only one shell process will be seen:
# ./inotify.ksh93
Setting up watches.
Watches established.
Import job should start on newdata.txt (/tmp/ CLOSE_WRITE,CLOSE).
Weekly backup is ready.
We processed 2 events.
$ pps inot
PID TTY STAT TIME COMMAND
3583 pts/1 S+ 0:00 /bin/ksh93 ./inotify.sh
3584 pts/1 S+ 0:00 inotifywait -m -e close_write /tmp /var/tmp
Although ksh93 behaves properly and in general handles scripts far more gracefully than all
of the other Linux shells, it is rather large:
The mksh binary is the smallest of the Bourne implementations above (some of these shells
may be missing on your system, but you can install them with yum). For a long-term monitoring
process, mksh is likely the best choice for reducing both processing and memory footprint, and
it does not launch multiple copies of itself when idle assuming that a coprocess is used.
Converting the script to use a Korn coprocess that is friendly to mksh is not difficult:
#!/bin/mksh
unset IFS # default of space, tab and nl
# Wait for filesystem events
inotifywait -m -e close_write \
/tmp/ /var/tmp/ /home/oracle/arch-orcl/ \
2</dev/null |& # Launch as Korn coprocess
while read -p dir op file # Read from Korn coprocess
do [[ "${dir}" == '/tmp/' && "${file}" == *.txt ]] &&
print "Import job should start on $file ($dir $op)."
[[ "${dir}" == '/var/tmp/' && "${file}" == CLOSE_WEEK*.txt ]] &&
print Weekly backup is ready.
[[ "${dir}" == '/home/oracle/arch-orcl/' && "${file}" == *.ARC ]]
&&
su - oracle -c 'ORACLE_SID=orcl ~oracle/bin/log_shipper' &
[[ "${dir}" == '/tmp/' && "${file}" == SHUT ]] && break
((step+=1))
done
echo We processed $step events.
Flush its standard output whenever it writes a message.
An fflush(NULL) is found in the main processing loop of the inotifywait source,
and these requirements appear to be met.
The mksh version of the script is the most reasonable compromise for efficient use and
correct behavior, and I have explained it at some length here to save readers trouble and
frustration -- it is important to avoid control structures executing in subshells in most of
the Borne family. However, hopefully all of these ersatz shells someday fix this basic flaw and
implement the Korn behavior correctly.
A Practical Application -- Oracle Log Shipping
Oracle databases that are configured for hot backups produce a stream of "archived redo log
files" that are used for database recovery. These are the most critical backup files that are
produced in an Oracle database.
These files are numbered sequentially and are written to a log directory configured by the
DBA. An inotifywatch can trigger activities to compress, encrypt and/or distribute the archived
logs to backup and disaster recovery servers for safekeeping. You can configure Oracle RMAN to
do most of these functions, but the OS tools are more capable, flexible and simpler to use.
There are a number of important design parameters for a script handling archived logs:
A "critical section" must be established that allows only a single process to manipulate
the archived log files at a time. Oracle will sometimes write bursts of log files, and
inotify might cause the handler script to be spawned repeatedly in a short amount of time.
Only one instance of the handler script can be allowed to run -- any others spawned during
the handler's lifetime must immediately exit. This will be achieved with a textbook
application of the flock program from the util-linux package.
The optimum compression available for production applications appears to be lzip . The author claims that the integrity of
his archive format is superior to many more well known
utilities , both in compression ability and also structural integrity. The lzip binary is
not in the standard repository for Oracle Linux -- it is available in EPEL and is easily
compiled from source.
Note that 7-Zip uses the same LZMA
algorithm as lzip, and it also will perform AES encryption on the data after compression.
Encryption is a desirable feature, as it will exempt a business from
breach disclosure laws in most US states if the backups are lost or stolen and they
contain "Protected Personal Information" (PPI), such as birthdays or Social Security Numbers.
The author of lzip does have harsh things to say regarding the quality of 7-Zip archives
using LZMA2, and the openssl enc program can be used to apply AES encryption
after compression to lzip archives or any other type of file, as I discussed in a previous
article . I'm foregoing file encryption in the script below and using lzip for
clarity.
The current log number will be recorded in a dot file in the Oracle user's home
directory. If a log is skipped for some reason (a rare occurrence for an Oracle database),
log shipping will stop. A missing log requires an immediate and full database backup (either
cold or hot) -- successful recoveries of Oracle databases cannot skip logs.
The scp program will be used to copy the log to a remote server, and it
should be called repeatedly until it returns successfully.
I'm calling the genuine '93 Korn shell for this activity, as it is the most capable
scripting shell and I don't want any surprises.
Given these design parameters, this is an implementation:
# cat ~oracle/archutils/process_logs
#!/bin/ksh93
set -euo pipefail
IFS=$'\n\t' # http://redsymbol.net/articles/unofficial-bash-strict-mode/
(
flock -n 9 || exit 1 # Critical section-allow only one process.
ARCHDIR=~oracle/arch-${ORACLE_SID}
APREFIX=${ORACLE_SID}_1_
ASUFFIX=.ARC
CURLOG=$(<~oracle/.curlog-$ORACLE_SID)
File="${ARCHDIR}/${APREFIX}${CURLOG}${ASUFFIX}"
[[ ! -f "$File" ]] && exit
while [[ -f "$File" ]]
do ((NEXTCURLOG=CURLOG+1))
NextFile="${ARCHDIR}/${APREFIX}${NEXTCURLOG}${ASUFFIX}"
[[ ! -f "$NextFile" ]] && sleep 60 # Ensure ARCH has finished
nice /usr/local/bin/lzip -9q "$File"
until scp "${File}.lz" "yourcompany.com:~oracle/arch-$ORACLE_SID"
do sleep 5
done
CURLOG=$NEXTCURLOG
File="$NextFile"
done
echo $CURLOG > ~oracle/.curlog-$ORACLE_SID
) 9>~oracle/.processing_logs-$ORACLE_SID
The above script can be executed manually for testing even while the inotify handler is
running, as the flock protects it.
A standby server, or a DataGuard server in primitive standby mode, can apply the archived
logs at regular intervals. The script below forces a 12-hour delay in log application for the
recovery of dropped or damaged objects, so inotify cannot be easily used in this case -- cron
is a more reasonable approach for delayed file processing, and a run every 20 minutes will keep
the standby at the desired recovery point:
# cat ~oracle/archutils/delay-lock.sh
#!/bin/ksh93
(
flock -n 9 || exit 1 # Critical section-only one process.
WINDOW=43200 # 12 hours
LOG_DEST=~oracle/arch-$ORACLE_SID
OLDLOG_DEST=$LOG_DEST-applied
function fage { print $(( $(date +%s) - $(stat -c %Y "$1") ))
} # File age in seconds - Requires GNU extended date & stat
cd $LOG_DEST
of=$(ls -t | tail -1) # Oldest file in directory
[[ -z "$of" || $(fage "$of") -lt $WINDOW ]] && exit
for x in $(ls -rt) # Order by ascending file mtime
do if [[ $(fage "$x") -ge $WINDOW ]]
then y=$(basename $x .lz) # lzip compression is optional
[[ "$y" != "$x" ]] && /usr/local/bin/lzip -dkq "$x"
$ORACLE_HOME/bin/sqlplus '/ as sysdba' > /dev/null 2>&1 <<-EOF
recover standby database;
$LOG_DEST/$y
cancel
quit
EOF
[[ "$y" != "$x" ]] && rm "$y"
mv "$x" $OLDLOG_DEST
fi
done
) 9> ~oracle/.recovering-$ORACLE_SID
I've covered these specific examples here because they introduce tools to control
concurrency, which is a common issue when using inotify, and they advance a few features that
increase reliability and minimize storage requirements. Hopefully enthusiastic readers will
introduce many improvements to these approaches.
The incron System
Lukas Jelinek is the author of the incron package that allows users to specify tables of
inotify events that are executed by the master incrond process. Despite the reference to
"cron", the package does not schedule events at regular intervals -- it is a tool for
filesystem events, and the cron reference is slightly misleading.
The incron package is available from EPEL . If you have installed the repository,
you can load it with yum:
# yum install incron
Loaded plugins: langpacks, ulninfo
Resolving Dependencies
--> Running transaction check
---> Package incron.x86_64 0:0.5.10-8.el7 will be installed
--> Finished Dependency Resolution
Dependencies Resolved
=================================================================
Package Arch Version Repository Size
=================================================================
Installing:
incron x86_64 0.5.10-8.el7 epel 92 k
Transaction Summary
==================================================================
Install 1 Package
Total download size: 92 k
Installed size: 249 k
Is this ok [y/d/N]: y
Downloading packages:
incron-0.5.10-8.el7.x86_64.rpm | 92 kB 00:01
Running transaction check
Running transaction test
Transaction test succeeded
Running transaction
Installing : incron-0.5.10-8.el7.x86_64 1/1
Verifying : incron-0.5.10-8.el7.x86_64 1/1
Installed:
incron.x86_64 0:0.5.10-8.el7
Complete!
On a systemd distribution with the appropriate service units, you can start and enable
incron at boot with the following commands:
# systemctl start incrond
# systemctl enable incrond
Created symlink from
/etc/systemd/system/multi-user.target.wants/incrond.service
to /usr/lib/systemd/system/incrond.service.
In the default configuration, any user can establish incron schedules. The incrontab format
uses three fields:
<path> <mask> <command>
Below is an example entry that was set with the -e option:
While the IN_CLOSE_WRITE event on a directory object is usually of greatest
interest, most of the standard inotify events are available within incron, which also offers
several unique amalgams:
$ man 5 incrontab | col -b | sed -n '/EVENT SYMBOLS/,/child process/p'
EVENT SYMBOLS
These basic event mask symbols are defined:
IN_ACCESS File was accessed (read) (*)
IN_ATTRIB Metadata changed (permissions, timestamps, extended
attributes, etc.) (*)
IN_CLOSE_WRITE File opened for writing was closed (*)
IN_CLOSE_NOWRITE File not opened for writing was closed (*)
IN_CREATE File/directory created in watched directory (*)
IN_DELETE File/directory deleted from watched directory (*)
IN_DELETE_SELF Watched file/directory was itself deleted
IN_MODIFY File was modified (*)
IN_MOVE_SELF Watched file/directory was itself moved
IN_MOVED_FROM File moved out of watched directory (*)
IN_MOVED_TO File moved into watched directory (*)
IN_OPEN File was opened (*)
When monitoring a directory, the events marked with an asterisk (*)
above can occur for files in the directory, in which case the name
field in the returned event data identifies the name of the file within
the directory.
The IN_ALL_EVENTS symbol is defined as a bit mask of all of the above
events. Two additional convenience symbols are IN_MOVE, which is a com-
bination of IN_MOVED_FROM and IN_MOVED_TO, and IN_CLOSE, which combines
IN_CLOSE_WRITE and IN_CLOSE_NOWRITE.
The following further symbols can be specified in the mask:
IN_DONT_FOLLOW Don't dereference pathname if it is a symbolic link
IN_ONESHOT Monitor pathname for only one event
IN_ONLYDIR Only watch pathname if it is a directory
Additionally, there is a symbol which doesn't appear in the inotify sym-
bol set. It is IN_NO_LOOP. This symbol disables monitoring events until
the current one is completely handled (until its child process exits).
The incron system likely presents the most comprehensive interface to inotify of all the
tools researched and listed here. Additional configuration options can be set in
/etc/incron.conf to tweak incron's behavior for those that require a non-standard
configuration.
Path Units under systemd
When your Linux installation is running systemd as PID 1, limited inotify functionality is
available through "path units" as is discussed in a lighthearted article by Paul Brown
at OCS-Mag .
The relevant manual page has useful information on the subject:
$ man systemd.path | col -b | sed -n '/Internally,/,/systems./p'
Internally, path units use the inotify(7) API to monitor file systems.
Due to that, it suffers by the same limitations as inotify, and for
example cannot be used to monitor files or directories changed by other
machines on remote NFS file systems.
Note that when a systemd path unit spawns a shell script, the $HOME and tilde (
~ ) operator for the owner's home directory may not be defined. Using the tilde
operator to reference another user's home directory (for example, ~nobody/) does work, even
when applied to the self-same user running the script. The Oracle script above was explicit and
did not reference ~ without specifying the target user, so I'm using it as an example here.
Using inotify triggers with systemd path units requires two files. The first file specifies
the filesystem location of interest:
The PathChanged parameter above roughly corresponds to the
close-write event used in my previous direct inotify calls. The full collection of
inotify events is not (currently) supported by systemd -- it is limited to
PathExists , PathChanged and PathModified , which are
described in man systemd.path .
The second file is a service unit describing a program to be executed. It must have the same
name, but a different extension, as the path unit:
The oneshot parameter above alerts systemd that the program that it forks is
expected to exit and should not be respawned automatically -- the restarts are limited to
triggers from the path unit. The above service configuration will provide the best options for
logging -- divert them to /dev/null if they are not needed.
Use systemctl start on the path unit to begin monitoring -- a common error is
using it on the service unit, which will directly run the handler only once. Enable the path
unit if the monitoring should survive a reboot.
Although this limited functionality may be enough for some casual uses of inotify, it is a
shame that the full functionality of inotifywait and incron are not represented here. Perhaps
it will come in time.
Conclusion
Although the inotify tools are powerful, they do have limitations. To repeat them, inotify
cannot monitor remote (NFS) filesystems; it cannot report the userid involved in a triggering
event; it does not work with /proc or other pseudo-filesystems; mmap() operations do not
trigger it; and the inotify queue can overflow resulting in lost events, among other
concerns.
Even with these weaknesses, the efficiency of inotify is superior to most other approaches
for immediate notifications of filesystem activity. It also is quite flexible, and although the
close-write directory trigger should suffice for most usage, it has ample tools for covering
special use cases.
In any event, it is productive to replace polling activity with inotify watches, and system
administrators should be liberal in educating the user community that the classic crontab is
not an appropriate place to check for new files. Recalcitrant users should be confined to
Ultrix on a VAX until they develop sufficient appreciation for modern tools and approaches,
which should result in more efficient Linux systems and happier administrators.
Sidenote:
Archiving /etc/passwd
Tracking changes to the password file involves many different types of inotify triggering
events. The vipw utility commonly will make changes to a temporary file, then
clobber the original with it. This can be seen when the inode number changes:
# ll -i /etc/passwd
199720973 -rw-r--r-- 1 root root 3928 Jul 7 12:24 /etc/passwd
# vipw
[ make changes ]
You are using shadow passwords on this system.
Would you like to edit /etc/shadow now [y/n]? n
# ll -i /etc/passwd
203784208 -rw-r--r-- 1 root root 3956 Jul 7 12:24 /etc/passwd
The destruction and replacement of /etc/passwd even occurs with setuid binaries called by
unprivileged users:
For this reason, all inotify triggering events should be considered when tracking this file.
If there is concern with an inotify queue overflow (in which events are lost), then the
OPEN , ACCESS and CLOSE_NOWRITE,CLOSE triggers likely
can be immediately ignored.
All other inotify events on /etc/passwd might run the following script to version the
changes into an RCS archive and mail them to an administrator:
#!/bin/sh
# This script tracks changes to the /etc/passwd file from inotify.
# Uses RCS for archiving. Watch for UID zero.
[email protected]
TPDIR=~/track_passwd
cd $TPDIR
if diff -q /etc/passwd $TPDIR/passwd
then exit # they are the same
else sleep 5 # let passwd settle
diff /etc/passwd $TPDIR/passwd 2>&1 | # they are DIFFERENT
mail -s "/etc/passwd changes $(hostname -s)" "$PWMAILS"
cp -f /etc/passwd $TPDIR # copy for checkin
# "SCCS, the source motel! Programs check in and never check out!"
# -- Ken Thompson
rcs -q -l passwd # lock the archive
ci -q -m_ passwd # check in new ver
co -q passwd # drop the new copy
fi > /dev/null 2>&1
Here is an example email from the script for the above chfn operation:
-----Original Message-----
From: root [mailto:[email protected]]
Sent: Thursday, July 06, 2017 2:35 PM
To: Fisher, Charles J. <[email protected]>;
Subject: /etc/passwd changes myhost
57c57
< fishecj:x:123:456:Fisher, Charles J.:/home/fishecj:/bin/bash
---
> fishecj:x:123:456:Fisher, Charles J.:/home/fishecj:/bin/csh
Further processing on the third column of /etc/passwd might detect UID zero (a root user) or
other important user classes for emergency action. This might include a rollback of the file
from RCS to /etc and/or SMS messages to security contacts. ______________________
Charles Fisher has an electrical engineering degree from the University of Iowa and works as
a systems and database administrator for a Fortune 500 mining and manufacturing
corporation.
BASH Shell: How To Redirect stderr To stdout ( redirect stderr to a File ) Posted on
March 12,
2008 March 12, 2008 in Categories BASH Shell , Linux , UNIX last updated March 12, 2008 Q. How do I
redirect stderr to stdout? How do I redirect stderr to a file?
A. Bash and other modern shell provides I/O redirection facility. There are 3 default
standard files (standard streams) open:
[a] stdin – Use to get input (keyboard) i.e. data going into a program.
[b] stdout – Use to write information (screen)
[c] stderr – Use to write error message (screen)
Understanding I/O streams
numbers
The Unix / Linux standard I/O streams with numbers:
Handle
Name
Description
0
stdin
Standard input
1
stdout
Standard output
2
stderr
Standard error
Redirecting the standard error stream to a file
The following will redirect program error message to a file called error.log: $ program-name 2> error.log
$ command1 2> error.log
Redirecting the standard error (stderr) and stdout to
file
Use the following syntax: $ command-name &>file
OR $ command > file-name 2>&1
Another useful example: # find /usr/home -name .profile 2>&1 | more
Before we get to this year's list of FREE eBooks, a few answers to common questions I
receive during my FREE EBOOK GIVEAWAY:
How many can you download?
ANSWER: As many as you want! This is a FREE eBook giveaway, so please download as
many as interest you.
Wow, there are a LOT listed here. Is there a way to download all of them at once?
ANSWER: Yes, please see the note below on how to do this.
Can I share a link to your post to let others know about this giveaway?
ANSWER: Yes, please do share the good news with anyone you feel could benefit from
this.
I know you said they are "Free," but what's the catch?
ANSWER: There is no catch. They really are FREE . This consider it a, "Thank you,"
for being a reader of my blog and a customer or partner of Microsoft.
Ok, so if they are free and you're encouraging us to share this with others, can I post a
link to your post here on sites like Reddit, FatWallet, and other deal share sites to let
them know, or is that asking too much?
ANSWER: Please do. In fact, I would encourage you to share a link to this post on any
deal site you feel their users could benefit from the FREE eBooks and resources included
below. Again, I WANT to give away MILLIONS of FREE eBooks!
Are these "time-bombed" versions of the eBooks that stop working after a certain amount
of time or reads?
ANSWER: No, these are the full resources for you to use.
Ok, ready for some FREE eBooks? Below is the collection I am posting this year (which
includes a ton of new eBooks & resources, as well as some of the favorites from previous
years):
... ... ...
PowerShell
Microsoft Dynamics GP 2015 R2 PowerShell Users Guide
 <img alt='' src='https://secure.gravatar.com/avatar/d098097d2a43d2fc1f0d31327f8288a6?s=90&d=mm&r=g' srcset='https://secure.gravatar.com/avatar/d098097d2a43d2fc1f0d31327f8288a6?s=180&d=mm&r=g 2x' class='avatar avatar-90 photo' height='90' width='90' />


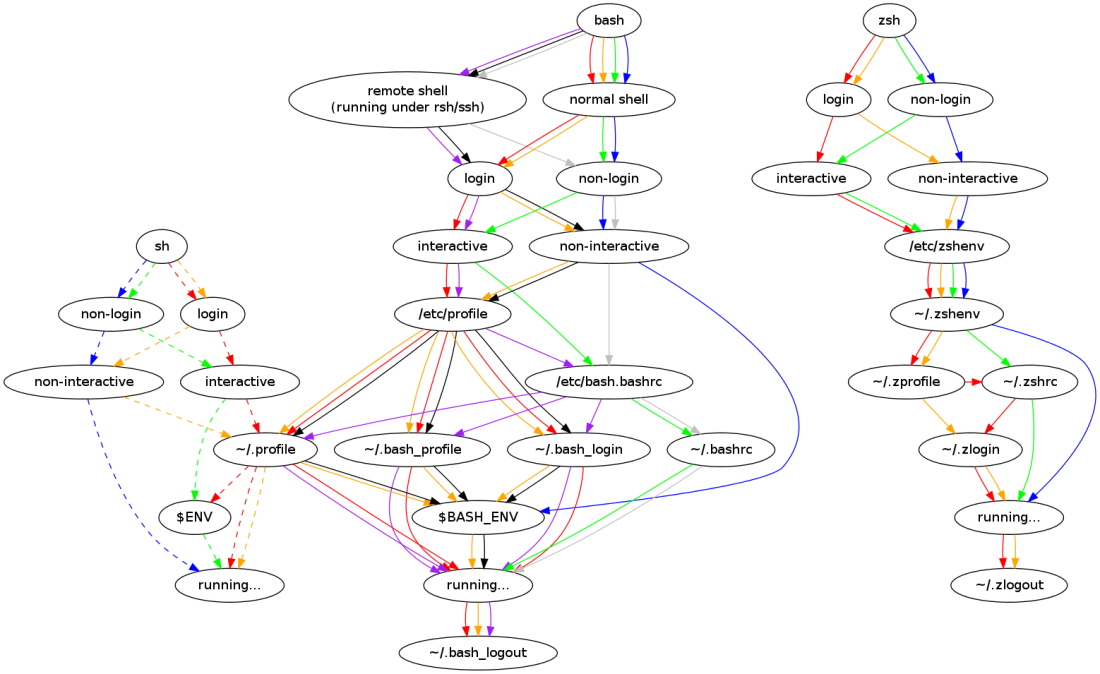
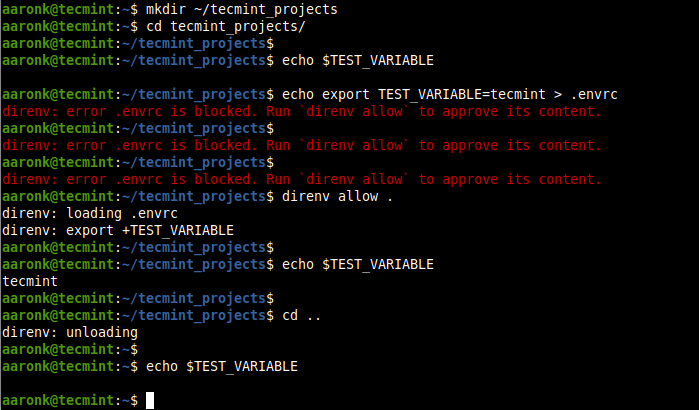

Top Free Resources to Learn Shell Scripting
<img data-attachment-id="80431" data-permalink="https://itsfoss.com/shell-scripting-resources/learn-shell-scripting/" data-orig-file="https://i1.wp.com/itsfoss.com/wp-content/uploads/2020/06/Learn-Shell-Scripting.png?fit=800%2C450&ssl=1" data-orig-size="800,450" data-comments-opened="1" data-image-meta="{"aperture":"0","credit":"","camera":"","caption":"","created_timestamp":"0","copyright":"","focal_length":"0","iso":"0","shutter_speed":"0","title":"","orientation":"0"}" data-image-title="Learn-Shell-Scripting" data-image-description="" data-medium-file="https://i1.wp.com/itsfoss.com/wp-content/uploads/2020/06/Learn-Shell-Scripting.png?fit=300%2C169&ssl=1" data-large-file="https://i1.wp.com/itsfoss.com/wp-content/uploads/2020/06/Learn-Shell-Scripting.png?fit=800%2C450&ssl=1" src="https://i1.wp.com/itsfoss.com/wp-content/uploads/2020/06/Learn-Shell-Scripting.png?ssl=1" alt="Learn Shell Scripting" srcset="https://i1.wp.com/itsfoss.com/wp-content/uploads/2020/06/Learn-Shell-Scripting.png?w=800&ssl=1 800w, https://i1.wp.com/itsfoss.com/wp-content/uploads/2020/06/Learn-Shell-Scripting.png?resize=300%2C169&ssl=1 300w, https://i1.wp.com/itsfoss.com/wp-content/uploads/2020/06/Learn-Shell-Scripting.png?resize=768%2C432&ssl=1 768w" sizes="(max-width: 800px) 100vw, 800px" data-recalc-dims="1" />
<img data-attachment-id="80374" data-permalink="https://itsfoss.com/shell-scripting-resources/learnshell/" data-orig-file="https://i2.wp.com/itsfoss.com/wp-content/uploads/2020/06/learnshell.png?fit=800%2C594&ssl=1" data-orig-size="800,594" data-comments-opened="1" data-image-meta="{"aperture":"0","credit":"","camera":"","caption":"","created_timestamp":"0","copyright":"","focal_length":"0","iso":"0","shutter_speed":"0","title":"","orientation":"0"}" data-image-title="learnshell" data-image-description="" data-medium-file="https://i2.wp.com/itsfoss.com/wp-content/uploads/2020/06/learnshell.png?fit=300%2C223&ssl=1" data-large-file="https://i2.wp.com/itsfoss.com/wp-content/uploads/2020/06/learnshell.png?fit=800%2C594&ssl=1" src="https://i2.wp.com/itsfoss.com/wp-content/uploads/2020/06/learnshell.png?ssl=1" alt="Learnshell" srcset="https://i2.wp.com/itsfoss.com/wp-content/uploads/2020/06/learnshell.png?w=800&ssl=1 800w, https://i2.wp.com/itsfoss.com/wp-content/uploads/2020/06/learnshell.png?resize=300%2C223&ssl=1 300w, https://i2.wp.com/itsfoss.com/wp-content/uploads/2020/06/learnshell.png?resize=768%2C570&ssl=1 768w" sizes="(max-width: 800px) 100vw, 800px" data-recalc-dims="1" />
<img data-attachment-id="80381" data-permalink="https://itsfoss.com/shell-scripting-resources/shell-scripting-tutorial/" data-orig-file="https://i2.wp.com/itsfoss.com/wp-content/uploads/2020/06/shell-scripting-tutorial.png?fit=800%2C377&ssl=1" data-orig-size="800,377" data-comments-opened="1" data-image-meta="{"aperture":"0","credit":"","camera":"","caption":"","created_timestamp":"0","copyright":"","focal_length":"0","iso":"0","shutter_speed":"0","title":"","orientation":"0"}" data-image-title="shell-scripting-tutorial" data-image-description="" data-medium-file="https://i2.wp.com/itsfoss.com/wp-content/uploads/2020/06/shell-scripting-tutorial.png?fit=300%2C141&ssl=1" data-large-file="https://i2.wp.com/itsfoss.com/wp-content/uploads/2020/06/shell-scripting-tutorial.png?fit=800%2C377&ssl=1" src="https://i2.wp.com/itsfoss.com/wp-content/uploads/2020/06/shell-scripting-tutorial.png?ssl=1" alt="Shell Scripting Tutorial" srcset="https://i2.wp.com/itsfoss.com/wp-content/uploads/2020/06/shell-scripting-tutorial.png?w=800&ssl=1 800w, https://i2.wp.com/itsfoss.com/wp-content/uploads/2020/06/shell-scripting-tutorial.png?resize=300%2C141&ssl=1 300w, https://i2.wp.com/itsfoss.com/wp-content/uploads/2020/06/shell-scripting-tutorial.png?resize=768%2C362&ssl=1 768w" sizes="(max-width: 800px) 100vw, 800px" data-recalc-dims="1" />
<img data-attachment-id="80376" data-permalink="https://itsfoss.com/shell-scripting-resources/shell-scripting-udemy/" data-orig-file="https://i0.wp.com/itsfoss.com/wp-content/uploads/2020/06/shell-scripting-udemy.png?fit=800%2C375&ssl=1" data-orig-size="800,375" data-comments-opened="1" data-image-meta="{"aperture":"0","credit":"","camera":"","caption":"","created_timestamp":"0","copyright":"","focal_length":"0","iso":"0","shutter_speed":"0","title":"","orientation":"0"}" data-image-title="shell-scripting-udemy" data-image-description="" data-medium-file="https://i0.wp.com/itsfoss.com/wp-content/uploads/2020/06/shell-scripting-udemy.png?fit=300%2C141&ssl=1" data-large-file="https://i0.wp.com/itsfoss.com/wp-content/uploads/2020/06/shell-scripting-udemy.png?fit=800%2C375&ssl=1" src="https://i0.wp.com/itsfoss.com/wp-content/uploads/2020/06/shell-scripting-udemy.png?ssl=1" alt="Shell Scripting Udemy" srcset="https://i0.wp.com/itsfoss.com/wp-content/uploads/2020/06/shell-scripting-udemy.png?w=800&ssl=1 800w, https://i0.wp.com/itsfoss.com/wp-content/uploads/2020/06/shell-scripting-udemy.png?resize=300%2C141&ssl=1 300w, https://i0.wp.com/itsfoss.com/wp-content/uploads/2020/06/shell-scripting-udemy.png?resize=768%2C360&ssl=1 768w" sizes="(max-width: 800px) 100vw, 800px" data-recalc-dims="1" />
<img data-attachment-id="80377" data-permalink="https://itsfoss.com/shell-scripting-resources/bash-shell-scripting/" data-orig-file="https://i0.wp.com/itsfoss.com/wp-content/uploads/2020/06/bash-shell-scripting.png?fit=800%2C461&ssl=1" data-orig-size="800,461" data-comments-opened="1" data-image-meta="{"aperture":"0","credit":"","camera":"","caption":"","created_timestamp":"0","copyright":"","focal_length":"0","iso":"0","shutter_speed":"0","title":"","orientation":"0"}" data-image-title="bash-shell-scripting" data-image-description="" data-medium-file="https://i0.wp.com/itsfoss.com/wp-content/uploads/2020/06/bash-shell-scripting.png?fit=300%2C173&ssl=1" data-large-file="https://i0.wp.com/itsfoss.com/wp-content/uploads/2020/06/bash-shell-scripting.png?fit=800%2C461&ssl=1" src="https://i0.wp.com/itsfoss.com/wp-content/uploads/2020/06/bash-shell-scripting.png?ssl=1" alt="Bash Shell Scripting" srcset="https://i0.wp.com/itsfoss.com/wp-content/uploads/2020/06/bash-shell-scripting.png?w=800&ssl=1 800w, https://i0.wp.com/itsfoss.com/wp-content/uploads/2020/06/bash-shell-scripting.png?resize=300%2C173&ssl=1 300w, https://i0.wp.com/itsfoss.com/wp-content/uploads/2020/06/bash-shell-scripting.png?resize=768%2C443&ssl=1 768w" sizes="(max-width: 800px) 100vw, 800px" data-recalc-dims="1" />
<img data-attachment-id="80378" data-permalink="https://itsfoss.com/shell-scripting-resources/the-bash-academy/" data-orig-file="https://i1.wp.com/itsfoss.com/wp-content/uploads/2020/06/the-bash-academy.png?fit=800%2C332&ssl=1" data-orig-size="800,332" data-comments-opened="1" data-image-meta="{"aperture":"0","credit":"","camera":"","caption":"","created_timestamp":"0","copyright":"","focal_length":"0","iso":"0","shutter_speed":"0","title":"","orientation":"0"}" data-image-title="the-bash-academy" data-image-description="" data-medium-file="https://i1.wp.com/itsfoss.com/wp-content/uploads/2020/06/the-bash-academy.png?fit=300%2C125&ssl=1" data-large-file="https://i1.wp.com/itsfoss.com/wp-content/uploads/2020/06/the-bash-academy.png?fit=800%2C332&ssl=1" src="https://i1.wp.com/itsfoss.com/wp-content/uploads/2020/06/the-bash-academy.png?ssl=1" alt="The Bash Academy" srcset="https://i1.wp.com/itsfoss.com/wp-content/uploads/2020/06/the-bash-academy.png?w=800&ssl=1 800w, https://i1.wp.com/itsfoss.com/wp-content/uploads/2020/06/the-bash-academy.png?resize=300%2C125&ssl=1 300w, https://i1.wp.com/itsfoss.com/wp-content/uploads/2020/06/the-bash-academy.png?resize=768%2C319&ssl=1 768w" sizes="(max-width: 800px) 100vw, 800px" data-recalc-dims="1" />
<img data-attachment-id="80379" data-permalink="https://itsfoss.com/shell-scripting-resources/learn-bash-scripting-linkedin/" data-orig-file="https://i2.wp.com/itsfoss.com/wp-content/uploads/2020/06/learn-bash-scripting-linkedin.png?fit=800%2C420&ssl=1" data-orig-size="800,420" data-comments-opened="1" data-image-meta="{"aperture":"0","credit":"","camera":"","caption":"","created_timestamp":"0","copyright":"","focal_length":"0","iso":"0","shutter_speed":"0","title":"","orientation":"0"}" data-image-title="learn-bash-scripting-linkedin" data-image-description="" data-medium-file="https://i2.wp.com/itsfoss.com/wp-content/uploads/2020/06/learn-bash-scripting-linkedin.png?fit=300%2C158&ssl=1" data-large-file="https://i2.wp.com/itsfoss.com/wp-content/uploads/2020/06/learn-bash-scripting-linkedin.png?fit=800%2C420&ssl=1" src="https://i2.wp.com/itsfoss.com/wp-content/uploads/2020/06/learn-bash-scripting-linkedin.png?ssl=1" alt="Learn Bash Scripting Linkedin" srcset="https://i2.wp.com/itsfoss.com/wp-content/uploads/2020/06/learn-bash-scripting-linkedin.png?w=800&ssl=1 800w, https://i2.wp.com/itsfoss.com/wp-content/uploads/2020/06/learn-bash-scripting-linkedin.png?resize=300%2C158&ssl=1 300w, https://i2.wp.com/itsfoss.com/wp-content/uploads/2020/06/learn-bash-scripting-linkedin.png?resize=768%2C403&ssl=1 768w" sizes="(max-width: 800px) 100vw, 800px" data-recalc-dims="1" />
<img data-attachment-id="80380" data-permalink="https://itsfoss.com/shell-scripting-resources/advanced-bash-scripting-pdf/" data-orig-file="https://i0.wp.com/itsfoss.com/wp-content/uploads/2020/06/advanced-bash-scripting-pdf.png?fit=800%2C486&ssl=1" data-orig-size="800,486" data-comments-opened="1" data-image-meta="{"aperture":"0","credit":"","camera":"","caption":"","created_timestamp":"0","copyright":"","focal_length":"0","iso":"0","shutter_speed":"0","title":"","orientation":"0"}" data-image-title="advanced-bash-scripting-pdf" data-image-description="" data-medium-file="https://i0.wp.com/itsfoss.com/wp-content/uploads/2020/06/advanced-bash-scripting-pdf.png?fit=300%2C182&ssl=1" data-large-file="https://i0.wp.com/itsfoss.com/wp-content/uploads/2020/06/advanced-bash-scripting-pdf.png?fit=800%2C486&ssl=1" src="https://i0.wp.com/itsfoss.com/wp-content/uploads/2020/06/advanced-bash-scripting-pdf.png?ssl=1" alt="Advanced Bash Scripting Pdf" srcset="https://i0.wp.com/itsfoss.com/wp-content/uploads/2020/06/advanced-bash-scripting-pdf.png?w=800&ssl=1 800w, https://i0.wp.com/itsfoss.com/wp-content/uploads/2020/06/advanced-bash-scripting-pdf.png?resize=300%2C182&ssl=1 300w, https://i0.wp.com/itsfoss.com/wp-content/uploads/2020/06/advanced-bash-scripting-pdf.png?resize=768%2C467&ssl=1 768w" sizes="(max-width: 800px) 100vw, 800px" data-recalc-dims="1" />
<img data-attachment-id="80429" data-permalink="https://itsfoss.com/shell-scripting-resources/bash-notes-for-professional/" data-orig-file="https://i0.wp.com/itsfoss.com/wp-content/uploads/2020/06/Bash-Notes-for-Professional.jpg?fit=800%2C400&ssl=1" data-orig-size="800,400" data-comments-opened="1" data-image-meta="{"aperture":"0","credit":"","camera":"","caption":"","created_timestamp":"0","copyright":"","focal_length":"0","iso":"0","shutter_speed":"0","title":"","orientation":"1"}" data-image-title="Bash-Notes-for-Professional" data-image-description="" data-medium-file="https://i0.wp.com/itsfoss.com/wp-content/uploads/2020/06/Bash-Notes-for-Professional.jpg?fit=300%2C150&ssl=1" data-large-file="https://i0.wp.com/itsfoss.com/wp-content/uploads/2020/06/Bash-Notes-for-Professional.jpg?fit=800%2C400&ssl=1" src="https://i0.wp.com/itsfoss.com/wp-content/uploads/2020/06/Bash-Notes-for-Professional.jpg?ssl=1" alt="Bash Notes For Professional" srcset="https://i0.wp.com/itsfoss.com/wp-content/uploads/2020/06/Bash-Notes-for-Professional.jpg?w=800&ssl=1 800w, https://i0.wp.com/itsfoss.com/wp-content/uploads/2020/06/Bash-Notes-for-Professional.jpg?resize=300%2C150&ssl=1 300w, https://i0.wp.com/itsfoss.com/wp-content/uploads/2020/06/Bash-Notes-for-Professional.jpg?resize=768%2C384&ssl=1 768w" sizes="(max-width: 800px) 100vw, 800px" data-recalc-dims="1" />
<img data-attachment-id="80375" data-permalink="https://itsfoss.com/shell-scripting-resources/tutorialspoint-shell/" data-orig-file="https://i1.wp.com/itsfoss.com/wp-content/uploads/2020/06/tutorialspoint-shell.png?fit=800%2C647&ssl=1" data-orig-size="800,647" data-comments-opened="1" data-image-meta="{"aperture":"0","credit":"","camera":"","caption":"","created_timestamp":"0","copyright":"","focal_length":"0","iso":"0","shutter_speed":"0","title":"","orientation":"0"}" data-image-title="tutorialspoint-shell" data-image-description="" data-medium-file="https://i1.wp.com/itsfoss.com/wp-content/uploads/2020/06/tutorialspoint-shell.png?fit=300%2C243&ssl=1" data-large-file="https://i1.wp.com/itsfoss.com/wp-content/uploads/2020/06/tutorialspoint-shell.png?fit=800%2C647&ssl=1" src="https://i1.wp.com/itsfoss.com/wp-content/uploads/2020/06/tutorialspoint-shell.png?ssl=1" alt="Tutorialspoint Shell" srcset="https://i1.wp.com/itsfoss.com/wp-content/uploads/2020/06/tutorialspoint-shell.png?w=800&ssl=1 800w, https://i1.wp.com/itsfoss.com/wp-content/uploads/2020/06/tutorialspoint-shell.png?resize=300%2C243&ssl=1 300w, https://i1.wp.com/itsfoss.com/wp-content/uploads/2020/06/tutorialspoint-shell.png?resize=768%2C621&ssl=1 768w" sizes="(max-width: 800px) 100vw, 800px" data-recalc-dims="1" />
<img data-attachment-id="80382" data-permalink="https://itsfoss.com/shell-scripting-resources/scripting-notes-ccsf/" data-orig-file="https://i2.wp.com/itsfoss.com/wp-content/uploads/2020/06/scripting-notes-ccsf.png?fit=800%2C291&ssl=1" data-orig-size="800,291" data-comments-opened="1" data-image-meta="{"aperture":"0","credit":"","camera":"","caption":"","created_timestamp":"0","copyright":"","focal_length":"0","iso":"0","shutter_speed":"0","title":"","orientation":"0"}" data-image-title="scripting-notes-ccsf" data-image-description="" data-medium-file="https://i2.wp.com/itsfoss.com/wp-content/uploads/2020/06/scripting-notes-ccsf.png?fit=300%2C109&ssl=1" data-large-file="https://i2.wp.com/itsfoss.com/wp-content/uploads/2020/06/scripting-notes-ccsf.png?fit=800%2C291&ssl=1" src="https://i2.wp.com/itsfoss.com/wp-content/uploads/2020/06/scripting-notes-ccsf.png?ssl=1" alt="Scripting Notes Ccsf" srcset="https://i2.wp.com/itsfoss.com/wp-content/uploads/2020/06/scripting-notes-ccsf.png?w=800&ssl=1 800w, https://i2.wp.com/itsfoss.com/wp-content/uploads/2020/06/scripting-notes-ccsf.png?resize=300%2C109&ssl=1 300w, https://i2.wp.com/itsfoss.com/wp-content/uploads/2020/06/scripting-notes-ccsf.png?resize=768%2C279&ssl=1 768w" sizes="(max-width: 800px) 100vw, 800px" data-recalc-dims="1" />
<img data-attachment-id="80383" data-permalink="https://itsfoss.com/shell-scripting-resources/bash-linux-man-page/" data-orig-file="https://i2.wp.com/itsfoss.com/wp-content/uploads/2020/06/bash-linux-man-page.png?fit=800%2C437&ssl=1" data-orig-size="800,437" data-comments-opened="1" data-image-meta="{"aperture":"0","credit":"","camera":"","caption":"","created_timestamp":"0","copyright":"","focal_length":"0","iso":"0","shutter_speed":"0","title":"","orientation":"0"}" data-image-title="bash-linux-man-page" data-image-description="" data-medium-file="https://i2.wp.com/itsfoss.com/wp-content/uploads/2020/06/bash-linux-man-page.png?fit=300%2C164&ssl=1" data-large-file="https://i2.wp.com/itsfoss.com/wp-content/uploads/2020/06/bash-linux-man-page.png?fit=800%2C437&ssl=1" src="https://i2.wp.com/itsfoss.com/wp-content/uploads/2020/06/bash-linux-man-page.png?ssl=1" alt="Bash Linux Man Page" srcset="https://i2.wp.com/itsfoss.com/wp-content/uploads/2020/06/bash-linux-man-page.png?w=800&ssl=1 800w, https://i2.wp.com/itsfoss.com/wp-content/uploads/2020/06/bash-linux-man-page.png?resize=300%2C164&ssl=1 300w, https://i2.wp.com/itsfoss.com/wp-content/uploads/2020/06/bash-linux-man-page.png?resize=768%2C420&ssl=1 768w" sizes="(max-width: 800px) 100vw, 800px" data-recalc-dims="1" />
1 r/commandline � Posted by u/acksed 6 years ago
<a rel='nofollow' target='_blank' href='//rev.linuxquestions.org/www/delivery/ck.php?n=a054b75'><img border='0' alt='' src='//rev.linuxquestions.org/www/delivery/avw.php?zoneid=10&n=a054b75' /></a>
11-16-2009, 10:10 PM


<img aria-describedby="caption-attachment-28848" src="https://www.tecmint.com/wp-content/uploads/2018/03/List-Gogo-Aliases.png" alt="List Gogo Aliases" width="664" height="150" />
<img aria-describedby="caption-attachment-28849" src="https://www.tecmint.com/wp-content/uploads/2018/03/Gogo-Listing.png" alt="Running Gogo Without Options" width="661" height="105" />
<img aria-describedby="caption-attachment-28850" src="https://www.tecmint.com/wp-content/uploads/2018/03/Create-Gogo-Shortcut.png" alt="Create Long Directory Shortcut " width="739" height="270" />
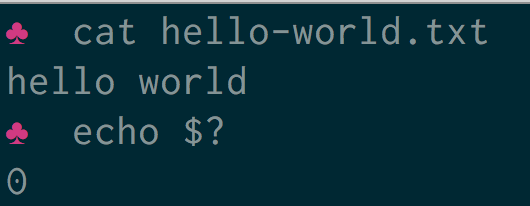

mbadran / gist:130469 Created

 bobbydavid
 dideler
 ghost
ghost
 cra
cra
 keltroth
 jan-warchol
 3v1n0
3v1n0